
Reference Manual Instruction Manual


66
Using the Web Server
– After all your messages have been defined, don’t forget
to click on Configure to save all the message
definitions.
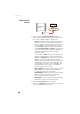
• Click on the Raw Data Messages submenu. Use the page
that opens to program the type of raw data you would like
the receiver to record.
Manual raw data will later be initiated either remotely by
enabling the Data Recording box on the Recording web
page, or locally using the Log button on the receiver front
panel.
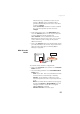
For example, to set the RNX and NAV raw data messages
at 1 second, do the following:
–In the ATOM Messages pane, select “RNX” from the
Message field, select “M” or “U” from the Output field
and type “1” in the Rate field. Click on the Add button
underneath to validate your entry. The programmed
message now appears in the table on the right.
–In the ATOM Messages pane, select “NAV” from the
Message field, select “M” or “U” from the Output field
and type “1” in the Rate field. Click on the Add button
underneath to validate your entry. The programmed
message now appears in the table on the right.
– Click on the Configure button located at the bottom of
the page
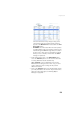
• Click on the Connections menu, then on the Serial Ports
submenu.
• Set each of the ports on which data output will take place.
If port B or F is used, make sure the Power ON option
(bottom of the page) is active.
Setting a Base
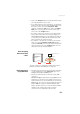
How to Start • Open the Web Server’s Configuration tab. The first time you
click on this tab, the Web Server will ask you to log in as
the administrator. Only the receiver administrator is
authorized to access the Configuration tab.
You are allowed to change the destination of a receiver
(e.g. it is currently a rover and you want to change it into
a base). In this case, on opening the Base Setup tab, the
Web Server will retain part of the rover settings that could
be applied to the base (e.g. antenna type, etc.).