
Quick Start Guide
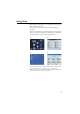
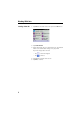
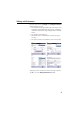
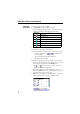

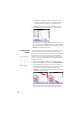
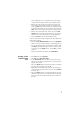
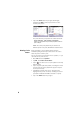
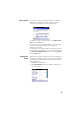
Table Of Contents
7
minus sign before the Y coordinate if the point must be
located below the horizontal axis (see examples below).
• Repeat the previous two steps until all the points have
been created. If you make a mistake on entering a new
point, tap Undo in the lower bar (the last created point will
be deleted) and resume the point creation step. Note that
Undo can be used to delete the last three entered points.
• After all the points have been created, tap on the Save
Pattern button to save the point pattern as a *.lpp file (the
default name is the current date in mm-dd-yy format).
• Then tap Cancel to quit the Point Pattern editor.
Later on, if you wish to make changes to this point pattern (to
add or delete points):
• Go back to Plan, Edit Point Patterns and use the Load Pattern
button to select, load and edit the corresponding lpp file.
• You can for example delete points from the pattern: First
tap Delete in the lower bar, then select one or more points
on the map, tap the Delete button, and tap OK to confirm
deletion.
• Save the modified point pattern using Save Pattern.
Inserting a Point
Pattern into the
Plan
• Go to Plan and select Input Plan.
• Tap Tools, then Insert Point Pattern.
•In the Select Points field, specify the name of the point
where to anchor the point pattern. The selected point then
appears as a red dot.
• Tap on the Browse button and select the llp file containing
the desired point pattern, then tap ok.
• Optionally, you may rotate the point pattern around the
selected anchor point by a value you enter in the Rotation
field (e.g. 45°).
• Tap on the Next> button. The map shows where the point
pattern will appear on the plan (below left). The group of
points is shown as red dots around the point selected in
the plan.