Spectra® RXT™ Troubleshooting Guide • Spectra RXT150 • RXT Media PN 90960005 Revision A
Notices Notices Except as expressly stated herein, Spectra Logic Corporation makes available its products and associated documentation on an “as is” basis, without warranty of any kind, either expressed or implied, including but not limited to the implied warranties or conditions of merchantability and fitness for a particular purpose.
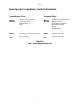
Notices Spectra Logic Corporation: Contact Information United States Office European Office Mailing Address Spectra Logic Corporation 1700 N 55th Street Boulder CO 80301 USA Mailing Address Spectra Logic Europe Limited Magdalen Centre Robert Robinson Avenue Oxford Science Park Oxford UK OX44 7 RW Phone (800) 833-1132 or (303) 449-6400 Phone +44 (0) 870 112 2150 Fax (303) 939-8844 Fax +44 (0) 870 112 2175 Web Site http://www.SpectraLogic.
Notices Product Warnings AC Power Warning: Risk of electrical shock. To remove AC power from the Spectra RXT150, unplug the power cord from the power inlet. There are no user-serviceable parts within the unit. High Voltage Warning: The Spectra RXT150 contains high-voltage components that can cause injury or death. Only service personnel should replace or install high-voltage components.
Contents Chapter 1. Introduction 7 About This Guide . . . . . . . . . . . . . . . . . . . . . . . . . . . . . . . . . . . . . . . . . . . . . . . . . . 7 Chapter 2. Troubleshooting the RXT150 8 Ejecting RXT Media . . . . . . . . . . . . . . . . . . . . . . . . . . . . . . . . . . . . . . . . . . . . . . . . 8 Checking Messages and Flash Codes . . . . . . . . . . . . . . . . . . . . . . . . . . . . . . . . . . 13 Capturing Debug Files . . . . . . . . . . . . . . . . . . . . . . . . . . . . . . . . . . .
Contents Chapter 4. Warranty and Repair 37 RXT Media Recommendation . . . . . . . . . . . . . . . . . . . . . . . . . . . . . . . . . . . . . . . . 37 Contacting SpectraGuard Support . . . . . . . . . . . . . . . . . . . . . . . . . . . . . . . . . . . . . 37 RMA Returns . . . . . . . . . . . . . . . . . . . . . . . . . . . . . . . . . . . . . . . . . . . . . . . . . . . . 38 RXT150 Repair Policy . . . . . . . . . . . . . . . . . . . . . . . . . . . . . . . . . . . . . . . . . . . . . .
1 Introduction About This Guide This guide describes the troubleshooting procedures for the Spectra RXT150 and Spectra RXT media. Intended Audience This guide is written for Spectra RXT150 users, who should already be familiar with the technical tasks associated with the maintenance and operation of backup systems. Related Publications The following publications related to the Spectra RXT150 are also available from Spectra Logic at www.spectralogic.
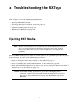
2 Troubleshooting the RXT150 This chapter covers the following information: • Ejecting RXT Media, below • Checking Messages and Flash Codes on page 13 • Capturing Debug Files on page 15 • Resetting the RXT150 on page 20 Ejecting RXT Media Note: Before you attempt to eject media in one of the following ways, be sure to call SpectraGuard Technical Support. They may want to have you gather logs or traces first so that they can analyze the problem.
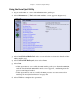
Chapter 2. Troubleshooting the RXT150 Using the Force Eject Utility 1. Log in to the RLC as a user with Administrative privileges. 2. Select Maintenance > Tools. The RXT Utilities screen appears (Figure 2-1). Figure 2-1 The RXT Utilities screen, showing the Load/Unload RXT Media Pack utility. 3. Select Load/Unload Media Pack. The screen refreshes to show the details of the utility (Figure 2-1). 4. Select Unload RXT Media pack, then select force. 5. Select Run.
Chapter 2. Troubleshooting the RXT150 Holding the Load/Unload Button Hold down the Load/Unload button (Figure 2-2) for approximately 15 seconds. Note: This action causes the drive to reboot, which in turn causes a forced eject. As a result of the reboot process, the host temporarily loses contact with the drive. Load/Unload Figure 2-2 The Load/Unload button. If this operation is not successful, proceed to Using an Allen Wrench for Manual Eject on page 11.
Chapter 2. Troubleshooting the RXT150 Using an Allen Wrench for Manual Eject Note: You need a #2 Phillips screwdriver and a 5/64 Allen wrench (not included with the RXT150) to complete this procedure. 1. Stop any backups running to the RXT150 and power the unit down. 2. Unplug the power cable and all other cabling from the back of the unit. 3. Carefully turn the unit upside down. 4. Use a #2 Phillips screwdriver to remove the four screws attaching the cover to the bottom RXT150 (Figure 2-3). 5.
Chapter 2. Troubleshooting the RXT150 8. Locate the hole on the side of the RXT150. When you are looking at the front of the unit, this hole is on the right side, near the back of the unit (Figure 2-5). Front Back Figure 2-5 The hole on the right side of the unit. 9. Insert a 5/64 Allen wrench into the hole, and rotate the wrench counterclockwise. The pack slowly ejects. 10. After removing the media from the RXT150, replace the cover on the top of the unit. 11.
Chapter 2. Troubleshooting the RXT150 Checking Messages and Flash Codes The Spectra RXT150 proactively provides information to users in two different ways: through the Web Interface and through the front panel’s digital display. The Web interface provides messages, and the digital display provides flash codes. The following sections describe how to use these helpful tools: • Messages, below • Flash Codes on page 14 Messages The Messages icon appears on the status bar of the Web interface (Figure 2-6).
Chapter 2. Troubleshooting the RXT150 Flash Codes Use the chart below to interpret the flash codes that appear on the digital display, then follow any recommended steps. If you need assistance, contact SpectraGuard Support. Code Meaning Resolution Powering On Status message that the drive is powering on; no action is required. Booting Status message that the drive is booting up; no action is required. Waiting Status message that the drive is processing; no action is required.
Chapter 2. Troubleshooting the RXT150 Capturing Debug Files SpectraGuard staff may ask for logs of debug files when they troubleshoot a problem. Debug files may reveal the source of errors in program code or in hardware.
Chapter 2. Troubleshooting the RXT150 3. Select Get Debug Files. The screen refreshes to show the utility’s description. 4. Select Run. The Get Debug Files Utility screen appears (Figure 2-8). Figure 2-8 The Get Debug Files Utility screen. 5. Select the type(s) of files to download. 6. Select Next. The screen refreshes to indicate that the file or files are ready to download. 7. Click on the link to start the process. 8.
Chapter 2. Troubleshooting the RXT150 Viewing Debug Files on the Web Interface If you want to review debug files for the last configured trace, follow these steps. Note: Debug files run constantly, and this screen can be viewed at any time. Each debug file contains up to 5MB of trace information. 1. Log on to the Web interface as an Administrator. 2. Select Maintenance > Traces; the System Trace screen appears (Figure 2-9). Figure 2-9 The System Trace screen. 3.
Chapter 2. Troubleshooting the RXT150 Capturing Debug Files with the Serial Interface Before You Begin Before using the serial interface, make sure that: • You have a properly configured terminal emulator, such as TeraTerm. (HyperTerminal is not recommended for use with the RXT-150.) • You have a standard DB9 serial cable. • The terminal emulation settings are set to: • 115200 bps • 8 data bits • No parity • 1 stop bit • No flow control Capturing Debug Files 1.
Chapter 2. Troubleshooting the RXT150 4. Type 4, then press the Enter key on your keyboard; the Diagnostics Tracing Menu displays (Figure 2-10). Figure 2-11 The Diagnostics Tracing Menu. 5. Type 1 or 2 (as instructed by SpectraGuard Support), the press Enter. The trace should take less than two minutes to run. 6. Copy the trace information. 7. Paste the trace information into an e-mail for SpectraGuard Support.
Chapter 2. Troubleshooting the RXT150 Resetting the RXT150 Resetting the RXT150 allows a soft reboot of the drive. Caution: Never reset the drive while data is being written to RXT media. Only reset the drive on the recommendation of SpectraGuard Technical Support. A drive reset erases valuable log information that SpectraGuard Support staff can use to diagnose problems.
Chapter 2. Troubleshooting the RXT150 Resetting the RXT150 with the Serial Interface Before You Begin Before using the serial interface, make sure that: • You have a properly configured terminal emulator, such as TeraTerm. (HyperTerminal is not recommended for use with the RXT-150.) • You have a standard DB9 serial cable. • The terminal emulation settings are set to: • 115200 bps • 8 data bits • No parity • 1 stop bit • No flow control Resetting the RXT150 1.
3 Troubleshooting RXT Media This chapter reviews how to replace a failed hard drive inside of an RXT media pack. Caution: Only replace a disk drive in an RXT media pack under the direction of SpectraGuard support staff. Caution: A RAID 0 RXT media pack requires reformatting. Reformatting the RXT media pack destroys any user data that currently exists on the disks in the RXT media pack.
Chapter 3. Troubleshooting RXT Media Before Replacing Disk Drives Cautions Caution: Only replace a disk drive on the direction of SpectraGuard Support. Contact SpectraGuard Support if the Web interface or an LED indicates that a disk drive has failed. . Figure 3-1 System message indicating an RXT media disk drive problem. Caution: Only use Spectra-Logic-approved drives for replacement. To order new drives, see Contacting SpectraGuard Support on page 37.
Chapter 3. Troubleshooting RXT Media Preparing to Replace a Failed Disk Drive To prepare for the replacement of the failed disk drive, follow these steps. 1. Log on to the RXT150 Web interface 2. Select Maintenance > Tools > Get RXT Media Pack Drive Status; the Get RXT Media Pack Drive Status Utility screen displays (Figure 3-2). Drive Serial Number Color indicates status 12 disk drives in this pack (Gold Media) Figure 3-2 The Get RXT Media Pack Drive Status Utility screen.
Chapter 3. Troubleshooting RXT Media Replacing a Disk Drive in Silver and Green RXT Media Use this process to replace a 3.5-inch disk drive in Silver and Green RXT media. Opening the Media Pack 1. Carefully turn the RXT media pack upside-down. 2. Use a #1 Phillips screwdriver to remove the screws that secure the pack’s bottom (Figure 3-3 and Figure 3-4). Figure 3-3 An Silver RXT media pack with four screws to remove. Figure 3-4 An Green RXT media pack with six screws to remove. 3.
Chapter 3. Troubleshooting RXT Media 4. Remove the electro-static discharge (ESD) panel (Figure 3-5) by lifting up first from the end with the overlapping tab (A), then sliding the panel out from the other end of the media pack (B). A B Figure 3-5 Removing the ESD panel (Silver media pack shown). 5. Carefully turn the RXT media on its side so that you have access to one side of the pack. 6. Proceed to Disconnecting the Disk Drive on page 27.
Chapter 3. Troubleshooting RXT Media Disconnecting the Disk Drive 1. Use a #2 Phillips screwdriver to remove the two screws closest to the open side of the pack (Figure 3-6). Figure 3-6 The screws on one side of a Silver RXT media pack. On Green RXT media, do this only for the drive—or the drive above the drive— that you are replacing (see Figure 3-7). If you are removing this drive or the one beneath it, remove these two screws.
Chapter 3. Troubleshooting RXT Media 4. Use a #2 Phillips screwdriver to loosen the ESD resistor screw on the side of the disk drive (Figure 3-8). Figure 3-8 The ESD screw (Silver media shown). On Green RXT media, you may get to skip this step. See Figure 3-9. If you are replacing a disk drive on this end, you need to remove the ESD screw. Display If you are replacing a disk drive on this end, you do not need to remove an ESD screw; it is only present on the other drive.
Chapter 3. Troubleshooting RXT Media 5. Use a #2 Phillips screwdriver to loosen the screw on the bracket that secures the connector to the disk drive (Figure 3-10). Caution: Take care not to damage the flex circuit; keep the cable as straight as possible. Figure 3-10 The bracket screw (Silver media shown). 6. Carefully remove the bracket from the disk drive, sliding it first down the cable, then off (Figure 3-11). o Figure 3-11 Sliding the bracket off the connector.
Chapter 3. Troubleshooting RXT Media 7. Disconnect the disk drive connector (Figure 3-12) from the loose drive, then remove the disk drive from the pack. o Figure 3-12 Disconnecting the disk drive connector. Note: If the failed disk drive is still in the pack (underneath the drive you just removed), then repeat Step through Step 7 for the other disk drive. The only step you do not have to repeat is the removal of the resistor cable; that is only on the one drive.
Chapter 3. Troubleshooting RXT Media Installing the New Disk Drive in Silver and Green RXT Media 1. Replace the failed disk drive with the new disk drive and plug in the disk drive connector. 2. Carefully replace the bracket that secures the connector to the disk drive, sliding it first up the cable, then into place. It must sit flush against the disk drive (Figure 3-13). o Figure 3-13 Replacing the bracket on the connector. 3.
Chapter 3. Troubleshooting RXT Media 4. If the disk drive you replaced is the first drive that you could access when you removed the bottom of the pack, proceed to Step 5 below. If the drive you replaced is the drive underneath: • Carefully place the disk drive into the media pack. • Use a #2 Phillips screwdriver to tighten the four screws (two on each side) that attach it to the pack; make sure that the heads of the screws are flush with the side of the pack. • Repeat Step 2 and Step 3 for the next drive.
Chapter 3. Troubleshooting RXT Media 8. Replace the ESD panel: • Slide the end with the cut-outs (Figure 3-16) into its place at the pogo-pad end of the pack (A in Figure 3-17). • Pinch the sides of the panel in (B in Figure 3-17) while pushing down (C in Figure 3-17) until the entire ESD panel lays flat in the pack. B B C A Figure 3-16 The cut-outs. Figure 3-17 Replacing the ESD panel. 9.
Chapter 3. Troubleshooting RXT Media Replacing a Disk Drive in Gold RXT Media Use this process to replace a 2.5-inch disk drive in Silver and Green RXT media. 1. Remove the two screws on the side panel of the RXT media (Figure 3-19). Figure 3-19 The two side panel screws. 2. Slide the side panel out. 3. Locate the failed disk drive, which is labeled with the serial number you wrote down from the Get RXT Media Pack Drive Status Diagnostic screen (Figure 3-2 on page 24). 4.
Chapter 3. Troubleshooting RXT Media 6. Slide the side panel’s metal tabs into the media pack’s slots (Figure 3-21). Caution: These tabs play a structural role in providing proper pressure on each of the disk drives in the RXT media pack. Confirm the orientation of the tabs before pressing the side panel into place; this way you can avoid damaging the disk drives or the tabs. B A Figure 3-21 The tabs on the side panel (A) match the slots inside the media pack (B). 7.
Chapter 3. Troubleshooting RXT Media Finish 1. Load the RXT media pack into the RXT150. 2. Select Maintenance > Tools > Get RXT Media Pack Drive Status. The RXT media drives should report as Optimal (green), as shown in Figure 3-23. All drives should appear green (unless spare). Figure 3-23 The Get RXT Media Pack Drive Status Utility screen. The RXT media pack automatically rebuilds itself when placed back into the RXT150. Note that the rebuild process can be lengthy, depending on the amount of data.
4 Warranty and Repair This chapter reviews the RXT150 warranty and Spectra Logic’s repair policies and processes: • Contacting SpectraGuard Support on page 37 • RMA Returns on page 38 • RXT150 Repair Policy on page 39 Note: This warranty applies only to the RXT150. It does not include RXT media. RXT Media Recommendation Spectra Logic recommends storing spare RXT media on site for facilities requiring immediate access to spare media to accommodate data growth or replace failed media.
Chapter 4. Warranty and Repair RMA Returns Your technical support representative may ask you to return a problem component to Spectra Logic for servicing. To return an RXT150 or component for service: 1. Obtain a Return Materials Authorization (RMA) number from a technical support representative; this number identifies the part on its arrival. 2. Pack the component in its original shipping materials and as instructed by Spectra Logic. Note: If the component is improperly packed, the warranty is void. 3.
Chapter 4. Warranty and Repair RXT150 Repair Policy Limited Warranty Spectra Logic warrants the RXT150 to be in good working order for a period of one full year from the date of shipment from Spectra Logic or an authorized Spectra Logic dealer.
Chapter 4. Warranty and Repair Warranty Shipping The RXT150 unit must be returned in the original carton and packed with the original packing material. Failure to do so will void the warranty. See the label on the inside lid of the shipping container for instructions on packing the RXT150. The purchaser is responsible for paying the shipping and insurance charges for warranty goods to Spectra Logic. Spectra Logic will pay for shipping the repaired item back to the purchaser.
Chapter 4. Warranty and Repair Standard Repair Service for the RXT150 The standard return-to-factory service supplied with the standard warranty, as it applies to the United States and the European Union, includes telephone access to a Technical Support representative from 8:00am to 5:00pm local time Monday through Friday, excluding Spectra Logic holidays.
Chapter 4. Warranty and Repair RXT Media Repair Policy Limited Warranty for RXT Media RXT media is warranted for three years return-to-factory. The standard turn-around time is two weeks from receipt of the product. Upon completion of repair, Spectra Logic will return the unit via two-day shipment. Note: Spectra Logic will return a fully functioning media pack with the appropriate RAID level; however, all data on the media will be lost due to the re-manufacturing process.
Chapter 4. Warranty and Repair Express Repair Service for RXT Media Express Repair Service enables the customer to exchange an entire RXT media pack if it requires repair. Express Repair Service is available throughout North America and the European Union. Contact your Spectra Logic sales representative for other locations.