ZIPK4T2/ZIPK8T2 User Manual Speco Gray Series Kits
IMPORTANT SAFEGUARDS AND WARNINGS .............................................................................................. 7 CHAPTER 1 PRODUCT OVERVIEW ................................................................................................................ 1 1.1 REAR PANEL ...................................................................................................................................................... 1 1.2 REMOTE CONTROL (FOR REFERENCE ONLY)..............................
USER MANUAL 4.2.3 Start Menu ................................................................................................................................................ 18 4.2.3.1 Unlock and Lock Screen ..........................................................................................................................................18 4.2.3.2 Shutdown .................................................................................................................................................
USER MANUAL 5.3.2 Exception .................................................................................................................................................. 36 5.4 NETWORK.............................................................................................................................................................. 37 5.4.1 General ..................................................................................................................................................
USER MANUAL 5.6.3 Multi-user .................................................................................................................................................. 52 5.6.3.1 Changing Password .................................................................................................................................................53 5.6.3.2 Add New Users ........................................................................................................................................
USER MANUAL 6.1.2 Event Search, Playback & Backup ....................................................................................................... 71 6.1.2.1 Event Playback Control ...........................................................................................................................................73 6.1.3 Sub-periods Playback............................................................................................................................. 73 6.1.
USER MANUAL Welcome Thank you for purchasing this surveillance system. Please read this manual carefully before installing and operating the cameras and the NVR (network video recorder). If technical assistance is needed, please contact Speco Technologies Technical Support. Phone: 1-800-645-5516 option 3 Email: techsupport@specotech.
USER MANUAL Important Safeguards and Warnings Please carefully read the following instructions to avoid personal injuries and prevent the equipment and other devices from being damaged. 1. Power source (note: please use the power supply that was included) Never operate the equipment by using an unspecified power supply. 1. Never push objects of any kind through the openings on the recorder Never push objects of any kind through the openings on the NVR to avoid electric shock or other accidents. 2.
USER MANUAL Handle the unit gently as rough physical handling may cause malfunction. 8. Use standard lithium battery After disconnecting power, if the system clock does not continue to work, please replace the standard 3V lithium battery on the main board. Warning: Turn off the unit before replacing the batteries. Please properly dispose of the used batteries. 9. Put the equipment in a place with good ventilation The recorder can produce a large amount of heat during operation.
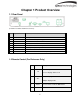
Chapter 1 Product Overview 1.1 Rear Panel (4-channel recorder shown for reference) Item Physical Port Connection Method 1 2 3 4 5 6 7 8 Power Switch Power Port USB Port HDMI Port VGA Port Audio Out WAN Port LAN Ports Startup and shutdown Connect the included power supply Connect USB devices, such as USB mouse and USB flash drive. Connect to a monitor or TV Connect to a monitor with VGA port Audio signal output, RCA port Network interface to router Network interface to IP cameras.
USER MANUAL 6 Submenu 7 8 Go to submenu Up arrow key Press to enter the selected menu item and SEL edit the setting 9 Left/Right key 10 Down arrow key 11 Press to rewind during video playback 12 Press to fast forward during video playback Press to play recorded video or enter the 13 playback search menu 14 Press to start manual recording Press to stop manual recording or stop the 15 video playback Table 2-1 Press to pause the video playback or enter 16 frame-playback mode 2
USER MANUAL Chapter 2 NVR Installation & Connection 2.1 Connection Diagram Speaker (4-channel recorder connection shown for reference) 2.2 Power Supply Connection Caution: Use only the supplied power adapter that was included in the package Connect one end of the power adapter to the power connector on the back of the NVR. Plug the other end of the power adapter into the wall outlet. Press the Power switch to turn on the power.
USER MANUAL Chapter 3 NVR Common Operations 3.1 Using the Supplied Mouse 1. Left Button: o Click to select menu options. o During live viewing in split-screen view, double-click on a channel to view it in full-screen. Double-click the channel again to return to split-screen viewing. o Click up on a channel in Live View to open the Camera Quick Toolbar. o General click and drag actions 2. Right Button: o Click once to open the Task bar in the Live View screen. View Task bar on 4.2.
USER MANUAL MAN 3.2 Using the Virtual Keyboard The virtual keyboard will pop up on the screen when data needs to be entered. Click to toggle the keyboard to upper case and more punctuation Click to delete a character Click to enter Move the cursor to right Move the cursor to left 3.3 Password When the recorder is powered on for the first time, a password is required to set. Please make sure to remember the username and password and save them in a secure place.
USER MANUAL New Admin Name: set the user name. New Admin Password: set the admin password. The password must be a combination of 8 characters. Confirm Password: Enter the password again. Click Apply to confirm the setup and go to the login interface. Enter the user name & password to log in. NOTE: If the password is forgotten or lost, please contact support to reset the password.
USER MANUAL MAN Chapter 4 Start up 4.1 Start Wizard The Startup Wizard will help configure the system and get the system up and running quickly. quickly 4.1.1 Start Wizard Click the Start Wizard button to proceed to the next step 4.1.
USER MANUAL Check the DHCP box if the recorder is connected to a network with DHCP capability. A router typically has DHCP. The router will assign the network parameters automatically when DHCP is enabled on the recorder. To manually assign parameter values, see below: IP Address: The IP address identifies the recorder in the network. It consists of four groups of numbers between 0 to 255, separated by periods. For example, “192.168.001.100”.
USER MANUAL MAN 4.1.3 Date/Time Date and Time Click on the calendar icon to set the current system date. Date: Click on the calendar icon to set the system date. Time: Click to set the system time. Date Format: Choose from the drop down menu to set preferred date format. Time Format: Choose time format between 24Hour and 12Hour. Time Zone: Set the correct time zone. NTP NTP stands for Network Time Protocol.
USER MANUAL MAN Check the “NTP” box, and select the NTP server. DST DST stands for Daylight Saving Time. DST:: Enable if Daylight Saving Time (DST) is observed in the time zone where the system is installed.
USER MANUAL MAN 4.1.4 IP Camera IP cameras can be added to the NVR through this menu if the included cameras are not connected directly to the PoE ports on the back of the NVR. Click Search to search IP cameras in the same network. Choose the IP camera(s) to add, and then click the icon to add to the NVR.
USER MANUAL MAN Enter the camera’s user name & password to add the camera(s). The default credentials are admin/admin. Click the button to add an individual IP camera to a single channel. Click Search button to search IP cameras, and then click one of the IP camera in the device list. IP Address/Domain: IP address or domain name of the IP camera Alias: Name of the IP camera Position: Position to display the camera name on the screen.
USER MANUAL MAN 4.1.5 Disk The NVR comes with a preinstalled HDD HDD. If for any reason, the HDD needs to be formatted, select s the HDD and then click the Format HDD button. Overwrite:: Use this option to overwrite the old recordings on the HDD when the HDD gets full. For example, if the option 7 days is chosen then only the last 7 days of recorded data are kept on the HDD. To prevent overwriting any old recordings, select Disable.
USER MANUAL MAN 4.1.7 Mobile Scan the QR code with the mobile app to view the N NVR VR remotely through a smartphone. 4.1.8 Summary Check “Don't Don't show this window next time time" to not display the Start Wizard again when the system is rebooted next time. Click Finish button to save & exit.
USER MANUAL MAN 4.2 Live View Screen Overview Status Icons This indicates that the NVR is currently recording. This icon appears when motion has been detected detected. The icon indicates that the external I/O alarm device has been triggered This icon indicates an HDD error This icon indicates the HDD is unformatted This icon indicates the HDD is full.
USER MANUAL MAN This icon indicates the HDD is read read-only. No Camera: IP camera is not connected. Click to open Quick Add menu to add IP camera Click to edit current IP camera 4.2.1 Camera Quick Toolbar In live view,, click the left button of the mouse on a channel to display the Camera Quick Toolbar. Click to manually record the channel immediately. If the manually recording is in process, the icon will be in red color. Click one more time to stop manual record.
USER MANUAL MAN 4.2.2 Task bar Click to open the Start Menu Click to choose different layout for live view Click to start viewing channels in a sequence Quick playback. If chosen, the recording for all channels from the beginning of the day will start playing back. If the arrow is clicked, playback from the last 5s,, 10s, 30s, 1min, 1m and 5min can be chosen.
USER MANUAL MAN 4.2.3 Start Menu To switch to another user. To enable multiple users, see 5.6.3 Multi-user user. Search earch & Playback. See Chapter 6 Search, Playback & Backup NVR System Setup. See Chapter 5 NVR System Setup Lock & unlock sscreen. See 4.2.3.1 Unlock and Lock Screen. Screen Shutdown, reboot & logout. See 4.2.3.2 Shutdown. 4.2.3.1 Unlock and Lock Screen The screen will be locked to protect unauthorized OSD operation if there is no user interaction after 1 minute.
USER MANUAL If Logout is chosen, the live view screen will disappear. Log in to the system again for operation.
USER MANUAL Chapter 5 System Setup Go to Start Menu Setup.
USER MANUAL 5.1 Channel Available options in this section are: camera configuration, live view display, manage IP cameras, adjust IP camera’s image, motion setup, and privacy mask setup. 5.1.1 IP Channels Click Search to search for IP cameras on the local network. Click Add to add an individual IP camera or click Add All to add all IP cameras. Note that this should be used only for channels where the IP camera isn’t connected directly to the PoE port on the back of the NVR.
USER MANUAL MAN Click Search button to search for IP cameras, and then click one of the IP camera cameras in the device list. IP Address/Domain: IP address or domain name of the IP camera Alias: Nickname of the channel Position: Position to display the camera name on the screen.
USER MANUAL Auto Assign IP to Camera(s): If for any reason, the IP camera’s IP address was set to a different network segment as the NVR’s internal camera network segment, this option can be used to change the camera back to the network segment that the NVR recognizes. Channel Delete: Choose one or more IP cameras, and click this button to delete them from the channels. 5.1.2 Custom RTSP Custom RTSP URLs can be used to get video streams from 3rd party IP cameras where their respective RTSP URLs are known.
USER MANUAL MAN 5.1.3 Live camera. Channel Name: Nickname of the IP camera Setup: Click the icon to go to the setup page.
USER MANUAL Choose a channel to configure Give a name to the camera Date format to display for the camera Time format to display for the camera Refresh Rate of the camera (60Hz should be used for North America) Choose a camera type (Auto, AHD, TVI, CVI) for analog camera To show the camera name in live view screen To show the system time in live view screen Adjust the Hue value for the image color Adjust the Bright value for the image color Adjust the Contrast value for the image color Adjust the Saturati
USER MANUAL MAN 5.1.4 Image Control Setup: Click the icon to go to the setup page.
USER MANUAL MAN Choose a channel to configure Select the desired built-in in IR cut filter mode to ensure the camera works properly both in the day and night.
USER MANUAL MAN 5.1.5 Motion Configure motion detection options in this section. Setup: Click the icon to go to the setup page. Motion Detection Area: The whole screen is marked for motion detection (red blocks) as default. To disable motion detection on a certain area, click the grid cursor and then drag the mouse to unmark the area into transparent blocks. After setup is completed, right click on the mouse m to return and click Save to complete the motion zone setup.
USER MANUAL MAN Sensitivity:: Set the sensitivity level. Level 1 the lowest sensitivity level while level 8 is the highest sensitivity level. 5.1.6 Alarm Click the Alarm button to configure the motion detection alarm actions: Buzzer: The NVR can use its internal buzzer to emit an alarm tone. The buzzer duration can be set here. Record: Click the icon to choose which channel(s) should be recorded when motion detection is triggered.
USER MANUAL Send Email: Select to let the NVR send an email when the motion is detected. Email must be set up first in the Network section in order for this to work. Full Screen: If this function is enabled and a motion is detected in a channel, that channel will go to full screen. FTP Upload: To upload alarm images to an FTP server when motion is detected. To set up FTP, see 5.4.4 FTP. 5.1.7 Privacy Mask Privacy mask can be used to cover certain areas of the image where viewing/recording is not desired.
USER MANUAL 5.2 Record This section allows for configuration of recording settings. 5.2.1 Stream The IP cameras have multiple simultaneous streams which are used for different purposes. The main stream defines the recording video quality which will be saved in the HDD. The sub stream defines the video quality for remote access viewing, such as the web client. The mobile stream defines the video quality for remote viewing with the mobile app.
USER MANUAL Bitrate Mode: To set a custom bitrate value, choose the User-defined mode. To have the system set a recommended bitrate value based on the selected resolution of the stream, choose the Predefined mode. Bitrate: Set the bitrate value. Note that higher bitrate values will result in higher image quality, but will also consume more storage space on the HDD. 5.2.2 Record Configuration of the channel recording parameters. 5.2.2.1 Record Record Switch: Check to enable recording for the channel.
USER MANUAL 5.2.2.2 Record Schedule Set a recording schedule for normal (continuous) and/or motion recording. To set the recording mode, click on the mode (Normal or Motion) and then drag the cursor to mark the time slots. The recording schedule must be set for each channel. Use the Copy function to set the same schedule as the initial channel that was set, for all other channels. Click Apply to save the settings. Channel: Select the channel to set its recording schedule.
USER MANUAL 5.2.3 Capture This section allows for configuration of image capture (snapshot) settings. 5.2.3.1 Capture Auto Capture: Enable or disable automatic capturing for the channel. Stream Type: Select the image resolution between main stream or sub stream. Normal Interval: Time interval to capture an image during continuous recording. Alarm Interval: Time interval to capture an image when motion is triggered.
USER MANUAL 5.2.3.2 Capture Schedule Channel: Select the channel to set its capture schedule. Normal: Continuous capture (green markers). Motion: Motion capture (yellow markers). No Capture: An unmarked time slot means that there is no capture scheduled for that time slot. A snapshot can still be captured manually on the channel by the operator.
USER MANUAL 5.3 Alarm This section allows for configuration of alarm parameters. 5.3.1 Motion Refer to 5.1.6 Alarm 5.3.2 Exception The NVR can detect different types of errors to notify the operator. Event Type: Select the event type from the options below: - No Space on Disk: When an HDD is full. - Disk Error: If the HDD is not detected properly. - Video Loss: If a camera is not connected properly. Switch: Check the box to enable the monitoring of the event.
USER MANUAL Buzzer: Set the buzzer duration when an event occurs (Off/10s/20s/40s/60s). To disable the buzzer, select OFF. Show Message: Check the box to display a message on the screen when an event occurs. Send Email: Lets the NVR send an email when an event occurs. 5.4 Network Configure network settings of the NVR. 5.4.1 General 5.4.1.1 General Check the DHCP box if connecting to a DHCP server (a router typically provides this).
USER MANUAL IP Address: The IP address identifies the NVR in the network. It consists of four groups of numbers between 0 to 255, separated by periods. For example, “192.168.001.100”. Subnet Mask: Subnet mask is a network parameter which defines a range of IP addresses that can be used in a network. If IP address is like a street where you live then subnet mask is like a neighborhood. The subnet address also consists of four groups of numbers, separated by periods. For example, “255.255.000.000”.
USER MANUAL Check the “Enable PPPOE” box and then enter the User name & Password of PPPoE. Click Apply to save and the system will reboot to activate the PPPoE setting. 5.4.1.3 Port Configuration Web Port: This is the port that will be used to log in remotely to the NVR (e.g. using the Web Client). If the default port 80 is already taken by other applications, please change it. Client Port: This is the port that the NVR will use to send information through.
USER MANUAL 5.4.2 DDNS Configure DDNS settings. Speco Technologies provides a free DDNS service. By using DDNS, the external remote IP address of the device does not have to be known to remotely access the NVR. DDNS: Check to enable DDNS. Domain: specoXXXXXX.specoddns.net. The last 6 characters “XXXXXX” are the last 6 characters of the NVR’s Mac address. After all parameters are entered, click Test DDNS to test the DDNS settings.
USER MANUAL 5.4.3.1 Email Configuration Email: Check to enable the function. Encryption: Enable if the email server requires the SSL or TLS verification. If unsure, set to Auto. SMTP Port: Enter the SMTP port of the email server that will be used to send the email. SMTP Server: Enter the SMTP server address of the email service.
USER MANUAL User Name: Enter the email address of the sender. Password: Enter the password of the email address. Password: Display name of the sender. Receiver 1~3: Enter the email address(es) that will receive the notifications. Interval: Configure the length of the time interval between the notification emails from the NVR. To make sure all settings are correct, click Test Email. The system will send an automated email message to the email addresses that were specified. 5.4.3.
USER MANUAL Red: Exception (HDD full, HDD error, or Video Loss). 5.4.4 FTP Snapshots can be uploaded to an existing FTP server configured through this section. FTP Enable: Click to enable the FTP function. Server IP: Enter the FTP server IP address or domain name. Port: Enter the FTP port for file upload. Name/ Password: Enter the user name and password. Directory Name: Enter the default directory name for the FTP file uploads. Test FTP: Click to test the FTP settings.
USER MANUAL 5.5 Device Disk and Cloud configuration. 5.5.1 Disk 5.5.1.1 Disk Check and configure the internal HDD(s). The HDD already comes formatted with the system. Format the HDD only when necessary for some reason. Format HDD: Select the HDD and click Format HDD. To start formatting, enter the user name and password and then click OK. Overwrite: Use this option to overwrite the old recordings on the HDD when the HDD is full.
USER MANUAL 5.5.1.2 S.M.A.R.T This function can be used to display technical information on the installed hard. Tests can be performed (there are three types available) to evaluate and detect potential drive errors. Whole Evaluation not passed, continue to use the disk: If for some reason the hard drive has detected a fault (such as one or more bad sectors), you can instruct the NVR to continue saving to the drive.
USER MANUAL Conveyance: This is a very quick test that verifies that the mechanical parts of the hard drive are working. Note: When performing a test, the NVR will continue to work as normal. If an HDD S.M.A.R.T error is found, the HDD can continue to be used, but there will be a risk to lose recording data. At this point, the HDD may have to be replaced. Contact support when this occurs. 5.5.2 Cloud Dropbox can be used to upload snapshots for motion alarms.
USER MANUAL Make sure to click on the link within 3 minutes of receiving the email. Enter the local IP address of the NVR in the IP Address field (e.g. http://192.168.0.XXX) and specify the correct HTTP port. Click Authorize. Enter the user name and password of the NVR. The browser will redirect to Dropbox. Log in to Dropbox as necessary. Go to account settings and then the Connected apps tab. If Dropbox was activated properly, under the Linked apps section, there will show an app called “DVRCloudStorage”.
USER MANUAL 5.6 System General system configuration 5.6.1 General Device Name: Enter the desired name for the NVR. The name can include both letters and numbers. Language: Select a language for the system menus to be displayed in. Multiple languages are available. Video Format: Select the correct video standard for the region. NTSC is the standard for North America. Menu Timeouts: Click the drop-down menu to select the time NVR will exit the Main Menu when idle.
USER MANUAL 5.6.1.1 Date and Time Date & Time Date: Click the calendar icon to change the date. Time: Click the box to change the time. Date Format: Select the preferred date format. Time Format: Select the preferred time format. Time Zone: Select the applicable time zone.
USER MANUAL 5.6.1.2 NTP Settings The NTP (Network Time Protocol) function allows the NVR to automatically sync its clock with a time server over the Internet. This gives it the ability to constantly have an accurate time setting (the NVR will periodically sync automatically). Check to enable the NTP, and select a Server Address, click Update Now to manually sync the date & time. Click Apply to save the settings. 5.6.1.3 DST Settings DST (Daylight Saving Time) configuration.
USER MANUAL Enable DST: Select when Daylight Saving starts and ends: Week: Select the month, a particular day and time when Daylight Saving starts and ends. Date: Select the start date (click the calendar icon), end date and time when Daylight Saving starts and ends. Start Time / End Time: Set the start time and end time for Daylight Saving. Note: For the US, DST starts at 2am local time on the second Sunday in March and ends at 2am on the first Sunday in November. 5.6.
USER MANUAL VGA/HDMI Resolution: Select a display resolution that is suitable for the monitor or TV. 1920 x 1080 will suit most displays. If the monitor supports 4K resolution, select either 2K (2560 x 1440) or 4K (3840 x 2160) to take advantage of the higher resolution. Scale and Offset: The NVR supports adjusting the size & position of the display screen to match the monitor or TV. Click Setup to adjust. Scale:To adjust the size of the displayed screen by scale.
USER MANUAL MAN The system supports the following account types: • ADMIN — System Administrator Administrator:: The administrator has full control of the system, and can change both administrator and user passwords and enable/disable password protection. • playback and other USER — Normal User:: Users only have access to live viewing, search, playback, functions. Specific permissions can be granted to individual users. 5.6.3.
USER MANUAL MAN 5.6.3.2 Add New Users 1. Select one of the user accounts that is currently disabled and then click the User Edit icon 2. Select Enable from the drop-down down next to User Enable. 3. Click the field next to User Name to change the user name for the account. 4. Select Enable from the drop-down down next to Password Enable. 5. Click the field next to Password to enter the desired password. 6. Click the field next to Confirm to reenter the password. 7. Click Save.
USER MANUAL MAN 5.6.3.3 Setting User Permissions The administrator account is the only account that has full control of all system functions. Specific functions can be enabled or disabled for every user account account. 1. Click the edit icon under the Permission tab. 2. Check the boxes next to any system menus or capabilities for the user to access. Click All to check all boxes. Click Clear to check none of the boxes. 3. Click Save to save your modifications.
USER MANUAL 5.6.4 Maintenance In this section, the available parameters are: system log, factory default, firmware upgrade, export & import system parameters, and system auto reboot. 5.6.4.1 Log The system log shows important system events, such as motion alarms and system warnings. Easily create a backup file of the system log for a set time period to a USB flash drive.
USER MANUAL MAN Log Searching and Backing Up: 1. Click the field next to Start Date &Start Time to choose the starting date & time.. 2. Click the field next to End Date & End Time to choose the end date & time. 3. Select the type of events to search for from the drop down next to Log Type,, or select All to see the entire system log for the selected time period. 4. Click Search. 5.
USER MANUAL 6. Click Backup to create a backup of the system log for the search period. Please make sure the flash drive has been connected to the NVR’s USB port. 7. When the backup drive menu appears, navigate to the folder for the backup file to be saved in, and then click OK to begin. 5.6.4.2 Load Default Reset the NVR settings to its factory default state. Restoring default settings will not delete recordings and snapshots saved to the hard drive.
USER MANUAL 5.6.4.3 Upgrade 1. Copy the firmware file (.sw file) to the USB flash drive and insert the flash drive into the NVR’s USB port. 2. Click the Select File button to choose the firmware file in the USB flash drive, and then Click OK. 3. Click the Upgrade button to start the system upgrade. The system upgrade will last around 5-10 minutes. Do NOT power off the NVR or remove the USB from the NVR during this process. 5.6.4.
USER MANUAL Save Settings: Click to save the NVR current system settings to the USB flash drive. Enter the Admin password to authenticate. Load Settings: Click Load Settings button to navigate to the system settings file to import from the USB flash drive. Enter the Admin password to authenticate. 5.6.4.5 Auto Reboot This menu allows the system to auto reboot the NVR regularly. Auto Reboot: Check to enable. Time: Set the NVR to reboot by day, week or month.
USER MANUAL 5.6.5 Camera Maintenance For the IP camera that was included within the system, this menu allows IP camera’s firmware to be updated and the default settings to be restore. 5.6.5.1 Upgrade IP Camera 1. Choose one of the IP cameras to upgrade. 2. Click Select File, select the update file from the USB flash drive, then click OK.
USER MANUAL 3. Click the camera Upgrade button to start the upgrade. Enter the Admin password to authenticate. Do NOT power off the NVR and IP camera or remove the USB during the process. 5.6.5.2 Load Default Settings for IP Camera 1. Choose the IP cameras to restore back to factory settings. 2. Click Load Default to restore settings. Enter the Admin password to authenticate. 5.6.6 System Information This section displays the system information, channel information, record information & network status.
USER MANUAL Scan the QR code on this page with the Speco Gray mobile app to remotely view the NVR. 5.6.6.2 Channel Information View channel information for each connected camera such as the nickname, main stream and sub stream recording specifications, motion detection status, and privacy mask.
USER MANUAL 5.6.6.3 Record Information View recording information for each connected camera such as bit rate, stream type, recording resolution and frame rate (FPS). 5.6.6.4 Network State View network information. Total Bandwidth: Shows the NVR’s total available bandwidth that can be used by IP cameras. Used Bandwidth: Shows the used bandwidth of IP cameras.
USER MANUAL MAN Chapter 6 Search, Playback & Backup The Search function provides the ability to search for and play previously recorded videos as well as snapshots that are stored on the NVR’s hard drive. There is a choice of playing video that matches the recording schedule, manual recordings or motion events only. The Backup functio function n provides the ability to save important events (both video and snapshots) to a USB flash drive. 6.
USER MANUAL MAN 5. Video Playback Controls: to control the video playback. Enlarge the video playback to full screen Rewind, x2, x4, x8 and x16 Slow Play, 1/2, 1/4 and 1/8, 1/16 speed Play Pause Play frame by frame. Click once to play a frame of the video Stop Fast Forward, x2, x4, x8 and x16 Digital Zoom:: Click and then click click-and-drag on the image during playback to zoom in on the selected area. Right-click click to return to regular playback. Video Clip.
USER MANUAL MAN Snapshots: to capture a snapshot image to a USB flash drive. If the video playback is in split-screen view, select the channel to capture, and then click the icon to save the snapshot. 6. ecordings are shown with colored bars to represent different types of recording Timeline: Recordings (legend shown in the bottom-right right corner of the display). Use the time frame options ( ) to view a smaller or larger time period.
USER MANUAL MAN 1. Select a date to search for video recording from the calendar. Dates with recordings will be underlined. 2. Choose a search type. 3. Check channels to search, or check Channel to search all connected channels. 4. The search result will display on the timeline from 00:00 to 24:00. 5. Click button to start playback. 6. Control the playback with buttons on Video Playback Controls. 7. Use the time frame options ( ) to view a smaller or larger time period. 8.
USER MANUAL MAN 6.1.1.1 Video Clip Backup 1. Insert the USB flash drive to the NVR. 2. Start a playback. 3. Click the icon. 4. Check the desired channel(s). 5. Move the mouse cursor to the time where the clip should start. 6. Click and drag the cursor to the he time where the clip should end. 7. Click to save the video clip. 8. Select a file type for the backup files and then click the Save button to save the video clips. Make sure the USB drive has enough space to save the video clips. 9.
USER MANUAL 70
USER MANUAL MAN 6.1.2 Event Search, Playback & Backup 1 2 5 3 4 8 6 9 11 10 7 To search, play & back up for events: 1. Choose the date & time to search. 2. Check the recording types to search for, or check Search Type to choose all. 3. Choose the channels to search, or check Channel to choose all channels. 4. Click the icon to start search. 5. Events fitting the search criteria will be displayed. Double click the left button of the mouse on one of the events to play the video immediately. 6.
USER MANUAL MAN Thumbnails view. View the snapshots of the events. listed. Detailed view. Details of the events will be listed List view. Displays the list of the events. 8. When an event is selected,, the event information will be shown on the bottom left corner of the screen. 9. Check the box next to each event to select files, or check the box next to Select to select all events on the page. 10.
USER MANUAL MAN 6.1.2.1 Event Playback Control 1 2 3 5 4 1. Event List. Select events from here. 2. Click to save selected event clips to a USB flash drive. Click 3. Control the playback with buttons on Video Playback Controls. Click to play the video. or right-click right on the mouse to exit playback and return to the event search window. 4. The event that’s currently playing will be displayed on the timeline. 5. Use the time frame options ( ) to view a smaller or larger time period. 6.1.
USER MANUAL MAN 1 2 3 6 4 8 5 7 To search & play video in sub--periods: 1. Choose the date & time. 2. Choose the number of split-screens screens to play the videos in. 3. Check the recording types to search for, or check Search Type to choose all. 4. Choose the channels to search. Please note that this function only supports to search & play one channel at a time. 5. Click the play button to start playing. Control the playback with buttons on Video Playback Controls. 6.
USER MANUAL MAN 8. Use the time frame options ( ) to view a smaller or larger time period. 6.1.4 Picture Search & View Search and view snapshots. 1 2 5 3 4 8 6 9 10 11 7 To search, play & back up pictures: 1. Choose the date & time. 2. Select the types to search for,, or check Search Type to choose all. 3. Choose the channels to search search, or check Channel to choose all channels. 4. Click to start search. 5. Images that fit the search criteria will be displayed.
USER MANUAL MAN 6. Click icons in the bottom bottom-right right corner of the menu to browse between pages of pictures, or enter the specific page page. 7. Switch between different views by clicking on the icons at the right bottom corner of the screen: Thumbnails view. Displays the thumbnails of the events. List view. The events will be displayed in list. Detailed view. Displays the details of the files files. 8.
USER MANUAL MAN 6.1.4.1 .1 Picture Preview Control 1. Picture List - select the pictures here. 2. Click to save selected pictures to a USB flash drive. Click to view the pictures in a slide show. 3. Press button to exit the preview control window and go back to the picture search window. Press button to pause, press to resume slide show. Press button to display previous snapshot or group of snapshots, press to display the next snapshot or group of snapshots.
USER MANUAL Chapter 7 Remote Access via Web Client The NVR can be remotely accessed in various ways on a Windows PC or a Mac. The methods are as follows: • Internal local network o Internet Explorer using local IP address of NVR o Speco Gray Viewer (included on CD or download) application using local IP address of NVR or P2P ID of NVR o • Speco Gray Viewer plug-in for Safari on Mac using local IP address or P2P ID External o Internet Explorer: go to http://gray.specotech.
USER MANUAL MAN Display Resolution 1280*1024 1920*1080 Windows 7 or above OS Mac OS X® 10.9 or above DirectX DirectX 11 Direct3D Acceleration Function Ethernet Adapter 10/100/1000M Ethernet Adapter IE Microsoft Internet Explorer (Ver. 11,10,9,8). Mac Safari 5.1 or above in Download and Installation 7.2 Web Plug-in For IE: 1. Launch IE on the PC and enter the NVR IP address or DDNS domain name (Host Name) in the address field. Active-X plug-in in will need to be installed. installed Click 2.
USER MANUAL MAN in, close and launch the browser again, and repeat step 1 to open the login 3. After installing the plug-in, page. Enter the user name and password to log in in. For Mac Safari: 1. Launch Safari and enter the NVR IP address or DDNS domain name (Host Name) in the address field. in (a .dmg file). Navigate to the downloaded file and double click on it. 2. Download the plug-in 3. Click on "Continue" --> "Install".
USER MANUAL MAN 2 1 3 4 4. Close Safari and open it again to repeat step 1 to open the Web Client login page.
USER MANUAL MAN 7.3 Web Client Manager The system can be fully controlled through the web client interface interface. 7.3.1 Live Interface 1 3 2 4 5 6 8 7 1- Channel List: Open the channel list for quick camera function Click to display the Channel List. Click to hide the Channel List. Turn the Live video stream on/off. The button is in blue color if the live video stream is on. Manual Recording buttons. Click to start manually recording live stream video. Click again to stop top recording.
USER MANUAL MAN Manual snapshot button. Click to save a snapshot of the current live display to the computer. Bitrate button. Set camera to use the main stream, sub stream or mobile stream.. stream 2- Live Video Stream Options: Main stream: View all live videos using high high-quality main stream video settings. Sub stream: View all live videos using middle middle-quality sub stream video settings.
USER MANUAL MAN 7- Live View Control Buttons: Open the images on Live window. Close all Live channels Original Proportions: Shows live video at the original proportions Stretch: Stretch live video to fit the full area for each channel on screen. To enlarge the web client to full screen. Manual Recording: Click to start manually recording for all displayed channels. Click again to stop recording. Manual recordings are saved to the computer.
USER MANUAL MAN 7.3.2 Playback Search & play recording videos stored on the HDD of the NVR,, and download the videos to the computer. To search recordings: 1. Click Playback in the top-right right corner of the window. 2. Select a day on the calendar to search for recordings from. Days with recordings appear with a red underline. 3. Select the recording type to search for from the drop down next to Type,, or select All to search for all recordings. 4. Choose the video stream type to search & play.
USER MANUAL MAN 7.3.2.1 Playback Control Buttons Play the recordings Pause Stop frame-by-frame through playback. Only available if the Go Forward One Frame: Move frame Synchronous playback option is not checked. Click on one of the channels which is being played and then click record to record the current video to the computer. Click again to stop recording. Click on one of the channels which is being played and then click button to take a snapshot and save to the computer.
USER MANUAL MAN Choose the files to download and press Start Download button to begin. The he download status will show. Press Stop Download to stop. Playback Speed. Click to choose the playback speed. Play All Channels: Click to play all channels that were chosen. Only available when the Synchronous playback option is not checked. Stop All Channels: Click to stop playing all channels. Only available when the Synchronous playback option is not checked.
USER MANUAL 7.3.3 Remote Setting Remotely configure the settings of the NVR. See “Chapter 5 NVR System Setup” for more details on the NVR settings..
USER MANUAL MAN 7.3.4 Local Setting Set download locations for recordings and snapshots taken using Web Client, and choose the file type for video files. Record Path: Click to browse for and select the folder for the manual video recordings to be saved on the computer. Download Path: Click to browse for and select the folder for the downloaded files to be saved on the computer. Snapshot Path: Click to browse for and select the folder for the snapshots to be saved on the computer.
USER MANUAL MAN Chapter 8 Viewing Exported Video on PC/Mac Playing exported video files can be accomplished with the included video player player. Install the video player that’s on the CD. For Windows, choose the .exe file. For Mac, choose the .dmg file. file After installation, follow the instructions below. 1. Run the Video Player. 2. Copy the backup files to the computer if desired or leave them on the flash drive. 3.
USER MANUAL MAN Video Player Control 6 5 1 2 3 4 1. Play List Add files Remove files To choose play mode: play a single file and stop; play all listed files by sequence; repeat one file; repeat all files. Filter by file name 2. Hide/Show Playlist Click to open files or load a folder.
USER MANUAL MAN 3. Play Controls Play Pause Stop Play frame by frame. Click once to play a frame of the video Slow Play, 1/2, 1/4 and 1/8, 1/16 speed Fast Forward, x2, x4, x8 and x16 4. Volume control Multi-screen screen play. It allows for playing multiple videos simultaneously. 5. Take snapshot Save ave a video clip to your computer. Press once to start, press again to end the video clip. Keep the video player on top Enlarge the video play screen to full screen 6.
USER MANUAL MAN top mode Basic Settings: Set on-top Capture Settings: Set the format and the path to save snapshots.
USER MANUAL Chapter 9 Appendix 9.1 Troubleshooting 1. Q: What can I do if the system does not detect the HDD? A: Check if the power supply system is properly connected and data cord and power cable are securely connected, and if something is wrong with the HDD interface. 2. Q: I have changed the password but forgot the new password, how can I access the system? A: Contact support for a password reset. 3.
USER MANUAL A: Please check if the network connection settings are correct and RJ-45 port is with good contact. Check if the user credentials are correct. 10. Q: Why can’t I stop recording by pressing the “STOP” button or click “Stop Recording”? A: Pressing Stop or Stop Recording can only stop manual record. If you want to stop Scheduled recording for specific time period, please change the schedule setting.