Wide Dynamic Range Dome Camera CVC624WDR 200 N New Hi Highway h Amityville, NY 11701 631-957-8700 www.specotech.
WARNING & CAUTION CAUTION RISK OF ELECTRIC SHOCK DO NOT OPEN CAUTION : TO REDUCE THE RISK OF ELECTRIC SHOCK DO NOT REMOVE COVER (OR BACK). NO USER SERVICEABLE PARTS INSIDE REFER SERVICING TO QUALIFIED SERVICE PERSONNEL.
CONTENTS Package Contents 4 Precautions 5 Camera Installation 6-7 Features 8 OSD Menu Tree 9 OSD Menu Details 10-12 Troubleshooting 13-14 Specifications 15 Dimensions 16 Warranty 17 3
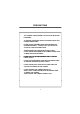
PACKAGE CONTENTS Please make sure that the following items are included in the package: 1 CVC624WDR Camera 2 Mounting Screws 1 Video Test Connector Please leave this manual with the end-user for future reference.
PRECAUTIONS • THIS CAMERA SHOULD BE ONLY INSTALLED BY QUALIFIED PERSONNEL • TO PREVENT A FIRE OR ELECTRICAL HAZARD PLEASE USE PROPER POWER CABLE • DO NOT CLEAN THE DOME COVER WITH AN ABRAISIVE CLEANING MATERIAL - PLEASE USE A SOFT CLOTH OR TISSUE TO CLEAN THE DOME COVER • THERE ARE NO USER-SERVICEABLE PARTS INSIDE.
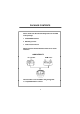
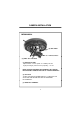
CAMERA INSTALLATION CONNECT POWER CABLE 1. WHEN USING 12 VOLTS DC (constant voltage 500 mA) Power Input :RED Center : (+) DC 12V Power Supply 2. CONNECT VIDEO CABLE -CONNECT CONNECT BNC CABLE TO THE BNC JACK JACK.
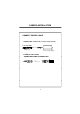
CAMERA INSTALLATION MECHANICAL (2) JOY STICK (1) Vari-focal Lens (3) Video Test Terminal (1) VARI-FOCAL LENS Adjust between TÅÆW (TELE ÅÆ WIDE) to set the angle (focal length). Set the focus by adjusting ∞ÅÆN NOTE: BOTH OF THE ABOVE ADJUSTMENTS GET LOCKED INTO POSITION THROUGH THE USE OF "LOCKING HANDLES".
FEATURES 1. Superior Wide Dynamic Image Quality It has very Wide Dynamic Range by using the Pixim ORCA Chip Set. Film-like colors are achieved under various Light conditions even in High Dynamic range scenes , Dynamic Range achieves a maximum of 120dB. 2. Digital Pixel System 2 Each pixel is processed independently to get clear and usable images. 3.
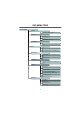
OSD MENU TREE SPECO MAIN MENU PRESETS DEFAULT / INDOOR / OUTDOOR / CUSTOM SET UP ID DISPLAY ID : (OFF / ON) CAMERA ID : 8 CHARACTER ID POSITION : (UP-LEFT / UP-CENTER / UP-RIGHT DOWN-LEFT / DOWN-RIGHT) LENS SELECT DC MANUAL WDR AUTO OFF MANUAL : (WDR BIAS Range -20 to 20 / WDR RANGE 0 to 36) WB CONTROL ATW(Range 2K~11K) AWB MANUAL (Range 2K ~11K) LOW LIGHT SLOW SHUTTER : (SHUTTER LIMIT Range OFF~X32 / AGC CONTROL Range 0 to 60) AUTO D/N SPECIAL VIDEO : (NTSC / PAL) FLIP : (OFF / ON) SYNC : (L,LOCK /
OSD MENU DETAILS 1. OSD MENU ENTER / EXIT A. OSD MENU ENTER • Push Center Key for 2 seconds B. OSD MENU EXIT • Press EXIT Menu from Main Menu • If Pressing Set Key for 2 seconds from Main Menu appears. In this case, just press Set Key. C. 'SAVE' and 'QUIT‘ • Left or Right Key - Selecting Menu • Up or Down Key - Returning to Menu 1. Press the SET key to access the main setup mode. 2. Select the desired feature using the UP or Down key. 3 Change the status of the selected feature using the LEFT or 3.
OSD MENU DETAILS C. LENS • MANUAL : Use Manual lens Only. D. WDR • WDR (Wide Dynamic Range) : You can adjust the desired WDR BIAS from -20 to 20 and WDR RANGE from 0 to 36 E. WB CONTROL E • ATW (Auto Tracking White Balance) : The camera automatically control the white balance in any environment. • AWB (Auto White Balance) : The white balance is automatically adjusted in a specific environment. • MANUAL : Users can adjust the colors by adding or reducing the WB level.
OSD MENU DETAILS • BACK LIGHT : BACK LIGHT ADJUST or SELECT AREA • RESOLUTION : Select Resolution of CCD or PIXIM • COLOR MODE : COLOR or B/W SELECTION • SHARPNESS : ON (You can adjust the desired Sharpness form 8 to 8) or OFF H. EXIT MENU • EXIT NO CHANGES : No change • SAVE NEW AND EXIT : Save change • RESTORE FACTORY SETTINGS : Factory default • RELEASE VERSION I.
TROUBLESHOOTING If you have trouble operating your camera, camera refer to the following Problem Nothing appears on the screen. Solution ● Check that the power cord and line connection between the camera and monitor are correct ● Check that y you have properly p p y connected VIDEO cable to the camera VIDEO output jack. The image on the screen is dim. ● Is the lens stained with dirt? Clean your lens with soft clean cloth. ● Set the monitor for the proper conditions.
TROUBLESHOOTING Problem Solution The color of the picture is not proper. ● Check that you have properly set the ‘ WHITE BALANCE ’ menu The image on the screen flickers. ● Is the camera facing to direct sunlight or fluorescent lighting? Change the camera position.
SPECIFICATIONS Signal g System y NTSC Pick-up Device 1/3 inch Pixim ORCA CMOS (Dramatic Dynamic range sensor) Total of pixels 742(H) x 552(V) Horizontal Resolution 540 Horizontal TV Lines (color) Vertical Resolution 460 VTVL Scanning System 525 Iines interlaced / 625 Iines interlaced Synchronization Internal Video Output 1.0Vp-p/75 ohm Composite Sensitivity 0.08Lux (DSS on) with F1.
DIMENSIONS * SIDE VIEW * TOP VIEW 16
WARRANTY 17
MEMO
MEMO
0 New Highway Amityville, NY 11701 631-957-8700 www.specotech.com Rev. 100317 Speco Technologies is constantly developing product improvements. We reserve the right to modify product design and specifications without notice and without incurring any obligation.