Intensifier Series Camera HT-INTT5 200 New Highway Amityville, NY 11701 631-957-8700 www.specotech.com Please read this manual thoroughly before operation and keep it handy for further reference.
Contents Features 3~4 Precautions 5~6 --------------------------7 Operating Your Camera * SET UP----------------------------------------------------------------9~11 * SET UP LENS-----------------------------------------------------------12 * SHUTTER SPEED CONTROL ---------------------------------13~16 * BACK LIGHT-------------------------------------------------------------17 * AUTO GAIN (AGC) ----------------------------------------------------18 * WHITE BALANCE -------------------------------------
Features ♣ SLC ( Speco Light Compensation ) When the image is in front of strong background lighting, your camera allows you to get the best image. ♣ INTENSIFIER ♣ OSD Gives you full control of the camera’s advanced functions. ♣ REDUCE NOISE 1/3 inch density CCD and digital processor permit high quality pictures to be captured in very low light conditions. ♣ High Resolution A DSP chip removes image noise efficiently and shows a clean image in low light conditions.
Precautions * Do not install the camera in extreme temperature conditions. - Only use the camera under conditions where temperatures are between -10℃ and +50℃. Be especially careful to provide ventilation when operating under high temperatures. * Do not drop the camera or subject them to physical shocks. -It can cause malfunctions to occur. * Do not expose the camera to radioactivity. * Do not install or use the camera in an environment where the humidity is high.
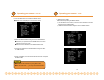
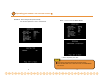
Operating your camera ◈OSD Menu Setting ◈Functions SET UP MENU LENS OPTION ●DC ●MANUAL 1.
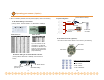
Operating your camera ( Option ) 1. When controlled by RS-485, Pelco-D protocol (Option), refer to the following. •Please Observe Polarity! C. System Integration A. DIP Switch Setting on the Camera 485(+) (Factory default : Camera Address = 01, Baud Rate = 2400bps) 485(-) ① Receiver ② Monitor Multiflexer IR Remote Controller CCD Camera D. IR Remote Controller ( Optional ) - Can call and control each camera on the monitor by the following.
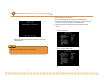
Operating your camera - SET UP 1. Press the SET button to access the SETUP mode. ●SETUP menu is displayed on the monitor screen. Operating your camera - 1) Setting up the LENS Select the lens pressing the RIGHT button. ① On the SETUP menu screen, move the arrow indicator to the lens using the UP or DOWN button. ② Select the desired feature using the LEFT or RIGHT button. 2. Select the desired feature using the UP or DOWN button.
Operating your camera – SHUTTER SPEED CONTROL① 2) Shutter status and speed control You can control brightness of the screen by the shutter speed. ① Press the SET button to display the setup menu and move the arrow indicator to ‘SHUTTER’ using the UP or DOWN button. ② Set ‘SHUTTER’ to the desired mode using the LEFT or RIGHT button. ▶OFF : Deactivation ▶When DC LENS selected, press SET button to control the BRIGHTNESS.
Operating your camera –SHUTTER SPEED CONTROL ② ▶MANUAL : When setting shutter speed manually. You can select speed from ‘1/60’ to ‘1/200,000’sec ▶ELC : You can control the BRIGHTNESS. ③ When completed, press ‘SET’ Notes ●Avoid pointing the camera directly at a fluorescent lamp. ●When the SHUTTER menu is set to FLK mode, the INTENSIFIER will not work.
Operating your camera - BACKLIGHT 3) SLC (Speco Light Compensation) - BACKLIGHT A built-in SR chip provides intelligent light level control to overcome severe Backlight conditions. ① Press the SET button to display the SETUP menu and move the arrow indicator to ‘SLC’ using the UP or DOWN button. ② SET ‘SLC’ to the desired mode using the LEFT or RIGHT buttons. ▶OFF ▶LOW ▶MIDDLE 17 ▶HIGH 4) AUTO GAIN (AGC) AGC allows a brighter picture in low light conditions.
Operating your camera - WHITE BALANCE 5) WHITE BALANCE ① Press the SET button to display the SETUP menu and move the arrow indicator to ‘WHITE BALANCE’ using the UP or DOWN button. ② Set ‘WHITE BAL.’ to the desired mode using LEFT or RIGHT button. ▶MANUAL : To fine adjust, select the Manual mode. You can increase or decrease the red or blue factor while monitoring the difference on the screen. Set to ‘MANUAL’ mode and press the SET button.
Operating your camera - Operating your camera - DNR 6) REDUCE NOISE (Dynamic Noise Reduction) DNR reduces the video noise on the screen. ① Press the SET button to display the SETUP menu and move the arrow to ‘REDUCE NOISE’ using the UP or DOWN button. ② SET ‘REDUCE NOISE’ to the desired mode using the LEFT or RIGHT button. INTENSIFIER 7) INTENSIFIER Allows you to get clear images under night or low light conditions.
Operating your camera - CAMERA TITLE① 8) NEXT PAGE ① Press the SET button to display the SETUP menu and move the arrow indicator to ‘NEXT PAGE’ using the UP or DOWN button. ② SET ‘NEXT PAGE’ to the desired mode using the LEFT or RIGHT button. (1) CAMERA TITLE ① Press the SET button to display the SETUP menu and move the arrow indicator to ‘CAMERA TITLE’ using the UP or DOWN button. ② SET ‘ON’ using the LEFT or RIGHT button.
Operating your camera – COLOR/SYNC (2) COLOR : You can choose color and B/W mode electronically. ① Press the SET button to display the setup menu and move the arrow indicator to ‘COLOR’ using the UP and DOWN button. ② SET ‘COLOR’ to the desired mode using the LEFT or RIGHT button. (3) SYNC : Two SYNCHRONIZATION modes are available INTERNAL and EXTERNAL LINE-LOCK. ① Press the SET button to display the setup menu and move the arrow indicator to ‘SYNC’ using the UP and DOWN button.
Operating your camera – MOTION DETECTION (4) Whenever your camera detects motion, THE WORDS “motion detected’ will appear on the screen. ① Press the SET button to display the setup menu and move the arrow indicator to ‘MOTION’ using the UP and DOWN button. ② SET ‘MOTION’ to the desired mode using the LEFT or RIGHT button. Max. Min. ▶OFF : Deactivation ▶ON : MOTION. activated -Press SET button. -Move the arrow indicator to ‘AREA SET’ using UP and DOWN button, and then press the SET button.
Operating your camera - PRIVACY (5) PRIVACY : To mask area which you want to be private. ① Press the SET button to display the setup menu and move the arrow to ‘PRIVACY’ using the UP and DOWN button. ② SET ‘PRIVACY’ to the desired mode using the LEFT or RIGHT button. Operating your camera - MIRROR (6) REVERSE ① Press the SET button to display the setup menu and move the arrow indicator to ‘REVERSE’ using the UP and DOWN button. ② SET ‘REVERSE’ to the desired mode using the LEFT or RIGHT button.
Operating your camera - SHARPNESS (7) DETAIL ① Press the SET button to display the setup menu and move the arrow indicator to ‘DETAIL’ using the UP and DOWN button. ② SET ‘DETAIL’ to the desired mode using the LEFT or RIGHT button. Operating your camera - RESET/RETURN (8) DEFAULT : Use to reset your camera to FACTORY DEFAULT SETTING. (9) PAGE 1 : Save the setting of NEXT PAGE function, and then move to SET UP menu.
Troubleshooting If you have trouble operating your camera, refer to the following. Problem Solution Solution Problem ●Check that the power cord and line are properly connected. ●Check that you have properly connected the VIDEO cable the camera VIDEO output jack. The color of the picture is not matched. ●Check that you have properly set the ‘WHITE BAL’ menu The image on the screen flickers. ●Is the camera facing to direct sunlight or fluorescent lighting? Change the camera option.
DIMENSIONS SPECIFICATIONS ITEM HT-INTT5 Power Source DC 12V & AC 24v ( Dual Voltage ) Power Consumption 280mA(DC) / 3.8W(AC) I mage Sensor 1/3”, SONY SUPER HAD CCD, Total Pixels 811(H) x 608(V) , 1/3” CCD Effective Pixels 768(H) x 494(V) , 1/3” CCD LENS Type C & CS MOUNT ( OPTIONAL) Maximum Aperture Ratio N/A Scanning System 2 : 1 Interlaced 525 Lines / 60 Fields / 30 Frames Synchronization Internal / Line Lock selectable Video Output 1.
WARRANTY 37