INSTRUCTION MANUAL 550 Line Color Dome Camera Focus Free CVC6146SCSFF Speco Technologies is constantly developing product improvements. We reserve the right to modify product design and specifications without notice and without incurring any obligation. Rev.
CAUTION CAUTION CAUTION RISK OF ELECTRIC SHOCK DO NOT OPEN RISK OF ELECTRIC SHOCK RISK OF DOELECTRIC NOT OPENSHOCKCAUTION:TO REDUCE THE RISK OF ELECTRIC SHOCK DO NOT OPEN DO NOT REMOVE COVER(OR BACK). CAUTION:TO REDUCE THE RISK OF ELECTRIC SHOCK USER-SERVICEABLE PARTS INSIDE. CAUTION:TO REDUCE THE RISK OF ELECTRIC NO SHOCK DO NOT REMOVE COVER(OR BACK). DO NOT REMOVE COVER(ORREFER BACK).SERVICING TO QUALIFIED SERVICE PERSONNEL. NO USER-SERVICEABLE PARTS INSIDE. NO USER-SERVICEABLE PARTS INSIDE.
Contents Contents 3 Precautions 4 Sefety Instructions 5 SPECIFICATIONS 6 General Features 7 Menu Set Up 8 ▶Menu Set Up ▶Lens Set Up ▶Exposure ▶Back Light ▶D-WDR ▶White Bal.
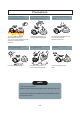
Precautions Do not install the camera in extreme temperature conditions. Only use the camera under conditions where temperatures are between -10°C and +50°C. Be especially careful to provide ventilation when operating under high temperatures. Never keep the camera pointed directly at strong light. It can cause malfunctions to occur. Do not install the camera under unstable lighting conditions. Severe lighting change or flicker can cause the camera to work improperly.
Sefety Instructions Precautions for use ◑ This camera should be installed by qualified personnel only ◑ There are no user serviceable parts inside ◑ Do not disassemble this camera other than to make initial adjustments ◑ Use a UL approved regulated 24 volt AC or 12 volt DC power supply ◑ Use appropriate low voltage power cable to prevent fire or electrical shock ◑ Please insure that your installation area can support the weight of the camera Please handle this camera carefully : ◑ Do not use a strong
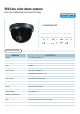
550 Line color dome camera Focus free AI Motorized zoom Lens(2.8-10mm) Focus Free ■ CVC6146SCSFF 0.00001LUX x256 550 SPECIFICATIONS MODEL Sensor Total Pixels Effective Pixels Scanning System Synchronization O.S.D Backlight Resolution S/N (Y signal) Min.
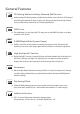
3D-DNR DSP General Features 3D-DNR DSP Digital Noise 3D-DNR Reduction 3D-DNR DSP 3D Filtering Method of Newly Advanced DNR Function ☞ Newly developed 3D filtering enhances Digital Noise reduction at low light levels.
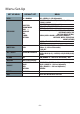
Menu Set-Up SET UP MENU LENS DEFAULT SET DC / MANUAL EXPOSURE SHUTTER BRIGHTNESS AGC: --SENS-UP BLC D-WDR RETURN WHITE BAL. ATW DAY / NIGHT.
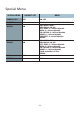
Special Menu SPECIAL MENU DEFAULT SET MENU CAMERA TITLE OFF ON / OFF D - EFFECT ON FREEZE / MIRROR/ D-ZOOM/ GAMMA/ NEG.
Menu Set Up Menu items can be selected by using the OSD buttons of the camera 1. Press the Set Up button. * The Set Up menu will be displayed on the monitor. SETUP LENS EXPOSURE WHITE BAL DAY / NIGHT 3DNR SPECIAL ADJUST RESET EXIT DC ATW COLOR ON 2. Move and select the required function using the Up and Down button. * Move the arrow indicator Up or Down to select the desired feature by pressing the Up or Down button.
3. Changing menu settings using the Left or Right button. * Available values or Status are displayed by pressing the Left or Right buttons. Press the button until desired value / status is displayed. 4. After completing the setting move the arrow indicator to EXIT and press the SET button to EXIT. NOTE * Move to the available submenu by moving arrow to desired feature. * Submenu is not available when this symbol is display "- - - -" Lens 1.
NOTE * When DC is selected, the brightness can be adjusted. The brightness control range is 1 ~ 100. Lens BRIGHTNESS RETURN 100 3. Press the RETURN to return to the SETUP menu. Exposure This function is used to select Automatic or Manual shutter speed control. 1. On the Set Up menu screen select EXPOSURE by using the Up or Down button. 2. Select the desired shutter mode by pressing the Left or Right button.
EXPOSURE SHUTTER BRIGHTNESS SENS-UP BLC D-WDR RETURN FLK ---HIGH AUTO BLC OFF NOTE * To produce better results with FLK, do not use it in conjunction with the WDR mode in the BACKLIGHT menu. * Desired shutter speed can be selected by user 1/60, 1/250, 1/500, 1/2000, 1/5000, 1/0000, 1/100000, FLK . * Brightness just can operate when selected the Manual mode(Option), When selected DC mode, brightness will be disabled .
* RETURN: Select Return to save the changes in the EXPOSURE menu and retun to the SETUP menu. NOTE * Pressing the SET button in AUTO mode allows adjustment of image brightness by increasing or decreasing the shutter speed (x2 ~x258). * The higher the level, the brighter the image becomes, but it is possible that an after image (ghosting) could appear. * When SENS-UP is activated the increased magnification can induce noise and pixelation; this is quite normal.
BLC ON BLC OFF 3. Select a mode using the Left and Right buttons then press the SET button. Select BLC to adjust the desired BLC area and GAIN level. * GAIN : Adjust the BLC sensitivity by selecting LOW, MIDDLE or HIGH. * DEFAULT : Press the Default to back to the factory default when input the wrong data . ① Move the arrow indicator to select the WIDTH of cells to increase or decrease by using the Left / Right button from 0 ~ 7 cells.
* Move the arrow indicator to RETURN and press the Set Up button after complete the BLC area set to return to EXPOSURE menu. 4. Select HSBLC(High Suppress Backlight Compensation) by using the Left and Right buttons then press the Set Up button to set up the desired HSBLC area and GAIN level. HSBLC OFF HSBLC ON * LEVEL : Adjust the HSBLC sensitivity by selecting between 0~8. * DEFAULT : Press the Default to return to the factory default when input the wrong data .
D-WDR(digital WDR) This camera provides intelligent light level control to overcome even strong backlight conditions. 1. Move the arrow indicator to D-WDR using the Up or Down button on the EXPOSURE menu screen. 2. Select the desired feature by using the Left or Right button.
White Balance The White Balance function is used to control the “on-screen” color. 1. Move the arrow indicator to WHITE BAL on the SETUP menu screen using the Up and Down button. 2. Select the desired mode by using the Left or Right button. SETUP LENS EXPOSURE WHITE BAL DAY / NIGHT 3DNR SPECIAL ADJUST RESET EXIT DC ATW COLOR ON * There are three user selectable White Balance settings available.
Day / Night Picture can be displayed in either color or black and white. 1. Select DAY / NIGHT using the Up or Down button on the SETUP menu screen. SETUP LENS EXPOSURE WHITE BAL DAY / NIGHT 3DNR SPECIAL ADJUST RESET EXIT DC ATW COLOR ON 2. Select the desired mode using the Left and Right buttons. * COLOR : The picture is always displayed in color. * BW : The White Balance is automatically adjusted in a specific environment.
3. Select the desired mode and set the values by using the Left or Right button . * DELAY : The range can be adjusted between 0 ~ 63. * S - LEVEL : The start level can be adjusted between 0 ~ 100. * E - LEVEL : The end level can be adjusted between 0 ~ 100. 3DNR 3DNR is used to reduce the level of background noise in a low luminance environment. 1. Move the arrow indicator to 3DNR by using the Up and Down button. SETUP LENS EXPOSURE WHITE BAL DAY / NIGHT 3DNR SPECIAL ADJUST RESET EXIT DC ATW COLOR ON 2.
Special 1. When the SETUP menu screen is displayed, select SPECIAL using the Up and Down buttons. SETUP LENS EXPOSURE WHITE BAL DAY / NIGHT 3DNR SPECIAL ADJUST RESET EXIT DC ATW COLOR ON 2. Select one of the mode using the Up and Down button. SPECIAL 1. CAM TITLE OFF OFF 2. D - EFFECT 3. MOTION OFF OFF 4. PRIVACY OFF OFF 5. SYNC OFF OFF 6. RETURN 1. CAM TITLE : When input, the Camera ID is displayed on the monitor.
NOTE * When CAMERA TITLE is set to OFF, the CAMERA TITLE is not displayed on the monitor. 3) Press the SETUP button. CAMERA TITLE 0123456789 ABCDEFGHIJKLM NOPQRSTUVWXYZ ▷ → ← ↑ ↓ ( ) ㅡ_□ / = & : ~ , . ← → CLR POS END 1-4) The CAMERA TITLE can be up to 15 alphanumeric characters in length. ① Move the cursor to choose an alphanumeric character. CAMERA TITLE 0123456789 ABCDEFGHIJKLM NOPQRSTUVWXYZ ▷ → ← ↑ ↓ ( ) ㅡ_□ / = & : ~ , .
NOTE * In cases where the wrong Camera ID has been input........ Move the cursor to CLR and press SETUP button to erase characters from left to right, and repeat the above steps to input the characters again. 1-5) To select the position where the Camera ID should be displayed on the screen. ① Move the cursor to POS and press the SET button. CAMERA TITLE 0123456789 ABCDEFGHIJKLM NOPQRSTUVWXYZ ▷ → ← ↑ ↓ ( ) ㅡ_□ / = & : ~ , . ← → CLR POS END ② Created camera ID is displayed.
③ Select a new position by using the four CAM1 directional button, Press the SET button to confirm the position. 2) D - EFFECT Move the cursor to D-EFFECT and press the SET button to set the other image functions. SPECIAL 1. CAM TITLE OFF OFF 2. D - EFFECT 3. MOTION OFF OFF 4. PRIVACY OFF OFF 5. SYNC OFF OFF 6. RETURN 2 -1) FREEZE : Image freezing or moving Image D-EFFECT 1. FREEZE OFF 2. MIRROR V-FLIP 3. D-ZOOM OFF 4. GAMMA 0.45 5..
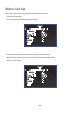
2 -2) MIRROR : Flip the image horizontally on the screen. D-EFFECT 1. FREEZE OFF 2. MIRROR V-FLIP 3. D-ZOOM OFF 4. GAMMA 0.45 5. RETURN * V-FLIP : Flip the image vertically on the screen. * ROTATE : Flip the horizontal image vertically on the screen. * OFF : Disabled. MIRROR ON MIRROR OFF 3) D - ZOOM: Digital zoom available, range x1 ~ x32. PAN : The pan range can be controlled between -10 ~ + 100 TILT : The tilt range can be controlled between -10 ~ + 100 D-ZOOM D-ZOOM x 2.
NOTE * PAN and TILT function should be available when using the digital zoom. 2-4) GAMMA : Desired gamma values can be adjusted between 0.05 ~ 1.00. 2-5) RETURN : Move the arrow indicator to RETURN after complete the setup to return to SPECIAL menu. 3. MOTION MOTION AREA SELECT AREA DISPLAY LEFT / RIGHT WIDTH TOP / BOTTOM HEIGHT SENSITIVITY RETURN AREA ON 100 100 100 100 40 3-1) When the special menu screen is displayed, use the Up or Down botton to access the MOTION menu.
⑤ Move the arrow indicator to select the SENSITIVITY to increase or decrease by using the Left / Right button between the level 0 ~ 40. RETURN : Move the arrow indicator to RETURN after complete the setup to return to SPECIAL menu. 4. PRIVACY Hide an area you want to hide on the screen. 4-1). When the SPECIAL menu screen is displayed, press the Up and Down buttons to set to PRIVACY. SPECIAL 1. CAM TITLE OFF ON 2. D - EFFECT 3. MOTION OFF OFF 4. PRIVACY OFF ON 5. SYNC OFF OFF 6. RETURN 4-2).
③ Move the arrow indicator to WIDTH to make desired width of cells to increase or decrease by using the Left / Right button between the level 0 ~ 100. ④ Move the arrow indicator to HEIGHT to make desired height of cells to increase or decrease by using the Left / Right button between the level 0 ~ 100. ⑤ Move the arrow indicator to the LEFT / RIGHT and TOP / BOTTOM to select the desired area positon by using the LEFT or RIGHT button.
2. Select the desired mode by using Up or Down button.. ADJUST SHARPNESS - - - - - - - -100 BLUE - - - - - - - -100 RED - - - - - - - -100 RETURN SHARPNESS : Improving image clarity. The level can be adjusted to obtain an improved image. However, when the level is set too high it can distort the image or cause noise. * Select BLUE or RED to increase or decrease the value of R-Gain(RED) and B-Gain(BLUE) while monitoring the color of the image.
Trouble Shooting PROBLEM Northing appears on the screen. POSSIBLE CAUSE ☞Check the power cable, power supply output and video connection between the camera and monitor. ☞Are the camera lens or the lens glass dirty? The image on the screen is dim. Clean the lens / glass with a soft clean cloth. ☞Adjust the monitor controls, as required. ☞If the camera is facing a very strong light, change the camera position. ☞Adjust the lens focus. The image on the screen is dark.
PRODUCT WARRANTIES AND INFORMATION EFFECTIVE JULY 8, 2008 POLICY, TERMS AND CONDITIONS OF SALE This statement of policy is in lieu of any other policy, expressed or implied, and no representative or person is authorized to assume for us any other liability or policy without our written consent. We cannot be held responsible for typographical errors.
200 New Highway Amityville, NY 11701 631-957-8700 1 800 645 5516 www.specotech.