
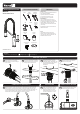
Installation Sheet


19
ADJUST
TEMPERATURE
TO ADJUST TEMPERATURE
To adjust the temperature of water exiting
the Faucet, place Handle in the open
position, and rotate the Handle forward or
rearward.
A
B
REVERSAL OF TEMPERATURE ADJUSTMENT
20
This Faucet has the ability for the user to choose the temperature adjustment direction of the
Handle. If the installed temperature adjustment direction of the Handle is opposite from your
preference (Cold when handle is rotated forward, Hot when rotated rearward, or vice versa). Turn
OFF the water supplies and reverse the Inlet Hose connections.
21
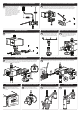
NOTE: SENSOR FAUCET WILL ONLY OPERATE
WITH THE HANDLE IN THE “OPEN” POSITION.
DAILY OPERATION
Place Handle in the “OPEN” position.
Activate Faucet and adjust flow and
temperature to desired settings. Wave
Hand across Sensor Eye again to turn off
Faucet. Leave Handle in the set position
for next use.
1
In the unlikely event of the Sensor or Solenoid not working properly, a Manual Bypass switch is
located on the Solenoid Box. To bypass the Solenoid control, simply turn off water supply and
rotate the dial with a coin counterclockwise until it stops.
2
When Manual Bypass is engaged, the
Faucet will operate like a standard
non-sensor Faucet. Use the Handle to
operate.
3
MANUAL BYPASS
To disable the Manual Bypass, turn the
switch dial clockwise when the water
supply is shut off.
TROUBLESHOOTING
If water flow from the Faucet decreases:
1) Make sure the supply stops and the handle are fully open.
2) Remove the Aerator from the spout using the outlet wrench. Operate the Faucet with outlet device removed. If
water flow is acceptable, disassemble the outlet device and rinse components with clean water.
If no water flows from the Faucet, and If you can hear a clicking sound of Solenoid opening, but no water flows:
1) Verify that the HOT and COLD wall stops and the handle are completely open.
2) If the Battery Light within the Sensor Eye or Solenoid blinks continuously, even when the Faucet is not in use, the
batteries within the Solenoid have low voltage and need replacement.
3) Verify that the In-Line Filter in the Solenoid is not blocked by debris. Clean filter if needed.
If you do not hear a clicking sound of Solenoid opening and no water flows:
1)
Verify that there is no object within 2.5"(65mm) of the sensor window. If the Battery Light within the Sensor Eye blinks
continuously, even when the Faucet is not in use, the batteries within the Solenoid have low voltage and need replacement.
2) Unplug connections to Solenoid for 2 minutes. Plug connections back in. The red light on the Sensor should turn
on for several seconds before becoming operational. If not, check power supplies and connections.
3) Disconnect the existing Solenoid Assembly and connect a new Solenoid Assembly.
Activate the Sensor and check for water flow. If the water flows, the existing Solenoid Assembly should be replaced.
If the batteries have been replaced, but the Faucet still does not operate:
1) Check the battery polarity and electrical connections. Make sure all electrical connections are fully inserted.
2) If the Faucet does not operate, replace the existing Solenoid Assembly with one you know to be functioning.
If the water will not shut off:
1) Verify that the manual bypass located on the solenoid assembly is switched off
2) Let the faucet run for 240 seconds and the solenoid should automatically close.
3) If it is a new installation and still not working, replace the Solenoid Assembly.
QUESTIONS AND ANSWERS
Q. How does the Sensorflo
®
Faucet work?
A. It uses laser technology. The Sensor emits a non-visible beam of light.
Q. Is the Sensorflo
®
Faucet sensor beam adjustable?
A. No, the Sensorflo
®
Faucet sensor beam is not adjustable. It has been factory set to factory
specifications for these Faucets.
Q. The finish on my Faucet seems to be deteriorating. What can I do to prevent this from happening?
A. Many commercial cleaning products contain harsh chemicals and abrasives. These products should
not be used on any chrome-plated plumbing products. Please use only mild soap and water to clean
the Faucet. Dry immediately with a soft cloth.
Q. Is my Faucet protected from power surges?
A. Yes, Sensorflo
®
has been designed to have built-in power surge protection.
Q. If we lose power, do I have to do something to get the Faucet to operate again?
A. After a power outage, the Faucet is automatically ready for operation as soon as the power comes back on
.
Q. If I call a plumber to come and install this Faucet, will they know enough to hook it up?
A. Our installation diagrams are very easy to follow.
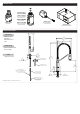
MAINTENANCE
1) Your SENSORFLO
®
Faucet is designed and engineered in accordance with the highest
quality and performance standards. With proper care, it will provide years of hygienic and
trouble-free service.
2) Periodically, the Faucet will require some minor maintenance to keep it at peak performance. There are
2 low battery indicator lights. One located on the Sensor on the Faucet body and the other located on
the Solenoid Box. When the low battery light on the Sensor blinks, it indicates that the battery is low.
However, the Solenoid can still function at this point. When the low battery light on the Solenoid blinks,
the Solenoid will stop functioning at this point and the batteries need to be replaced immediately. To
replace the batteries, follow the installation instructions in the electrical connections section of this
document.
3) Periodically clean the In-Line Filter.
4) The finish of your Faucet should be cleaned using mild soap and warm water.
5) Dry immediately with a soft, clean cloth for best results.
6) NEVER use abrasive cleaners, chemicals, alcohol or other solvents. They may damage the surfaces of
the non-chrome plated finishes.
PRODUCT WARRANTY
With exception of items listed below, this product has a limited warranty against defects in
materials or workmanship for the period listed below from the date of purchase.
Consumer/Residential: Limited Lifetime Warranty
Commercial Use: 5 Year Limited Warranty
Warranty is limited to replacement of defective components or units.
Associated replacement or repair labor costs are NOT included. This warranty only pertains to single
dwelling residential use. Products used for other than single dwelling residential use are covered by a 5
year limited warranty from the date of purchase.
CALIFORNIA PROPOSITION 65
CALIFORNIA PROPOSITION 65:
WARNING: This product can expose you to chemicals including lead, which is known to
the State of California to cause cancer and birth defects or other reproductive harm. For
more information go to www.P65Warnings.ca.gov.
Wash hands after installation, repair, or removal of this product.