
Installation Guide

1
B
C
OFF
A
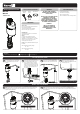
Turn OFF water supplies (A). Lift handle of
Filter (B). Rotate Filter counter-clockwise
while holding the Rotational Dial stationary
(C).
2
Once Filter is released, pull upward to
remove from the Fill Valve. Clean Filter by
rinsing under running water.
3
Clean Filter by rinsing under running water.
4
A
B
ON
C
FILTER MAINTENANCE
Insert the Filter into the Fill Valve while
aligning the Tabs (A). Rotate Filter
clockwise while holding the Rotational Dial
stationary until Filter locks into position
(B). Turn ON water supplies (C).
TROUBLESHOOTING
If water level is too high or too low in the tank:
1) Adjust water level by following the steps within the “WATER LEVEL ADJUSTMENT” section of this
document.
Fill Valve does not turn ON:
1) Verify that the wall supply is completely ON.
2) If the Fill Valve still does not operate, turn OFF the water supply and clean the Filter by following the
steps within the “FILTER MAINTENANCE” section of this document.
Fill Valve does not turn OFF
:
1)
Verify proper installation of the Refill Tube as shown in “Step 3.”
2) Verify proper water level adjustment as outlined in the
“WATER LEVEL ADJUSTMENT” section of this
document.
PRODUCT WARRANTY
With exception of items listed below, this product has a limited warranty against defects in
materials or workmanship for the period listed below from the date of purchase.
Consumer/Residential: 7 Year Limited Warranty
Commercial Use: 5 Year Limited Warranty
Warranty is limited to replacement of defective components or units.
Associated replacement or repair labor costs are NOT included. This warranty only pertains to single
dwelling residential use. Products used for other than single dwelling residential use are covered by a 5
year limited warranty from the date of purchase.
CALIFORNIA PROPOSITION 65
CALIFORNIA PROPOSITION 65:
WARNING: This product can expose you to chemicals including lead, which is known to
the State of California to cause cancer and birth defects or other reproductive harm. For
more information go to www.P65Warnings.ca.gov.
Wash hands after installation, repair, or removal of this product.
COMPLIANCE
CONNECTIONS
ASME A112.18.1
7/8” Ballcock Inlet Size
Contractor to supply necessary
inlet connections.
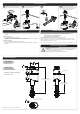
ROUGH-IN DIAGRAM
DIMENSIONS SUBJECT TO CHANGE WITHOUT NOTICE.
2
1
2
"
64mm
2
1
8
"
54mm
3
1
16
"
77mm
8 3/4in [223mm] MIN
12 1/2in [317mm] MAX
11
16
"
18mm
15/16-14 UNS-1
FIT 7/8" BALLCOCK
6in [150mm] MIN
9 5/8in [245mm] MAX
WATER LEVEL
R
7
8
"
22mm