
Installation Sheet

CPV-TP / CPV-TP-DV SERVICE INSTRUCTIONS
Service instructions
Caution- Any repair or servicing of the valve may affect the maximum hot temperature setting of the valve. After
working on the valve, make sure the maximum hot water temperature is set to the recommended setting of 110° F
maximum.
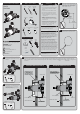
T/P Cartridge Removal
1) Shut off the hot & cold water supply integral stops at the valve. Remove valve trim from valve.
2) With the valve in the OFF position, remove the Bonnet by unthreading with an adjustable wrench. The cartridge
may come out with the bonnet.
3) If necessary, remove the cartridge from the valve body by pulling on the valve spindle of the cartridge. Make
sure the lower cartridge seal is installed in the bottom of the cartridge and not in the valve body. Inspect Lower
Cartridge Seal with Integral Screens to verify they are debris free. If debris is present, remove Lower Cartridge Seal
and clean Screen material.
4) Replace the necessary parts with new parts. When replacing the T/P cartridge, make sure that the Lower
Cartridge Seal is properly installed in the recesses on the bottom of the cartridge. This Lower Cartridge Seal is
positioned over the hot & cold inlet holes inside the body.
5) Make sure the large bonnet O-ring seal is installed and seated properly in the valve body. Reassemble the valve
bonnet by threading it into the valve body with an adjustable wrench. Important- Adjust the valve’s maximum hot
water temperature to the recommended setting of 110° F. See Step #15 of the installation instructions for the TLS
adjustment instructions.
6) Turn ON the hot & cold water supply integral stops. Check valve for leaks.
7) Reassemble the valve trim parts.
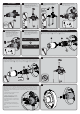
Spring Check Stop Parts Removal
1) Shut off hot and cold water supply valves to the integral stops of the valve. Remove valve trim from valve.
2) CLOSE integral stops by turning the stop spindles clockwise. Unscrew the stop’s retaining nut with wrench.
Carefully remove the retaining nut w/spindle, spring, and poppet assembly. Clean and/or replace the necessary
parts. Reassemble the parts, reversing the above procedure. Repeat procedure on the other stop.
3) OPEN the integral stops by turning the stop spindles counter clockwise. Turn on the hot and cold water supply
valves. Check for leaks.
4) Reassemble the trim parts.
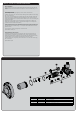
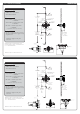
CPV-TP / CPV-TP-DV REPAIR PARTS
SPEAKMAN
®
I
ITEM #
P
PART #
D
DESCRIPTION
1 RPG05-0862 CHECK STOP REPAIR KIT
2 RPG05-1109 T/P CARTRIDGE
3 RPG49-0012 BONNET O-RING
4 RPG49-0011 LOWER CARTRIDGE SEAL
5 RPG05-0897 VOLUME CONTROL/DIVERTER CERAMIC REPAIR CARTRIDGE