
Installation Guide
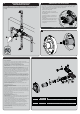

6 PIPE FITTING INSTALLATION
Connect the HOT and COLD Water Supply Lines ❷ (not included), the Shower Outlet Pipe ❸ (not included),
and Tub Outlet Pipe ❹ (not included), by threading them into the Valve Body ❶ in a clockwise direction.
Tighten the pipes to the Valve Body ❶ with a Pipe Wrench. Connect the Pipe Elbows ❺ (not included), to the
end of the shower outlet and tub outlet pipes. If performing a shower only installation, install Plug Cap ❻ in
place of tub outlet piping, as shown in STEP 5.
NOTE: The HOT water supply lines go into the H inlet, and the COLD water supply lines
go into the C inlet. Do not use PEX or CPVC between the valve and spout.
SHOWER ONLY
TUB + SHOWER
COLD
HOT
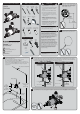
7 COPPER SWEAT INSTALLATION
When performing a Copper Sweat installation, it is recommended that you remove the Bonnet ❸ with O-Ring ❹, Valve
Cartridge ❺, Integral Stops ❻, and Diverter Cartridge ❷ (where applicable) to prevent damage during soldering. Use
a Slip Joint Wrench to unthread and remove the Bonnet ❸. Then remove Valve Cartridge ❺, from Valve Body ❼.
Unthread and remove the Integral Stops ❻ using a Socket Wrench equipped with a 9/16” (14mm) Deep Well Socket. If
your Shower Valve is equipped with an Integral Diverter, remove the Diverter Retaining Nut ❶ using a Socket Wrench
equipped with a 13/16” (20mm) Deep Well Socket. Remove Diverter Cartridge ❷ to prevent damage during soldering.
After soldering (STEP 8) is completed, reinstall the Valve Cartridge ❺, making sure that the mounting posts are aligned
and engaged to the corresponding holes in the Valve Body ❼, with the “H” marking to the left side as shown below.
Verify that the O-Ring ❹ is in place on the Bonnet ❸. Install Bonnet ❸ over the Valve Cartridge ❺ and thread onto the
Valve Body ❼. Tighten securely with Slip Joint Wrench on the machined flats of the Bonnet ❸. Final torque should be
150-168 in*lb. Take care to not over tighten connection or damage may occur. Reinstall the Integral Stops ❻ using a
Socket Wrench equipped with a 9/16” (14mm) Deep Well Socket. Final torque should be 70-106 in*lb. If your Shower
Valve is equipped with an Integral Diverter, reinstall the Diverter Cartridge ❷ taking care to align mounting posts of
Cartridge with the corresponding holes in the Diverter Valve Body. Install Diverter Retaining Nut ❶ and tighten with a
Socket Wrench equipped with a 13/16” (20mm) Deep Well Socket. Final torque should be 35-53 in*lb. Take care to not
over-tighten connections.
NOTE: Never install the valve body upside down!
Socket
Wrench
+
9/16” (14mm)
Deep Well Socke
t
13/16” (20mm)
Deep Well Socke
t
+
Normal Installation
(shown without Bonnet)
H
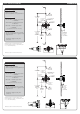
8 COPPER SWEAT FITTING INSTALLATION
Connect the HOT and COLD Water Supply Lines ❷ (not included), the Shower Outlet Pipe ❸ (not included),
and Tub Outlet Pipe ❹ (not included), by soldering them into the Valve Vody ❶. Connect the Pipe Elbows ❺
(not included), to the end of the shower outlet and tub outlet pipes. If performing a shower only installation,
install Plug Cap ❻ in place of tub outlet piping, as shown in STEP 5. Verify that all connections are soldered.
Reassemble Valve components as outlined in STEP 7.
NOTE: The HOT water supply lines go into the H inlet, and the COLD water supply lines
go into the C inlet. Do not use PEX or CPVC between the valve and spout.
SHOWER ONLY
TUB + SHOWER
COLD
HOT
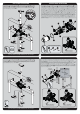
9 BACK-TO-BACK INSTALLATION
Your Shower Valve has the ability to be mounted back-to-back with another Valve in a shared space. This means the HOT
and COLD inlets may be reversed. Please see the following steps to adapt your valve for back-to-back mounting or
reversed inlet supplies.
If you are NOT making a reverse or back-to-back installation, skip this step, and continue with STEP 10. If the HOT and
COLD water supplies are reversed (HOT on right and COLD on left), disassemble Valve Cartridge as outlined in STEP 7.
Rotate Valve Cartridge ❸ 180° so “H” appears on the right. Install the Valve Cartridge ❸ making sure that the
mounting posts are aligned and engaged to the corresponding holes in the Valve Body ❹. Ensure that the O-Ring ❷ is in
place on the Bonnet ❶. Slide the Bonnet ❶ over the Cartridge and thread onto the body. Tighten securely with Slip Joint
Wrench on the machined flats of the Bonnet ❶. Final torque should be 150-168 in*lb. Take care to not over tighten
connection or damage may occur.
NOTE: Never install the valve body upside down!
Reverse
Installation
COLD
COLD
COLD
COLD
COLD
COLD
COLD
HOT
HOT
HOT
HOT
HOT
HOT
COLD
HOT
H
C
Reverse Installation
(shown without Bonnet)
C
Normal Installation
(shown without Bonnet)
H
Normal Installation
(changes not required)