
Quick Installation Guide
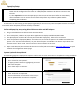


3. Site Information
Enter the site information as requested.
If some information is not known at this time, it
can be updated after the wizard is complete.
Click “Next Step” to continue.
Note: Make sure the time is displayed correctly. Also,
ensure that you choose the correct time zone. If this is
not set accurately, data will not be recorded correctly.
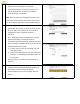
4. Inverter Configuration
Ensure that all inverters are powered up and each
LED is lit. Note that inverters do not need AC to
complete this step. A single DC channel is
sufficient.
Click “Next Step: Inverter Configuration” and the
SparqLinq will begin scanning for inverter.
It may take up to one minute to complete the scan.
Once scanning is complete, check to see if all of the
expected inverters are listed.
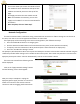
o If one or more inverters are missing, click the
scan again button.
o If after several attempts to scan fail to locate all
inverters, try relocating the SparqLinq closer to
the inverters.
Once all inverters are listed, click “Next Step” to
continue.
5. Module Layout
Using the sticker map made during installation of
the inverter, draw the layout as desired.
Click on Next Step once you are happy with the
layout.