
Quick Installation Guide

SparqLinq Setup
NOTE: DHCP is used to automatically configure the SparqLinq to connect to the installation’s network.
DHCP must be configured on the router or cable/DSL/fiber modem to be able to connect to the
internet.
It is also required to connect the SparqLinq to the internet at least once before or immediately
after installation so it can set the internal clock and perform any software updates before
completing the installation.
A technician can start setting up the SparqLinq gateway for the site at any time but QUAD inverters can only be
scanned for when DC power (from PV module) is available.
Preferred SparqLinq setup using Wired Ethernet cable and Wifi adapter:
1. Plug in included Ethernet cable to Home Internet Router.
2. On a smart phone, tablet or PC, open Wi‐Fi application to display available Network SSIDs.
3. The SparqLinq will create a Wi‐Fi access point with SSID “SparqLinq”. Select it for connection.
4. Enter the password “SparqLinq 80211” and make sure to include the space in the middle but without the
quotes. Tick “Connect Automatically” on your device if option is available. Your device may indicate “No
Internet Access” which is OK. Do not connect to home network at this time.
5. Open a web browser (we recommend Chrome or Firefox) and enter address http://192.168.111.1/ to open
network the configuration wizard page.
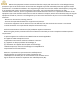
System Update & Setup Wizard
The following pages are displayed in sequence. Follow the on screen instruction to complete the setup procedure.
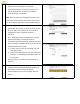
1. Software Update
Press “Check for new Update”.
If “Apply Update” button is highlighted, press and
wait until complete.
Press “Next Step” to continue.
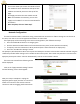
2. Technician Information
Enter Technician as requested.
If some information is not known at this time, it
can be updated after the wizard is complete.