NVIDIA GeForce4 MX420/440/460 SP7100M273X032PU ; SP7100M273X032TV SP7100M273V064PU ; SP7100M273V064TV 3D GRAPHIC ACCELERATOR MANUAL SPARKLE COMPUTER CO., LTD.
NVIDIA GeForce4 MX420/440/460 User’s Manual TABLE OF CONTENTS TABLE OF CONTENTS ................................................................................................. 2 1. NVIDIA GeForce4 MX420/440/460 Features .............................................................. 3 2. Hardware installation .................................................................................................. 4 3. Resolutions and colors supported:...............................................................
1. NVIDIA GeForce4 MX420/440/460 Features GeForce4 MX420 AGP bus, with 64MB or 128MB SDRAM on Board Graphics core 256-BIT Fill rate (AA samples/sec.) 1 BILLION Triangles/sec 31 MILLION Memory bandwidth 2.7 GB/SEC GeForce4 MX440 AGP bus, with 64MB DDR SDRAM on Board Graphics core 256-BIT Fill rate (AA samples/sec.) 1.1 BILLION Triangles/sec 34 MILLION Memory bandwidth 6.4 GB/SEC GeForce4 MX460 AGP bus, with 64MB DDR SDRAM on Board Graphics core 256-BIT Fill rate (AA samples/sec.) 1.
Other Features 2 dual-rendering pipelines 4 texels per clock cycle Cube environment mapping 64M high-speed 128-bit DDR RAM memory High-performance 2D rendering engine AGP 4X with Fast Writes NVIDIA Shading Rasterizer AGP 4X/2X and AGP Texturing Support Integrated hardware transform engine Integrated hardware lighting engine True-color hardware cursor High-quality HDTV/DVD playback True, reflective bump mapping Multibuffering (double, triple, quad) for smooth animation and video playback Operating systems su
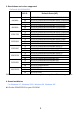
3. Resolutions and colors supported: GeForce4 MX420/440/460 B.P.P.
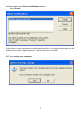
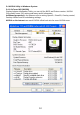
4.2 Click Driver installation 4.3 If everything fine, screen will show Confirm Installation window.
4.4 Now appears the Driver Confirmation window Select Install If the drivers is very new may not certified by Microsoft, if so, system will prompt you the drivers do not have “digital signature”, still you can force to install. 4.5 Then restart your computer.
5. Manually install Windows XP drivers 5.1 Installation and Setup The Windows setup program installs and modifies all of the necessary files. Follow these steps to install the Windows XP drivers. 1. Insert the DISC (CD Title Driver). 2. Select Control Panel from Start menu 3. Select the Display icon 4. Double-click on the Display icon in the Control Panel folder. You can also click the right mouse button anywhere on the desktop and select the Properties option form the pop-out menu. 5.
5.3 How to Change Refresh Rate in Windows XP 1. Make sure that you have installed windows XP Driver. Click on the Start box in the lower left corner and proceed to Setting, Control Panel 2. Inside the Control panel group , click on Display icon to open the Display Properties folder and choose Settings click the Advance Settings choose Monitor 3. Click on the Refresh Rate sub window to change refresh rate 4. Select OK and new refresh rate takes effect 5. Refresh Rate default is Optimal. 6.
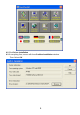
5.4 NVIDIA Utility in Windows System 5.4.1 GeForce4 MX (NVIDIA) Display Adapter Information Table, you can tell the BIOS and Drivers version, NVIDIA Chip model name, IRQ setting and many useful information. Additional properties is for advance user to setting OpenGL, Direct3D, Overlay control, Desktop Utilities and 3D antialiasing settings. NVIDIA on the Internet can reach NVIDIA official web site for more NVIDIA news.
5.4.2 nView nView have 4 modes : Standard, Clone, Horizontal span and Vertical span. If the optional connector is connected, you will be able to choose one as Windows default display device. Only the device is plugged and functional, You will be able to check the selection box. If you plug the connector after window boot up, click Detect Displays to enable the plugged output device.
5.4.2.1 Standard mode: nView disabled, only one monitor will work. Click Device Settings >> , you can select output device – CRT or TV. Or you can select Advanced … and select output device. Click Video output format bar to select S-Video or RCA (optional) output, default is auto select. Click Change Format to select your country and TV system – NTSC or PAL, no SECAM.
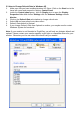
5.4.2.2 Color correction… Click Device Settings >>, select Color Correction…. This Window shows NVIDIA Digital Vibrance is functional and you can adjust Brightness, Contrast, Gamma and save it as your favorite setting. If you don’t like your adjustments, you can also check Automatically apply these settings at startup to change it back.
5.4.2.3 Screen Adjustment… Click Device Settings >>, select Screen Adjustment… You can adjust screen position. Display Timing can let you set your computer timing.
5.4.2.4 nView enable mode You need two monitors, one analog monitor(CRT) and one TV or DVI (Optional). All connected well and functional. Clone mode: 2 monitors show the same picture, Select Clone and Click Apply to active. Horizontal span mode: Picture span horizontally on 2 monitors. Select Horizontal span, Click Apply to active. Vertical span mode: Picture span vertically on 2 monitors Select Vertical span, Click Apply to active. Monitor with blue frame is active.
6. Manually install Windows 98 and Windows ME drivers 6.1 Installation and Setup The Windows setup program installs and modifies all of the necessary files. Follow these steps to install the Windows 98/ME drivers. 1. Insert the DISC (CD Title Driver). 2. Select Control Panel from My Computer group. 3. Select the Display icon 4. Double-click on the Display icon in the Setting -> Control Panel folder.
effect.
6.3 How to Change Refresh Rate 1. Make sure that you have installed windows 98/ME Driver. Click on the Start box in the lower left corner and proceed to Setting, Control Panel 2. Inside the Control panel group , click on Display icon to open the Display Properties folder and choose Settings click the Advance Settings choose Adapter 3. Click on the Refresh Rate sub window to change refresh rate 4. Select OK and new refresh rate takes effect 5. Refresh Rate default is Optimal. 6.
Windows2000 to run the new driver. Click OK.
FCC Statement This device complies with part 15 of the FCC Rules. Operation is subject to the following two condition.(1).this device may not cause harmful interference. (2).this device must accept any interference received, including interference that may cause undesired operation Warning: Note: This equipment has been tested and found to comply with the limits for a Class B digital device, pursuant to Part 15 of FCC Rules.