
User's Manual


USER’S MANUAL OF Wireless 802.11g Broadband Router
5
2 Installation
2.1 Hardware Installation
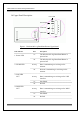
Step 1: Place the Wireless LAN Broadband Router to the best optimum transmission
location. The best transmission location for your Wireless 802.11g Broadband
Router is usually at the geographic center of your wireless network, with line of
sign to all of your mobile stations.
Step 2: Connect the Wireless 802.11g Broadband Router to your wired network.
Connect the Ethernet WAN interface of Wireless 802.11g Broadband Router by
category 5 Ethernet cable to your switch/ hub/ xDSL modem or cable modem. A
straight-through Ethernet cable with appropriate cable length is needed.
Step 3: Supply DC power to the Wireless 802.11g Broadband Router. Use only the
AC/DC power adapter supplied with the Wireless 802.11g Broadband Router; it
may occur damage by using a different type of power adapter.
The hardware installation finished.
2.2 Software Installation
There are no software drivers, patches or utilities installation needed, but only the
configuration setting. Please refer to chapter 3 for software configuration.
Notice: It will take about 55 seconds to complete the boot up sequence after
powered on the Wireless 802.11g Broadband Router; Power LED will be
active, and after that the WLAN Activity LED will be flashing to show
the WLAN interface is enabled and working now.