
User's Manual
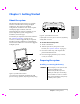
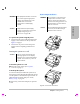


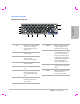

Table Of Contents
- M-Turbo Ultrasound System User Guide
- Contents
- Introduction
- Chapter 1: Getting Started
- Chapter 2: System Setup
- Displaying the setup pages
- Restoring default settings
- A & B Key, Footswitch setup
- Administration setup
- Annotations setup
- Audio, Battery setup
- Cardiac Calculations setup
- Connectivity setup
- Date and Time setup
- Display Information setup
- IMT Calculations setup
- Network Status setup
- OB Calculations setup
- OB Custom Measurements setup
- OB Custom Tables setup
- Presets setup
- System Information setup
- USB Devices setup
- Chapter 3: Imaging
- Chapter 4: Measurements and Calculations
- Chapter 5: Troubleshooting and Maintenance
- Chapter 6: Safety
- Ergonomic safety
- Electrical safety classification
- Electrical safety
- Equipment safety
- Battery safety
- Clinical safety
- Hazardous materials
- Electromagnetic compatibility
- ALARA principle
- Acoustic artifacts
- Guidelines for reducing MI and TI
- Output display
- Transducer surface temperature rise
- Acoustic output measurement
- Acoustic output tables
- Labeling symbols
- Chapter 7: References
- Chapter 8: Specifications
- Glossary
- Index

Chapter 1: Getting Started 7
Getting Started
Screen layout
Figure 1 Screen Layout
1 Mode Data Area Current imaging mode information (for example, Gen, Res, THI, and PW).
2 Orientation Marker Provides indication for image orientation. In dual and duplex images, the
orientation marker is green on the active screen.
3 Text Text entered using keyboard.
4 Pictograph Pictograph to indicate anatomy and transducer position. You can select
anatomy and screen location.
5 Calculations Menu Contains available measurements.
6 Image Ultrasound image.
7Measurement and
Calculations Data Area
Current data on measurements and calculations.
8 On-screen Options Options available in the current context.
9 Patient Header Includes current patient name, ID number, institution, user, and date/time.
10 System Status Information on system status (for example, exam type, transducer, AC
connected, battery charging, and USB).
11 Depth Marker Marks in .5 cm, 1 cm, and 5 cm increments depending on depth.
1
5
4
6
11
10
9
7
3
8
2