
User's Manual
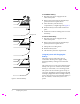
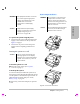
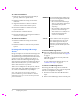
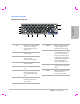

Table Of Contents
- M-Turbo Ultrasound System User Guide
- Contents
- Introduction
- Chapter 1: Getting Started
- Chapter 2: System Setup
- Displaying the setup pages
- Restoring default settings
- A & B Key, Footswitch setup
- Administration setup
- Annotations setup
- Audio, Battery setup
- Cardiac Calculations setup
- Connectivity setup
- Date and Time setup
- Display Information setup
- IMT Calculations setup
- Network Status setup
- OB Calculations setup
- OB Custom Measurements setup
- OB Custom Tables setup
- Presets setup
- System Information setup
- USB Devices setup
- Chapter 3: Imaging
- Chapter 4: Measurements and Calculations
- Chapter 5: Troubleshooting and Maintenance
- Chapter 6: Safety
- Ergonomic safety
- Electrical safety classification
- Electrical safety
- Equipment safety
- Battery safety
- Clinical safety
- Hazardous materials
- Electromagnetic compatibility
- ALARA principle
- Acoustic artifacts
- Guidelines for reducing MI and TI
- Output display
- Transducer surface temperature rise
- Acoustic output measurement
- Acoustic output tables
- Labeling symbols
- Chapter 7: References
- Chapter 8: Specifications
- Glossary
- Index

4 Preparing the system
To connect a transducer
1 Removethesystemfromthemini‐dock(if
present),andturnitupsidedown.
2 Pullthetransducerlatchup,androtateit
clockwise.
3 Alignthetransducerconnectorwiththe
connectoronthebottomofthesystem.
4 Insertthetransducerconnectorintothe
systemconnector.
5 Turnthelatchcounterclockwise.
6 Pressthe
latchdown,securingthetransducer
connectortothesystem.
To remove a transducer
1 Pullthetransducerlatchup,androtateit
clockwise.
2 Pullthetransducerconnectorawayfromthe
system.
Inserting and removing USB storage
devices
Imagesandclipsaresavedtointernalstorageand
areorganizedinasortablepatientlist.Youcan
archivetheimagesandclipsfromtheultrasound
systemtoaPCusingaUSBstoragedeviceor
Ethernetconnection.Althoughtheimagesand
clipscannotbeviewedfromaUSBstoragedevice
ontheultrasoundsystem,youcanremovethe
deviceandviewthemonyourPC.
TherearetwoUSBportsonthesystem,andone
onthemini‐dock.ForadditionalUSBports,you
canconnectaUSBhubintoanyUSBport.
Note: Thesystemdoesnotsupportpassword‐
protectedUSB
storagedevices.Makesurethatthe
USBstoragedeviceyouusedoesnothavepassword
protectionenabled.
To insert a USB storage device
InserttheUSBstoragedeviceintoanyUSB
portonthesystemormini‐dock.SeeFigure 1
onpage 1.
TheUSBstoragedeviceisreadywhenthe
USBiconappears.
Toviewinform ationaboutthedevice,see
“USBDevicessetup”onpage 23.
To remove a USB storage device
RemovingtheUSBstoragedevicewhilethe
systemisexportingtoitmaycausetheexported
filestobecorruptedorincomplete.
1 WaitfivesecondsaftertheUSBanimation
stops.
2 RemovetheUSBstoragedevicefromtheport.
WARNING:
To avoid damaging the USB storage
device and losing patient data from
it, observe the following:
• Do not remove the USB storage
device or turn off the ultrasound
system while the system is
exporting.
• Do not bump or otherwise apply
pressure to the USB storage
device while it is in a USB port on
the ultrasound system. The
connector could break.
Caution:
If the USB icon does not appear in
the system status area on-screen,
the USB storage device may be
defective or password-protected.
Turn the system off and replace the
device.