
Guide

1/12/2018 mbed Starter Kit Experiment Guide - learn.sparkfun.com
https://learn.sparkfun.com/tutorials/mbed-starter-kit-experiment-guide/all 53/65
mbed Starter Kit - Part 9: PWM Sounds SparkFun Wish List
mbed - LPC1768 (Cortex-M3)
DEV-09564
The mbed microcontroller is an ARM processor, a comprehensive set of peripherals and a USB programming and communication interface provided in a small…
Jumper Wires Standard 7" M/M - 30 AWG (30 Pack)
PRT-11026
If you need to knock up a quick prototype there's nothing like having a pile of jumper wires to speed things up, and let's face it: sometimes you want…
Breadboard - Self-Adhesive (White)
PRT-12002
This is your tried and true white solderless breadboard. It has 2 power buses, 10 columns, and 30 rows - a total of 400 tie in points. All pins are sp…
Break Away Headers - Straight
PRT-00116
A row of headers - break to fit. 40 pins that can be cut to any size. Used with custom PCBs or general custom headers.**Features: *** Pin Style: Squar…
SparkFun TRRS 3.5mm Jack Breakout
BOB-11570
TRRS connectors are the audio-style connectors that you see on some phones, MP3 players and development boards. TRRS stands for "Tip, Ring, Ring, Slee…
In addition to the listed parts, you will also need a set of headphones or speakers (with a 3.5mm plug) to complete the tutorial.
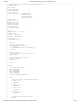
Schematic
Click on schematic to view larger image.
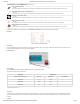
Connections
Connect a PWM output pin of the LPC1768 to the TIP of the audio jack breakout. Also, connect the tip to RING1 of the audio jack in order to get sound out of
both the left and right speakers. Do not connect anything to RING2!
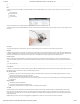
Fritzing Diagram
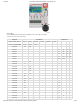
Hookup Table
Place the LPC1768 in a breadboard with pin VOUT in position i1 and pin 20 in position b20.
Connect the rest of the components as follows:
Component Breadboard
TRRS 3.5mm Jack Breakout* b27 (TIP) b28 (RING1) b30 (SLEEVE)
Jumper Wire a1 d30
Jumper Wire j20 e27
Jumper Wire c27 c28
* Pins not listed are not used.
The Code
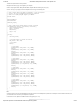
To make sounds, we need to modulate our PWM pin with a particular frequency. Luckily, we can control the precise frequency of the PWM within the mbed. If
you looked into how PWM works, you’ll notice that it is a square wave. Square waves do not make the most pleasant sound, but it will be good enough for our
purposes.
Program