
Guide

1/12/2018 mbed Starter Kit Experiment Guide - learn.sparkfun.com
https://learn.sparkfun.com/tutorials/mbed-starter-kit-experiment-guide/all 51/65
With the rise of the graphical user interface (GUI), such as Windows, terminal programs became emulated inside of the GUI and usually only reserved for more
advanced functions. Because many low-power embedded systems, such as the LPC1768, are incapable of running a GUI, we rely on a serial terminal to
communicate with the device. Check out our tutorial on Serial Terminal Emulators) for more info.
We use a USB cable to send and receiver serial commands from the computer to the LPC1768. The mbed platform converts the USB signals to UART, which is
interpreted by the LPC1768 processor. By using a program like PuTTY, we can send serial commands over that USB channel. If we write serial commands in
our mbed program, we can create a communications link between the mbed and our serial terminal. This allows us to interact with the mbed in real time!
Using a serial terminal like this is crucial in working with embedded systems. We can add printf statements in our program that provides status updates, gives the
contents of variables, and informs us of errors. Using a serial terminal in this manner is extremely helpful in debugging our embedded programs.
Analog to Digital Converter (ADC)
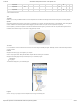
We used the mbed’s internal ADC to take measurements from the temperature sensor. The TMP36 Temperature Sensor works by amplifying the voltage drop
across the base and emitter of a transistor as temperature changes.
Pins 15 - 20 on the LPC1768 are capable of analog to digital conversions. Voltages between 0V and 3.3V are broken up (quantized) into steps. The LPC1768
uses a 12-bit value to denote the ADC readings, which means that there are 4096 possible values for voltages. In other words, 0V - 3.3V are broken down into
0.0008057V steps. Reading 0 on the ADC indicates 0V, reading 1 indicates 0.0008057V, reading 2 indicates 0.0016114V and so on.
However, note that in our program, we read the analog value (ain) as a float value between 0.0 and 1.0, where 1.0 is 3.3V. So, in order to determine the actual
measured voltage, we multiplied ain * 3.3. Using the measured voltage, we calculated the temperature in Celsius by the equation (Vmeas - 0.5) * 100.0, as per
the TMP36 datasheet.
If you would like to read more about ADC, see this Wikipedia article.
Serial Peripheral Interface (SPI)
SPI is a de facto communications bus standard, which means that its pins and protocol are just accepted by industry (versus being spelled out in an actual
standard by a governing body, like I2C). SPI generally requires 4 pins: SCK, MISO, MOSI, and CS. Because MISO and MOSI transmit data simultaneously, full
duplex communications are possible. SPI is capable of faster transfer speeds than I2C, but can only have 1 master and usually needs 1 extra pin dedicated for
each device added on the bus. Read more about SPI here.
SD Cards
Secure Digital (SD) cards grew out of MultiMediaCards (MMC) in 1999 as a small, transportable form factor for non-volatile flash memory. There are several
ways to transfer data to and from SD cards: SPI Mode, One-Bit SD Bus Mode, and Four-Bit SD Bus Mode. We used SPI in this project, as it is the easiest to use
and does not require an SD host license. Four-Bit mode, on the other hand, requires a host license and offers much faster transfer speeds. Read more about the
SD format here.
FAT File System
The mbed SDFileSystem library relies on the File Allocation Table (FAT) file system to read and write files in the SD card. The FAT file system is an old and
extremely simple file structure system that is still used by most low storage volume flash media (e.g. SD cards, flash drives, etc.) today. It is supported by every
major operating system. In basic terms, the front section of the disk partition is reserved for the file allocation table, which is a simple index that contains the
name of the file (or folder) and its location in the partition. Reading the FAT gives you all the files and folders within the disk partition, and you can use this
information to read, write, and modify specific files. You can learn more about the FAT file system here.
File Descriptor
In order to read and write to a file (located in our FAT file system!), we need to use a file descriptor to access that file.
In our program, we create a file descriptor with
FILE *file;
The pointer *file will be used as a handle to manage all of our file operations.
We then open a file from our FAT file system (namely, the temp_data.txt file on our SD card) and assign it to our handle. Notice the “w” parameter, which asks for
“write” permissions to the file. If the file does not exist, it is created.
file = fopen("/sd/temp_data.txt", "w");
After we attempt to open the file, we check to make sure that the file was indeed opened for writing:
langauge:c
if ( file == NULL ) {
error("ERROR: Could not open file for writing!\n");
return -1;
}
If the file was not opened successfully, the file variable does not point to anything (i.e. NULL). In this case, we print an error and stop the program.
We use the fprintf() function to write characters to the file.
fprintf(file, "%2.2fs: %3.1f deg C\n", timer.read(), degrees_c);
Notice that we passed in the file handle as our first parameter, which tells fprintf() where to put the characters.
Once we are done writing to the file, we close it with
fclose(file);