
Guide


1/12/2018 mbed Starter Kit Experiment Guide - learn.sparkfun.com
https://learn.sparkfun.com/tutorials/mbed-starter-kit-experiment-guide/all 38/65
// USB host keyboard and LCD demo
#include "mbed.h"
#include "USBHostKeyboard.h"
#include "uLCD_4DGL.h"
// LED to demonstrate multi-threading
DigitalOut led(LED1);
// Graphic LCD - TX, RX, and RES pins
uLCD_4DGL uLCD(p9,p10,p11);
// Callback function from thread
void onKey(uint8_t key) {
uLCD.printf("%c", key);
}
// Function that runs continuously in the thread
void keyboard_task(void const *) {
USBHostKeyboard keyboard;
while(1) {
// Try to connect a USB keyboard
uLCD.printf("Waiting...\n");
while(!keyboard.connect()) {
Thread::wait(500);
}
uLCD.printf("Connected!\n");
// When connected, attach handler called on keyboard event
keyboard.attach(onKey);
// Wait until the keyboard is disconnected
while(keyboard.connected()) {
Thread::wait(500);
}
uLCD.printf("\nDisconnected!\n");
}
}
// Main - the program enters here
int main() {
// Initialize LCD
uLCD.baudrate(115200);
uLCD.background_color(BLACK);
uLCD.cls();
uLCD.locate(0,0);
// Create a thread that runs a function (keyboard_task)
Thread keyboardTask(keyboard_task, NULL, osPriorityNormal, 256 * 4);
// Flash an LED forever
while(1) {
led=!led;
Thread::wait(500);
}
}
Run
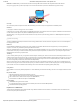
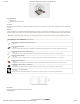
Compile the program and copy the downloaded file to the mbed. Connect a USB keyboard to the USB breakout board.
Press the mbed’s restart button, and the LCD should show “Waiting…” If the keyboard was connected properly, you should see “Connected” on the LCD. Once
you see “Connected,” start typing! You will see your keystrokes appear on the LCD.
NOTE #1: If you have some trouble getting the keyboard to connect, make sure the keyboard is plugged in and try resetting the mbed.