
Guide

1/12/2018 mbed Starter Kit Experiment Guide - learn.sparkfun.com
https://learn.sparkfun.com/tutorials/mbed-starter-kit-experiment-guide/all 13/65
18. Arduino for Production! AVR Atmega32 - Intro to Interrupts
PWM
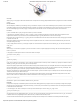
To control the brightness of the LEDs, we do not vary the current going into the LED. Rather, we rapidly turn the LED off and on to give the appearance of a
dimmer LED. This is known as “Pulse-Width Modulation” (PWM). Note that we are flipping the LED off and on so fast that generally our eyes cannot see the
flickering.
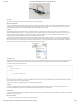
We adjust the “duty cycle” of this flipping process in order to control the brightness. Duty cycle just refers to how long our LED stays on in relation to how long it
stays off.
The higher the duty cycle (e.g. 75% in the image above), the brighter the LED will appear to be. At lower duty cycles (e.g. 25%) the LED will hardly appear to be
on. For a full tutorial on PWM, see Pulse-width Modulation.
In our rgb_buttons program, we use mbed’s built-in PwmOut object to control PWM on several of the LPC1768 pins. We can read the PWM value with the
.read() method and set a new PWM value with .write(). We use a floating point number to specify the duty cycle. This can be between 0.0 (0% duty cycle) to 1.0
(100% duty cycle).
Going Further
We’ve covered three important concepts in this tutorial: user input with buttons (using pull-up resistors), interrupts, and PWM. If these topics provide some
confusion, feel free to read through the “Digging Deeper” section to learn more about these topics in greater detail.
Beyond the Tutorial
See how the LED changes when you press a button down? Can you make it so that the LED changes when you release a button?
Since we are using interrupts, our while(1){} loop is empty. Make something happen while waiting for a button push! For example, flash another LED in
that while loop.
Can you re-create the functionality of the program without using any interrupts?
You might notice that the LED changes accidentally sometimes when you release a button. This is caused by a phenomenon known as contact bounce.
Can you create a way to remove contact bounce (known as “debouncing”)? This can be done in hardware or software.
Digging Deeper
If you are not familiar with C++, you may want to read up on Object Oriented Programming
It might also be a good idea to brush up on C syntax and C++ syntax
Read about pull-up resistors
Read about embedded interrupts and about mbed’s interrupt handling
Read about pulse-width modulation and about how mbed built-in PWM features
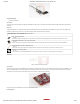
Experiment 3: Graphic LCD
Let’s make some graphics! In this tutorial, we walk you through connecting your Serial Miniature Graphic LCD to the mbed LPC1768 and making some shapes
and text. This tutorial is important as we will use the LCD in the next few tutorials, so pay close attention!