
Data Sheet

55 : circuit 3a
ARDUINO LIBRARIES: Writing code
that sends precise PWM signals to the
servo would be time consuming and
would require a lot more knowledge about
the servo. Luckily, the Arduino IDE has
hundreds of built-in and user-submitted
containers of code called libraries. One of
the built-in libraries, the Servo Library,
allows us to control a servo with just a few
lines of code!
To use one of the built-in Arduino libraries,
all you have to do is “include” a link to its
header file. A header file is a smaller code
file that contains definitions for all the
functions used in that library. By adding
a link to the header file in your code, you
are enabling your code to use all of those
library functions. To use the Servo Library,
you would add the following line to the top
of your sketch.
#include <Servo.h>
OBJECTS AND METHODS: To use the
Servo Library, you will have to start by
creating a servo object, like this:
Servo myServo;
Objects look a lot like variables, but they
can do much more. Objects can store
values, and they can have their own
functions, which are called methods.
The most used method that a servo object
has is .write():
myServo.write(90);
The write method takes one parameter, a
number from 0 to 180, and moves the servo
arm to the specified position (in this case,
degree 90).
Why would we want to go to the trouble of
making an object and a method instead of
just sending a servo control signal directly
over a pin? First, the servo object does the
work of translating our desired position
into a signal the servo can read. Second,
using objects makes it easy for us to add
and control more than one servo.
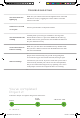
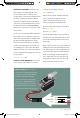
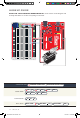
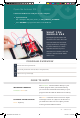
SERVO BASICS: Servo motor
connectors are polarized, but there
is no place to attach them directly.
Instead, connect three jumper
wires to the female 3-pin header
on the servo. This will make it so
you can connect the servo to the
breadboard. The servo wires are
color coded to make hookup simple.
GND
CONTROL
5V+
SIK v4 Book Oct 13.indb 55 10/18/17 10:00 AM