
Data Sheet


24 : circuit 1b
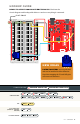
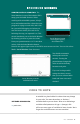
CODE TO NOTE
SERIAL BEGIN:
Serial.begin(9600);
Serial commands can be used to send and receive data from
your computer. This line of code tells the RedBoard that we
want to “begin” that communication with the computer, the
same way we would say “Hi” to initiate a conversation. Notice
that the baud rate, 9600, is the same as the one we selected
in the monitor. This is the speed at which the two devices
communicate, and it must match on both sides.
ANALOG INPUT:
potPosition =
analogRead(A0);
We use the analogRead() function to read the value on an
analog pin. analogRead() takes one parameter, the analog
pin you want to use, A0 in this case, and returns a number
between 0 (0 volts) and 1023 (5 volts), which is then assigned to
the variable
potPosition.
SERIAL PRINT:
Serial.
println(potPosition);
This is the line that actually prints the trimpot value to
the monitor. It takes the variable potPosition and prints
whatever value it equals at that moment in the loop(). The
ln
at the end of println tells the monitor to print a new
line at the end of each value; otherwise the values would all
run together on one line. Try removing the ln
to see what
happens.
CODING CHALLENGES
CHANGING THE RANGE: Try multiplying, dividing or adding to your sensor reading so
that you can change the range of the delay in your code. For example, can you multiply the
sensor reading so that the delay goes from 0–2046 instead of 0–1023?
ADD MORE LEDS: Add more LEDs to your circuit. Don’t forget the current-limiting
resistors. You will need to declare the new pins in your code and set them all to
OUTPUT .
Try making individual LEDs blink at different rates by changing the range of each
using multiplcation or division.