
Guide


3/7/2018 SparkFun Inventor's Kit for micro:bit Experiment Guide - learn.sparkfun.com
https://learn.sparkfun.com/tutorials/sparkfun-inventors-kit-for-microbit-experiment-guide/all#introduction-to-microsoft-makecode 36/63
Note: You may need to disable your ad/pop-up blocker to interact with the MakeCode programming environment and
simulated circuit!
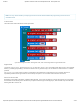
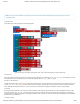
Code to Note
Let’s take a look at the code blocks in this experiment.
If you are having a hard time viewing this code, click on the image above to get a better look!
Set Pull Pin
When you start your micro:bit, some pins can be set to be naturally on or naturally off. The set pull pin block allows you to set
an initial state of a pin by selecting a pin and then its pull state, which is UP , DOWN or NONE .
Set Pin to Emit Event
Just like the button event in Experiment 4 there are events that you can read. But first, you have to set a pin to emit an event. You
use the set pin to emit event block to create a type of event for a specific pin to emit or send out when it reaches that state.
As an example, we set P16 to emit an EDGE event, which means that it changed from HIGH to LOW or LOW to HIGH.
On Event
Under the Advanced blocks you can find the Control blocks. These are the blocks that are the most complicated to use, but are
the most powerful. The On Event block accepts an event type to watch for and a pin that event should happen on. When that
specific event is emitted from that pin, it will trigger whatever code is inside of it. Take a moment to look through the list of different
events that you can listen for!
if / Else if / Else