
Guide

3/7/2018 SparkFun Inventor's Kit for micro:bit Experiment Guide - learn.sparkfun.com
https://learn.sparkfun.com/tutorials/sparkfun-inventors-kit-for-microbit-experiment-guide/all#introduction-to-microsoft-makecode 21/63
Note: You may need to disable your ad/pop-up blocker to interact with the MakeCode programming environment and
simulated circuit!
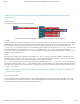
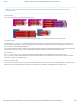
Code to Note
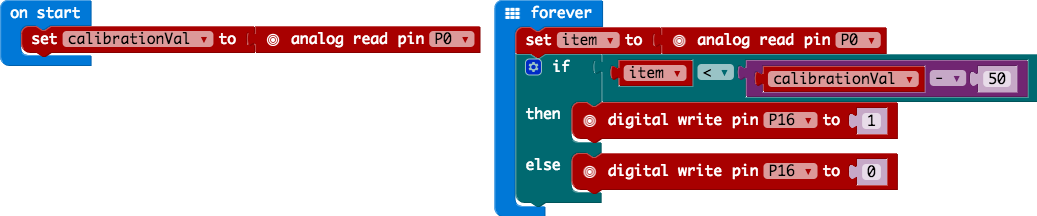
Let’s take a look at the code blocks in this experiment.
If you are having a hard time viewing this code, click on the image above to get a better look!
On Start
In previous experiments you have only used the forever block, which loops your code forever. The On start block is a block
of code that only runs once at the very beginning of your program. In this program we use it to set a calibration value once, and
then compare the changing value in the forever loop. This is a great spot for code that you only want to run a single time.
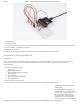
calibrationVal is a calibration variable. Your micro:bit takes a single reading of the light sensor in the on start block of code
and uses this value to compare against the calibrationVal variable in the forever loop. This value doesn’t change in
the forever block, as it is set in the on start block. To update this value you can press the RESET button on the back of your
micro:bit or power cycle the board.
If/Else
If the light value variable that is constantly being updated in the forever block is less than the calibration value minus 50, it is
dark and the LED should turn on. The (-50) portion of the if block is a sensitivity value. The higher the value, the less sensitive
the circuit will be; the lower the value, the more sensitive it will be to lighting conditions.
The if block is a logical structure. If the logical statement that is attached to it ( item < calibrationVal -50 ) is true, then it will
execute the code blocks inside of the if . If that statement is false, it will execute the else blocks. In this case if the statement
is true (the room is dark), then the micro:bit will turn on the LED on pin 16; else (if the room is bright), it will turn the LED off using
a digital write block.
Note: The logical operator blocks and the math block used to build the logical statement. You can find them under the Logic
and Math blocks respectively.
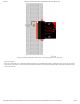
What You Should See
When the micro:bit runs the program it will take a single reading from the light sensor and use that as a calibration value of the
“normal” state of the room. When you place your hand over the light sensor or turn the lights off, the LED will turn on. If you turn
the lights back on or uncover the light sensor, the LED will turn off.