
Getting Started Guide

3/7/2018 Getting Started with the micro:bit - learn.sparkfun.com
https://learn.sparkfun.com/tutorials/getting-started-with-the-microbit?_ga=2.181651687.1167766512.1520447360-204410570.1509632255 5/13
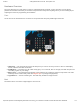
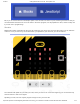
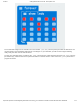
Click on the image above for a larger view.
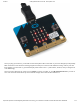
Let’s take a quick tour and check out what is available to us!
1. Projects — A cloud storage system connected to your computer with no account setup required.
2. Share — Allows you to share your project code in a number of different ways with your friends!
3. Blocks/JavaScript — Choose your own adventure by programming in blocks (default) or in JavaScript.
4. Program Space — This is where the magic happens and where you build your program…where you “make
code.”
5. Zoom/Undo-Redo — Sometimes you need to undo things, or zoom out and look around; these are the
buttons for that.
6. Name & Save — Name your program and save it (download it) to your computer.
7. Download — Similar to Save, download your program as a .hex file and drag it into your micro:bit.
8. Block Library — All of the options in terms of program building blocks, which are color-coded by function.
9. Simulator Hide/Show — You can hide/show the simulator if you would like.
10. Simulator — You don’t need hardware! MakeCode has a real-time simulator! As you change your program,
you can see what it will do on this virtual micro:bit!
Phew! Now you have a choice - blocks or text-based programming?
Blocks or Text
For this guide and the majority of the content that you will find on SparkFun for the micro:bit, we will be using block-
based programming examples.