
Data Sheet

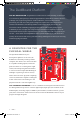


Baseplate Assembly
Before you can build circuits, you’ll want to first assemble the breadboard baseplate. This
apparatus makes circuit building easier by keeping the RedBoard microcontroller and the
breadboard connected without the worry of disconnecting or damaging your circuit.
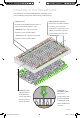
TO BEGIN, collect your parts: the RedBoard,
breadboard, included screwdriver, baseplate and
two baseplate screws.
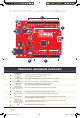
Your screwdriver has both Phillips and
flatheads. If it is not already in position,
pull the shaft out and switch to the
Phillips head.
3 : intro
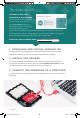
PEEL the adhesive backing off the breadboard.
CAREFULLY ALIGN the breadboard over its spot on the baseplate. The text on the
breadboard should face the same direction as the text on the baseplate. Firmly press the
breadboard to the baseplate to adhere it.
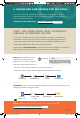
ALIGN THE REDBOARD with its spot
on the baseplate. The text on it should
face the same direction as the text on
the breadboard and the baseplate. Using
one of the two included screws, affix the
RedBoard to one of the four stand-off holes
found on the baseplate. The plastic holes
are not threaded, so you will need to apply
pressure as you twist the screwdriver.
Screw the second screw in the stand-off
hole diagonally across from the first. With
that, your baseplate is now assembled.
SIK v4 Book Oct 13.indb 3 10/18/17 9:58 AM