
Data Sheet
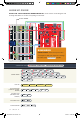

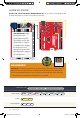

35 : circuit 1d
A B C
D
BLINKING
AN LED
READING A
POTENTIOMETER
READING A
PHOTORESISTOR
RGB NIGHT-LIGHT
CODING CHALLENGES
ADD MORE COLORS: You can create many more colors with the RGB LED. Use the
analogWrite()
function to blend different values of red, green and blue together to
make even more colors. You can divide the potentiometer value and make more nested
if statements so that you can have more colors as you twist the knob.
MULTI-COLOR BLINK: Try using delays and multiple color functions to have your
RGB LED change between multiple colors when it is dark.
CHANGE THE THRESHOLD: Try setting your threshold variable by reading the
value of a potentiometer. By turning the potentiometer, you can then change the
threshold level and adjust your night-light for different rooms.
FADING THE LED: Use
analogWrite()
to get your LED to pulse gently or
smoothly transition between colors.
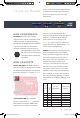
TROUBLESHOOTING
The LED never
turns on or off
Open the Serial Monitor and make sure that your photoresistor is
returning values between 0 and 1023. Cover the photoresistor; the
values should change. If they do not change, check your circuit.
Make sure that your threshold variable sits in between the value that
the photoresistor reads when it is bright and the value when it is
dark (e.g., bright = 850, dark = 600, threshold = 700).
My LED doesn’t
show the colors
that I expect
Make sure that all three of the pins driving your RGB LED are set to
OUTPUT, using the pinMode()
command in the setup section of the
code. Then make sure that each leg of the LED is wired properly.
Nothing is
printing in the
Serial Monitor
Try unplugging your USB cable and plugging it back in. In the
Arduino IDE, go to Tools > Port, and select the right port.
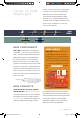
You’ve completed
Circuit 1D!
Continue to Project 2 to explore using buzzers to make sound.
SIK v4 Book Oct 13.indb 35 10/18/17 9:59 AM