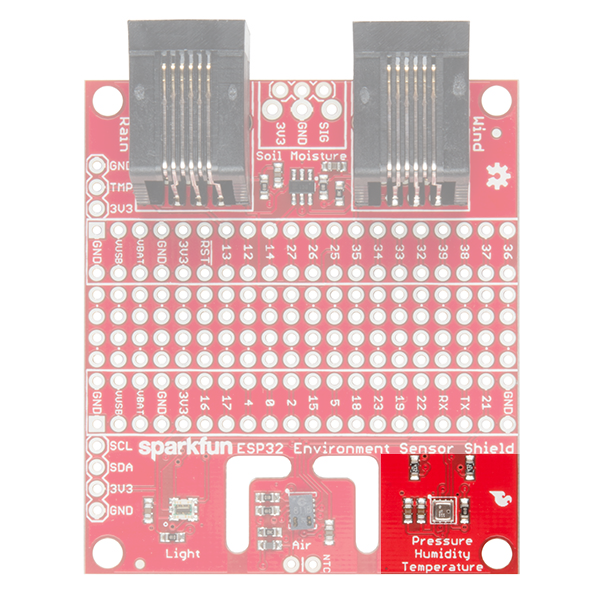
/23/2018 ESP32 Environment Sensor Shield Hookup Guide - learn.sparkfun.com Hardware Overview The ESP32 Environment Sensor Shield incorporates three sensors capable of measuring five different environmental variables. It also provides connections for several other sensors that can be connected if so desired. Onboard Sensors All of the onboard sensors are connected to the ESP32 via I2C connection. Pressure, Humidity, and Temperature The first onboard sensor is a Bosch BME280.
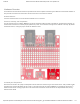
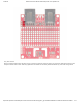
1/23/2018 ESP32 Environment Sensor Shield Hookup Guide - learn.sparkfun.com Luminosity The last onboard sensor is the Broadcom APDS-9301. It’s capable of detecting and reading light levels from nighttime through broad daylight. Keep in mind that the sensor will saturate if exposed to direct sunlight. By defaul, the sensor will have an I2C address of 0x39. By adding a solder jumper toward 0 on the jumper pads labeled JP3 on the back of the board, the address can be changed to 0x29.
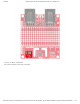
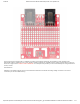
1/23/2018 ESP32 Environment Sensor Shield Hookup Guide - learn.sparkfun.com Jumpers on Back of the Board There are five jumpers on the back of the board. https://learn.sparkfun.com/tutorials/esp32-environment-sensor-shield-hookup-guide?_ga=2.200929641.659504291.1516640116-204410570.
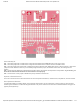
1/23/2018 ESP32 Environment Sensor Shield Hookup Guide - learn.sparkfun.com Here’s what they do: JP1 - Close this jumper with a solder blob to change the I2C address of the BME280 sensor from 0x77 to 0x76. JP2 - Close this jumper with a solder blob to change the I2C address of the CCS811 sensor from 0x5B to 0x5A. JP3 - Close the 0 half of this jumper with a solder blob to set the address of the APDS-9301 sensor to 0x29. Close the 1 half of this jumper to set the address to 0x49.
1/23/2018 ESP32 Environment Sensor Shield Hookup Guide - learn.sparkfun.com One tick per second corresponds to 1.492mph (2.40 kph) of wind speed. Obviously, the orientation of the weather meter determines what the resistance is for a given position. Sixteen positions are available and the voltage corresponding to each can be found on page 2 of the weather meter’s datasheet. Our example code provides you with a solid example on using the direction sensor, as well.
1/23/2018 ESP32 Environment Sensor Shield Hookup Guide - learn.sparkfun.com Rainfall The weather station will also provide you with a rainfall gauge. Much like the wind speed gauge, the rainfall gauge generates ticks to tally the amount of rain that has fallen. Count ticks to determine how much rain has fallen recently. Each tick represents 0.011" (0.28mm) of rainfall. This sensor is connected to pin 25 of the ESP32. https://learn.sparkfun.com/tutorials/esp32-environment-sensor-shield-hookup-guide?_ga=2.
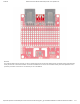
1/23/2018 ESP32 Environment Sensor Shield Hookup Guide - learn.sparkfun.com External Temperature If you so desire, you can connect one of our TMP36 external temperature sensors to the board at this location. Connecting it through a short wire will allow you to measure temperature outisde of the enclosure that the rest of the system is in. It measures with a 10mV/deg C output voltage. It is connected to pin 13 of the ESP32. https://learn.sparkfun.
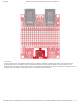
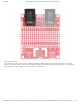
1/23/2018 ESP32 Environment Sensor Shield Hookup Guide - learn.sparkfun.com Any I2C Sensor We’ve provided a header which will allow you to connect any other I2C sensor or device you may think useful to the board. In fact, the pinout of this header is such that many SparkFun I2C boards can be directly attached without any wire order change at all! https://learn.sparkfun.com/tutorials/esp32-environment-sensor-shield-hookup-guide?_ga=2.200929641.659504291.1516640116-204410570.
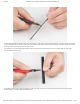
1/23/2018 ESP32 Environment Sensor Shield Hookup Guide - learn.sparkfun.com Hardware Assembly As previously mentioned, it’s a good idea to use headers (both male and female) to connect the two boards. Here we’ll show you a bomb-proof method to solder down the headers and making sure that they’re true and square so it’s easier to connect (and disconnect) the two boards. Trim the Headers When you purchase male and female headers, they’ll be too long for the ESP32 Thing and Environment Sensor Shield.
1/23/2018 ESP32 Environment Sensor Shield Hookup Guide - learn.sparkfun.com For the female headers, however, things are a little trickier. In order to trim to the appropriate length, you’ll lose one pin since these come in 40-position pieces as well. That means you’ll need to order two of these in order to get two 20-position pieces, and you’ll have two 19-position pieces left over. Bummer, I know.
1/23/2018 ESP32 Environment Sensor Shield Hookup Guide - learn.sparkfun.com Optionally, you may take a file, piece of sandpaper, or some other sanding/grinding tool to sand down the end of the header so that it’s smoother. You can do both pieces at the same time by holding them together and rubbing the ends on the finishing surface. Install the Male Headers We’re going to install the male headers on the ESP32 Thing board first.
1/23/2018 ESP32 Environment Sensor Shield Hookup Guide - learn.sparkfun.com Go ahead and solder all the pins to the ESP32 Thing at this time. If you're new to soldering, check out our through-hole soldering tutorial. We'll wait here. If you’re new to soldering, you may want to solder just the first and last position on each side, then pull the board free of the breadboard, to avoid heat damage to your breadboard.
1/23/2018 ESP32 Environment Sensor Shield Hookup Guide - learn.sparkfun.com Install the Female Headers Now we need to install the female headers onto the ESP32 Environment Sensor Shield. We’ll do this using the pins we just soldered to the ESP32 Thing. Take your female headers and place them on the male headers on the ESP32 Thing, as shown here.
1/23/2018 ESP32 Environment Sensor Shield Hookup Guide - learn.sparkfun.com Be certain you've placed the shield in the proper orientation! The component side of the shield should be facing the non-component side of the ESP32 Thing! Double check that the pin labels on the shield match those on the ESP32 Thing! Failure to observe these facing rules will make everything horrible and nothing will work! Flip the board over before soldering the female header pins.
1/23/2018 ESP32 Environment Sensor Shield Hookup Guide - learn.sparkfun.com Besides the ESP32 Arduino Core, the ESP32 Environment Sensor Shield also requires the CCS811, BME280 and APDS9301 Arduino libraries.
1/23/2018 ESP32 Environment Sensor Shield Hookup Guide - learn.sparkfun.com The first few lines are just diagnostics from the ESP32, and will be present at boot time regardless of the application being run. Immediately below the line “Connecting to sparkfun-guest” you see a series of dots. One dot appears every half second while the connection is pending, so you can see from this example that it took approximately 3 seconds for the WiFi to come online.
1/23/2018 ESP32 Environment Sensor Shield Hookup Guide - learn.sparkfun.com There are two useful pieces of data here. The first, where it says “Connection succeeded”, shows that a successful connection has been made to the Weather Underground server. If your internet connection is down, this will fail. The second is the one lone line that says “success”. This is the response from the server after your attempt to post data to it.

