
Install Manual


11SPAN Drive Installation Manual Installation |
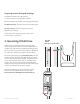
2. Placement & preparing
Remove the glass and lower plastic covers
1. Using a #2 Phillips screwdriver, remove the single
fastener on the top surface of Drive (where the
charging cable nests). Then, pull the top of the glass
cover away from the charger to remove.
2. Using a #2 Phillips screwdriver again, remove the
bottommost screw and loosen the 4 Phillips screws
on the front face of SPAN Drive. Then, take o the
lower plastic cover. Set the covers aside. Make sure
to keep the fasteners in a safe place for reassembly.
Using the Installation Template
Use a wall stud nder and mark the center of the stud
by drawing a vertical line approximately 24” in length
at the height of your mounting. You may also nd
a suitable location on a solid wall.
Place SPAN Drive against the wall at the desired
installation location and mark the two lower mounting
holes on the stud line.
Align the provided Installation Template to the
two lower mounting holes and tape the template
to the wall.
Mark the top mounting hole on the wall using the
Installation Template. If needed, mark the rear entry
knockout location. Remove the template from the wall.