Quick Start Guide Audio Driver Installation The SOYO CD Quick BIOS Setup Motherboard USB 2.
SOYO™ 1. AGP cards running at 3.3V are not supported, only AGP cards running at 1.5V can be used in this mainboard. 2. Please read the user guide before proceeding with your installations. Serious damage may occur if the procedure is not followed properly. 3. If you have any problem getting your system to work, please follow the troubleshooting tips in your user guide. 4. For immediate Technical questions, please visit http://www.soyousa.com/support and http://www.soyousa.com/kb.
SOYO™ SY-K7VMP Motherboard AMD® K7 Athlon & DuronTM processors VIA KM400 AGP/PCI Motherboard 100/133/166 MHz Front Side Bus supported ATX Form Factor Copyright © 2003 by SOYO Computer Inc. Trademarks: SOYO is a registered trademark of SOYO Computer Inc. All trademarks are properties of their owners. Product Rights: All names of the product and corporate mentioned in this publication are used for identification purposes only. The registered trademarks and copyrights belong to their respective companies.
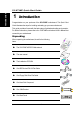
1 Introduction Congratulations on your purchase of the SY-K7VMP motherboard. This Quick Start Guide illustrates the steps for installing and setting up your new motherboard. This guide provides all users with the basic steps of motherboard setting and operation. For further information, please refer to the SY-K7VMP motherboard User’s Manual that came with your motherboard.
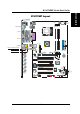
Introduction SY-K7VMP Quick Start Guide SY-K7VMP Layout PS/2 KB PS/2 Mouse Connector Connector ABR 1 2 USB 1/USB 2 COM A VGA out PRT LAN Connector ATX Power USBLAN MIC IN / Center & Bass out Audio out / Front out J30 Audio in / Rear out 8 7 2 1 AC97 codec IDE 1 IDE 2 3 LAN Chip 3V Lithium Battery 1 CDSPDO AUXIN1 PCI Slot #1 CDIN1 PCI Slot #2 1 9 1 1 2 COM2 PCI Slot #3 5 USB20_1 10 I/O CHIP PCI Slot #4 JP5 VT6307 PCI Slot #5 6 2 SIRCON 1 5 1 15 1 GAME1 FW1 5 10
Introduction SY-K7VMP Quick Start Guide Key Features CPU Supports AMD 462 pins Socket A processors : Athlon XP (Palomino/Thoroughbred/Barton) (200/266/333 MHz FSB) Duron/Morgan SOYO COMBO Setup CMOS setup menu for complete and easy changing of your CPU settings in CMOS setup, making jumpers obsolete. Chipset VIA® KM400/ 8235 Chipset VGA UniChrome™ 2D/3D Graphics with motion compensation Memory Supports PC2100 and PC2700 DDR (non-registered and non-ECC) memory modules.
Sound Onboard VIA VT1616 6 channel Audio Codec Network 10/100 MBps 100Base-T Ethernet controller, supporting Wake-On-Lan (WOL) BIOS Power Failure resume function to allow the system to turn on or off after a power failure, which is indispensable for server systems. Wake On Ring and Power On by Alarm to allow your system to wake up from suspend or power on through the modem or RTC alarm.
SY-K7VMP Quick Start Guide 2 Installation Installation To avoid damage to your motherboard, please follow these simple rules while handling this equipment: Before handling the motherboard, ground yourself by touching on to an unpainted portion of the system's metal chassis. Remove the motherboard from its anti-static packaging. Hold the motherboard by the edges and avoid touching its components. Check the motherboard for damage.
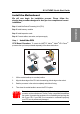
SY-K7VMP Quick Start Guide Install the Motherboard We will now begin the installation process. Please follow the step-by-step procedure designed to lead you to a complete and correct installation. Step 1- Install the Central Processing Unit (CPU) Installation Step 2- Install memory modules Step 3- Install expansion cards Step 4- Connect cables, case wires, and power supply Step 1.
SY-K7VMP Quick Start Guide 5. Set the jumpers on the FJ1 jumper block to the correct FSB for your CPU. FJ1 100 MHz 133 MHz 166 MHz Installation FSB Clock Select CPU Fan Installation Your Socket A processor kit comes with a cooling fan. Mount the fan on the processor according to the instructions provided by the manufacturer. The fan is a key component that will ensure system stability. The fan prevents overheating, therefore prolonging the life of your CPU.
SY-K7VMP Quick Start Guide Installation 2. Carefully mount the fan on top of the CPU and clip-on the first lock. 1 3. Clip-on the second lock and please make sure not to damage/scratch the board.
SY-K7VMP Quick Start Guide Installation 4. Connect the power connector to CPUFAN1. DIMM1 DIMM3 Note: If the fan is defective or Power connector is not connected to CPUFAN1, the system will enable Fan Off Control function. See below for more information on FOC function. When the CPU temperature exceeds, the temperature set in the CPU Temp. Protection in BIOS setup, SOYO’s Anti Burn Regulator (ABR) will automatically shutdown the system and beep until the power button is pressed for one time.
SY-K7VMP Quick Start Guide “FOC” includes the following functions: Auto Power Off System: If the BIOS receives the information of CPU fan revolution, it continues to function normally. If no signal is received, it will inform the system and disconnect the power supply immediately to protect the CPU from overheating. Note: The following must be observed to secure the normal functioning of “Fan-Off Control”: 1. FOC only works on CPUFAN 1. 2. A CPU fan with sensor pin must be used. 3.
SY-K7VMP Quick Start Guide ABR (Anti Burn Regulator) Installation SOYO's ABR (Anti Burn Regulator) is a specially designed hardware circuit that works hand in hand with the CPU’s internal sensor in monitoring the temperature of the CPU and prevent it from overheating. Once the heat accumulated in the CPU is over the set limit. ABR will automatically shut down the system power and warn you with a beeping sound. To de-activate the beeping sound, un-plug the AC power cord.
SY-K7VMP Quick Start Guide Step 3. Installation of Expansion Cards 1. Read the related expansion card’s instruction document before inserting the expansion card into the computer. 2. Press the expansion card firmly into expansion slot in the motherboard. 3. Make sure the metal contacts on the card are correctly seated in the slot. 4. Replace the screw to secure the slot bracket of the expansion card. 5. Install driver for the operating system you use. Note: AGP cards working on 3.
SY-K7VMP Quick Start Guide Pin1 Power Installation Pin1 A0PC Pin1 Pin2 Data(-) Pin2 GND Pin3 Data(+) Pin3 B0PC Pin2 USB20_1 Pin4 Pin6 GND Power Pin3 Pin7 Data(-) Pin8 Data(+) Pin9 GND Pin10 GND Pin4 NC 1394: FW1 Pin5 Pin6 PWR0 A0MC Pin7 CGND Pin8 B0MC Pin9 PWR0 Pin10 CGND Pin4 1394: FW2 Pin5 Pin6 Pin7 Pin8 Pin9 Pin10 A1PC GND B1PC NC PWR1 CPU Cooling Fan: CPUFAN1 Pin1 Pin2 Pin3 GND 12V A1MC CGND B1MC PWR1 CGND CPU Cooling Fan: CPUFAN2 Pin1 Pin2 Pin3 SENSOR GND Chassis Fan: CH
SY-K7VMP Quick Start Guide CMOS Clear (JP5) 1. Clear the CMOS memory by momentarily shorting pin 2-3 on jumper JP5. Its white cap can easily identify this jumper. 2. Put the jumper back to 1-2 to allow writing of new data into the CMOS memory.
SY-K7VMP Quick Start Guide 3 Quick BIOS Setup This motherboard allows you to change your memory and onboard peripheral settings in BIOS setup. After the hardware installation is complete, turn the power switch on, then press the key during the system diagnostic checks to enter the Award BIOS Setup program. The CMOS SETUP UTILITY will be shown on the screen. Then, follow these steps to configure your system. Step 1.
SY-K7VMP Quick Start Guide 4 The SOYO CD The SOYO-CD will Auto Run only in Windows Based Operating Systems. Your SY-K7VMP motherboard comes with a CD-ROM labeled "SOYO CD." The SOYO CD contains a. The user's manual for your new motherboard in PDF format, b. The drivers software available for installation, and c. A database in HTML format with information on SOYO motherboards and other products.
The SOYO CD SY-K7VMP Quick Start Guide (SOYO CD Start Up Program Menu) Under Windows 95/98/ME, the SOYO CD Start Up Program automatically detects the SOYO motherboard the system uses and displays the corresponding model name. The user's manual files included on the SOYO CD are in PDF (Postscript Document format). In order to read a PDF file, the appropriate Acrobat Reader software must be installed in your system.
SY-K7VMP Quick Start Guide Step 2. Install Drivers and Utilities (Driver Installation Menu) A short description of all available drivers follows: VIA 4 in 1 Driver Package for Win 9x/ME/NT/2k/XP VIA 4 In 1 driver includes four system drivers to improve the performance and maintain the stability of systems using VIA chipsets. These four drivers are: VIA Registry (INF) Driver, VIA AGP VxD driver, VIA ATAPI Vendor Support Driver and VIA PCI IRQ Miniport Driver.
SY-K7VMP Quick Start Guide K7VMP Hardware monitor for Win 9x/ME/2000/NT/XP Your motherboard comes with a hardware monitoring IC. By installing this utility, Temperature, Fan speed and Voltages can be monitored. It is also possible to set alarms when current system values exceed or fall below pre-set values. Step 3.
SY-K7VMP Quick Start Guide The SOYO CD After Windows XP installation, your device manager should look like this: 23
SY-K7VMP Quick Start Guide The SOYO CD After driver installation, your Windows XP device manager should look like this: 24
SY-K7VMP Quick Start Guide Drivers directory list in the CD driver Audio driver Via4 in1 driver The SOYO CD Onboard LAN USB 2.
SY-K7VMP Quick Start Guide 5 Audio Driver Installation Audio Driver Installation for Windows 98/98se After you have installed the audio driver, windows may prompt you to restart your computer. Audio Driver Installation When your computer has restarted it may look for the windows driver on your windows installation CD and ask you to insert your installation CD into your CD-drive. At this point you need to insert the windows installation CD into your CD-drive.
SY-K7VMP Quick Start Guide 6 USB2.0 Driver Installation USB2.0 Driver Installation for Windows XP USB 2.0 drivers are available for download using Windows Update for Windows XP. For additional information regarding USB 2.0 support in Windows XP, please visit http://www.microsoft.com/hwdev/bus/USB/default.asp (Windows XP Service Pack1 Include USB2.0 Driver) After installing service pack1, please do the following: 1) Go into the device manager. 2) Remove ” ”. 3) Restart your system. USB 2.
SY-K7VMP Quick Start Guide Quick Trouble shooting tips Boot-up Issues The system does not power-up, no beeping sound heard and the CPU fan does not turn on. 1. Check if the power cord is plug into the power source. 2. Check if the power is connected to the M/B. 3. Check if the cable of the case power button is connected to the M/B power button connector (see Connectors and Plug-ins section in this Quick start guide for more info). 4. Make sure the power supply is not defective. Change the power supply.
SY-K7VMP Quick Start Guide Example. If you have a P4 M/B, you need to use a P4 power supply. 5. If you already checked the power supply specification, change the power supply it might be defective. The minimum is 350 watts AMD approved. When I boot up my system, everything works fine, it sees my CPU and memory, detects my hard drive, floppy drive and CD-ROM but locks up at "Verify DMI pool data... ". It doesn’t boot go any further. What should I do? 1. Clear CMOS battery.
SY-K7VMP Quick Start Guide 3. If you still have the problem, remove all other add-on cards except for CPU/ Memory/ onboard Video/ Hard disk. See if you can finish Windows installation. Then put peripherals in one by one to identify which one causes the lockup. My system will not boot-up when I set my CPU to 133MHz FSB. It works with 100MHz FSB 1. Make sure to put some thermal paste on the CPU. 2. CPU might be defective. 3. Use an AMD approved power supply of at least 350 watts.
SY-K7VMP Quick Start Guide I’m using a 133MHz FSB CPU, I cannot find the DDR 100MHz option in the BIOS, why? The DDR speed should not be lower than the CPU FSB speed. VGA Issue I cannot set my VGA to go higher than 16 color (640x 480). 1. Make sure that you have installed the VIA 4 in 1 driver set. 2. Install/ re-install the VGA driver. After waking up from Suspend to RAM or Standby mode, the screen has no display but I can hear the hard disk operating 1. Install the VIA 4 in 1 driver set. 2.
SY-K7VMP Quick Start Guide The sound and everything else works fine except that the line-in and microphone do not work. What is wrong? 1. Please go to sound properties and check if the line-in and microphone in are enabled and not muted. 2. Check if the Microphone is ok. 3. When using 6 speakers the line-in and microphone channels are used for rear, center and bass. 6-Channel audio and microphone/line-in can not be used at the same time.
SY-K7VMP Quick Start Guide How to contact us: If you are interested in our products, please contact the SOYO sales department in the region you live. If you require Technical Assistance, please contact our Technical Support in the region you live. SOYO prefers Email as communication medium, remember to always add to the email the country that you live in. TAIWAN Hong Kong SOYO COMPUTER INC. SOYO ASIA LTD. No. 21 Wu-Kung 5 Rd., Hsing Chuang City, Taipei Hsien, Taiwan, R.O.C.
Edition: July 2003 Version P1.