Motherboard Quick Start Guide The SOYO CD Quick BIOS Setup Hardware Installation SY-7VCA Introduction
SOYO ™ SY-7VCA Motherboard Socket 370 for Intel PIII & Celeron processors VIA VT82C694X AGP/PCI Motherboard 66/100/133 MHz Front Side Bus supported ATX Form Factor Copyright © 2000 bySoyo Computer Inc. Trademarks: Soyo is the registered trademark of Soyo Computer Inc. All trademarks are the properties of their owners. Product Rights: All names of the product and corporate mentioned in this publication are used for identification purposes only.
1 Introduction Congratulations on your purchase of the SY-7VCA Motherboard. This Quick Start Guide illustrates the steps for installing and setting up your new Motherboard. This guide provides all users with the basic steps of Motherboard setting and operation. For further information, please refer to the SY-7VCA Motherboard Uses’Guide that came with your Motherboard.
SY-7VCA Motherboard Layout PS/2 KB PS/2 Mouse Connector Connector USB 1 Socket 370 PRT COM1 1 3 ATX Power CPUFAN SDRAM COM2 ® VT82C694X GAME SDRAM AUDIO-OUT LINE-IN 1 MIC-IN 1 CODEC AC97 PCI Slot #1 DIMM 1 AGP Slot DIMM 2 IDE 1 IDE 2 DIMM 3 3 1 JP5 PCI Slot #2 1 4 1 4 CDIN1 PCI Slot #3 Via CDIN2 ® VT82C686A JP10 1 Flash BIOS Introduction SY-7VCA Quick Start Guide 3 PCI Slot #4 D2 D8 D1 D3 SIRCON 1 5 AMR 3V Lithium Battery 2 1 FDC1 (Optional) 1 5 PCI Slot #5 U
Key Features Ø Ø Supports Intel® processors -FSB 66MHz: Celeron(400-700MHz) - FSB 100MHz: Pentium® III (500E850MHz) - FSB 133MHz: Pentium® III (533933MHz) Supports 66/100/133 MHz Front Side Bus Frequency Ø Supports 5 sets of voltage monitoring Ø Supports multiple-boot function Ø 5 x 32-bit bus master PCI slots Ø 1 x 16-bit ISA slot.
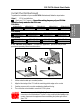
SY-7VCA Quick Start Guide 2 Installation Hardware Installation To avoid damage to your Motherboard, please follow these simple rules while handling this equipment: l Before handling the Motherboard, ground yourself by touching on to an unpainted portion of the system's metal chassis. l Remove the Motherboard from its anti-static packaging. Hold the motherboard by the edges and avoid touching its components. l Check the Motherboard for damage.
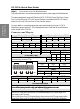
SY-7VCA Quick Start Guide To perform the installation of your new SY-7VCA Motherboard, follow the steps below: Step 1. CPU Installation Mark your CPU Frequency: Record the working frequency of your CPU that should be clearly marked on the CPU cover. FSB 66MHz 400MHz (66 x 6.0) 433MHz (66 x 6.5) 466MHz (66 x 7.0) 500MHz (66 x7.5) 533MHz (66 x 8.0) 566MHz (66 x 8.5) 600MHz (66 x 9.0) 633MHz (66 x 9.5) 667MHz (66 x 10.0) 700MHz (66 x 10.5) FSB 100MHz 500MHz (100 x 5.0) 550MHz (100 x 5.
SY-7VCA Quick Start Guide Connections to the Motherboard This section tells how to connect internal peripherals and the power supply to the Motherboard. Step 2. Hardware Installation The internal peripherals consist of IDE devices (HDD, CD-ROM), Floppy Disk Drive, Chassis Fan, Front Panel Devices (STR LED, Internal Speaker, Reset Button and IDE LED Switch.), Wake-On-LAN card, VGA card, Sound Card, and other devices.
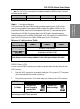
SY-7VCA Quick Start Guide ¡ N ° ote: The STR LED is connected to the Voltage that feeds the DIMM sockets. Therefore the following table applies: Suspend to RAM Normal Operation Power Off STR LED ON ON OFF Configure Memory Your board comes with three DIMM sockets, providing support for up to 1.5GB of main memory using unbuffered and registered DIMM modules from 8MB to 512MB. On this motherboard, DRAM speed can be set independent from the CPU front side bus speed.
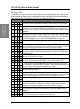
SY-7VCA Quick Start Guide Debug LEDs The Debug LEDs give an indication of the status of the system during boot-up. If the system does not boot-up properly, use the table below to find out at what point in boot-up sequence the problem arises. A x means the LED is off, a L means the LED is lit. Hardware Installation Code Explanation X X X L Initialization of the chipset.
SY-7VCA Quick Start Guide 3 Quick BIOS Setup This Motherboard does not require any hardware jumpers to set the CPU operating frequency. Instead, CPU settings are software configurable through the BIOS [Soyo Combo Feature]. The [Soyo Combo Feature] menu combines the main parameters that you need to configure your system. They are all in one menu to enable a quick setup in BIOS. Step 1. Select [Standard CMOS Features] Set [Date/Time] and [Floppy drive type], then set [Hard Disk Type] to “Auto”. Step 2.
SY-7VCA Quick Start Guide The SOYO CD 4 The SOYO-CD will NOT autorun if you use it on an Operating System other than Windows 9x or NT. Your SY-7VCA Motherboard comes with a CD-ROM labeled "SOYO CD." The SOYO CD contains (1) the user's manual file for your new Motherboard, (2) the drivers software available for installation, and (3) a database in HTML format with information on SOYO Motherboards and other products. Step 1.
The user's manual files included on the SOYO CD are in PDF (Postscript Document) format. In order to read a PDF file, the appropriate Acrobat Reader software must be installed in your system. Note: The Start Up program automatically detects if the Acrobat Reader utility is already present in your system, and otherwise prompts you on whether or not you want to install it. You must install the Acrobat Reader utility to be able to read the user's manual file.
SY-7VCA Quick Start Guide driver revision: VIA 4 in 1 driver package for Win 9x/NT VIA Ac97 Codec Driver for Win 9x/NT/2000 VIA hardware monitor for (Win 95/98) Cancel OK (Driver Installation Menu) The SOYO CD A short description of all available drivers follows: Ø VIA 4in1 driver package The 4 in 1 driver package includes all drivers your motherboard needs.
SY-7VCA Quick Start Guide Select which driver you want to install and click OK, or click Cancel to abort the driver installation and return to the main menu. Note: Once you have selected a driver, the system will automatically exit the SOYO CD to begin the driver installation program. When the installation is complete, most drivers require to restart your system before they can become active. Step 3.
SY-7VCA Quick Start Guide Quick Trouble shoot tips Video (no display) related issues I built a new computer system using a Soyo board and nothing happens when turning it on, no video and no beeps from the PC speaker. What is happening and how can it be fixed? No screen and no beeps mean that your CPU and motherboard do not work at all. It could be that the CPU is not seated correctly or that a component on the M/B is grounded (shorted) with the case.
SY-7VCA Quick Start Guide the AGP card to allow the card to go further down. Do take care not to damage the card by using too much force. I get distorted video my AGP card right after I save my bios. Why is that? The cause is likely that your AGP card is not running at the correct bus speed. To fix this, please clear the CMOS via JP5 and if it still does not work, please upgrade your motherboard bios to the latest version.
SY-7VCA Quick Start Guide Audio Issues I do not get any sound from my sound card. What could be wrong? Please make sure the speaker is connected to the speaker out port on your sound card. In Device Manager, I keep getting yellow exclamation signs on my sound port even though I have installed my sound driver several times and I could not get my sound card to work. What is wrong? It is likely that you did not have the correct driver installed.
SY-7VCA Quick Start Guide How to contact us: n If you are interested in our products, please contact the SOYO sales department in the region you live. n If you require Technical Assistance, please contact our Technical Support in the region you live. SOYO prefers Email as communication medium, remember to always add to the email the country that you live in. SOYO Taiwan SOYO USA No. 21 Wu-Kung 5 Rd.
SY-7VCA Quick Start Guide SOYO Deutschland GmbH SOYO Hong Kong August-Wilhelm-Kuhnholz-Str. 15 D-26135 Oldenburg Region Covered: Hong Kong Region Covered: Germany, Sales: tel: 852-27109810 fax: 852-27109078 E-mail: soyo@hkstar.com Web Site: www.soyo.com.hk Web Site: www.saat.de, www.soyosaat.com, www.soyo-saat.de Vertrieb Mainboards, Notebooks und SoyoCom Produkte: E-Mail: sales@soyo.
Edition: September 2000 Version 1.