
user manual


112
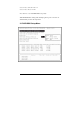
2.2.5 Delete RAID Setting & Partition
1. Press ‘Enter’ key to activate this item. An ‘E’ flash cursor appears at the
‘Drive Select Menu’ for the user to choose defined array drive to be
deleted.
2. ‘Data on RAID drives will be erased (Y/N)?’ prompt message shows up
to confirm the user’s selection.
3. Press ‘Y’ key, and then the data in drivers is destroyed.
Warning: Make sure the data in drives is no longer in use before deleting
RAID Array.
4. ‘RAID array List” automatically updates itself.
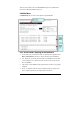
2.2.6 Delete All RAID Setting & Partition
1. Press ‘Enter’ key to activate this item.
2. ‘Data on RAID drives will be erased (Y/N)?’ prompt message shows up
to confirm the user’s selection.
3. Press ‘Y’ key, and then the data in drivers is destroyed.
Warning: Make sure the data in drives is no longer in use before deleting
RAID Array.
4. ‘RAID array List” automatically updates itself.
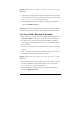
2.2.7 Rebuild RAID Array
When a drive is replaced or BIOS detects a bad drive, use Rebuild RAID
Array to keep data coherency for RAID 1 and 0+1.
1. Press ‘Enter’ key to activate this item. An ‘R’ flash cursor appears at the
‘Drive Select Menu’ for the user to choose the array to rebuild.
2. BIOS shows the source and destination drives and waits for
confirmation to rebuild. Press ‘Y’ to start rebuild process.
3. Process status bar shows up during the rebuild process.