
Installation Manual
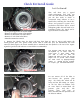


Gently install the new clutch disc and
pressure plate onto the alignment
dowels of the newly resurfaced
flywheel while installing the
mounting bolts by hand. Leave the
pressure plate bolts a little lose so the
pressure plate can move around. This is
so you can insert the clutch
alignment tool included in the clutch kit.
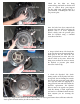
Locate the clutch alignment tool
included in the clutch replacement kit.
This is needed to line up the clutch
disc to the pilot bearing so the
transmission can be easily
reinstalled.
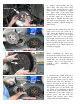
With the clutch disc loose position and
install the clutch alignment tool into
the clutch disc and pilot bearing. Slightly
tighten the bolts further to hold the
disc in place and move the tool in a
circular motion. It will give some
resistance in all directions and you want
to find a good center point. This
means the disc is in the middle of the
pressure plate.
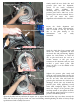
Tighten the pressure plate evenly and
slowly in a star pattern using a ratchet. Do
not tighten any one bolt all at once and do
not use air tools. This will bend the
pressure plate and cause the clutch not to
disengage. Work your way around the
pressure plate slowly tightening several
times until completely tight. You will
notice the fingers of the pressure plate
traveling inward as you tighten the bolts.
You want this progression to be as even as
possible. and 30 foot pounds.
Again the flywheel will try and turn the engine over so tighten inward. If this step is not done correctly the
clutch will not release properly which can cause hard shifting. Finish tightening the bolts to factory torque
specifications which is usually between 25