
Installation Manual
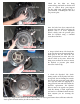


While the last bolts are being
removed keep your hands on the disc and
plate to control these parts. Support
the disc while using a finger which is a
good method of holding the disc onto
the pressure plate.
Once the bolts have been removed the
pressure plate may still be held onto the
flywheel with 3 or more alignment
dowels. Gently work the pressure plate
from the flywheel using a standard
screwdriver until free.
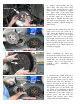
2. Inspect Clutch Wear: The clutch disc
is the part that wears down much like a
brake pad, in fact the clutch disc has
brake pad material on either side of it
which is held on by rivets. When this
lining wears it allows the rivets to contact
the flywheel or pressure plate which
causes the clutch to slip.
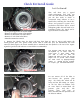
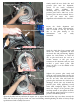
3. Check the Flywheel: The clutch
mating surface of the flywheel will now
be exposed. You are looking for extreme
heat checks, hot spots and cracks which
are a sign the clutch was slipping for a
long period of time and will warrant the
flywheel's replacement. The flywheel
below is what a the typical wear pattern
looks like during a clutch replacement
and can be re-machined which must be
done anytime you are servicing the
clutch.
If this step is skipped when the new clutch is installed you will have a good chance that it will chatter when the
clutch pedal is released and the job will need to be redone.