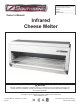
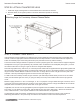
IMPORTANT FOR FUTURE REFERENCE Please complete this information and retain this manual for the life of the equipment: Model #: ___________________________ Serial #: ___________________________ Date Purchased: _____________________ Owner’s Manual Infrared Cheese Melter WARNING Improper installation, adjustment, alteration, service or maintenance can cause property damage, injury or death.
SAFETY PRECAUTIONS INFRARED CHEESE MELTER SAFETY PRECAUTIONS Before installing and operating this equipment, be sure everyone involved in its operation is fully trained and aware of precautions. Accidents and problems can be caused by failure to follow fundamental rules and precautions. The following symbols, found throughout this manual, alert you to potentially dangerous conditions to the operator, service personnel, or to the equipment.
INFRARED CHEESE MELTER INTRODUCTION Congratulations! You have purchased one of the finest pieces of heavy-duty commercial cooking equipment on the market. You will find that your new equipment, like all Southbend equipment, has been designed and manufactured to meet the toughest standards in the industry. Each piece of Southbend equipment is carefully engineered and designs are verified through laboratory tests and field installations.
SPECIFICATIONS INFRARED CHEESE MELTER SPECIFICATIONS NOTICE Local codes regarding installation vary greatly from one area to another. The National Fire Protection Association, Inc. states in its NFPA 96 latest edition that local codes are the “authority having jurisdiction” when it comes to installation requirements for equipment. Therefore, installations should comply with all local codes. Southbend reserves the right to change specifications and product design without notice.
INFRARED CHEESE MELTER SPECIFICATIONS NOTICE Proper ventilation is the owner’s responsibility. Any problem due to improper ventilation will not be covered by the warranty. Be sure to inspect and clean the ventilation system according to the ventilation equipment manufacturer’s instructions. Canopies are set over ranges, ovens, etc., for ventilation purposes. It is recommended that a canopy extend 6” past the appliance and the bottom edge be located 78” above the floor.
INSTALLATION INFRARED CHEESE MELTER INSTALLATION NOTICE These installation procedures must be followed by qualified personnel or warranty will be void. Local codes regarding installation vary greatly from one area to another. The National Fire Protection Association, Inc. states in its NFPA 96 latest edition that local codes are the “authority having jurisdiction” when it comes to installation requirements for equipment. Therefore, installations should comply with all local codes.
INFRARED CHEESE MELTER INSTALLATION STEP 2A: MOUNT ON FLUE RISER OF RANGE If the cheese melter is to be mounted over a range, a special flue riser is shipped with the cheese melter and range. Depending on the shipping requirements, the cheese melter, flue-riser, and range base may already be partially or completely assembled. 1. Attach the flue riser to the rear of the range using the installation procedure included in the range manual, but do not attach the wall shield (the back of the flue riser) yet.
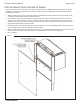
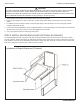
INFRARED CHEESE MELTER INSTALLATION STEP 2B: MOUNT ON WALL The cheese melter is installed by first attaching a mounting bracket to the wall, then attaching the cheese melter to the bracket. 1. Attach the wall-mount assembly to the wall using the six 1/4” x 2” lag screws and six washers provided (see Figure 5). Screw through frame and into wall studs since the cheese melter weighs as much as 265 pounds (120 kilograms). 2. Check that the wall-mount is level (both side-to-side and front-to-back).
INFRARED CHEESE MELTER INSTALLATION STEP 2C: ATTACH COUNTERTOP LEGS 1. Install each leg by screwing them into the threaded holes in the bottom of the base. 2. Stand the broiler on its legs and position to minimum clearances specified on serial tag.
INSTALLATION INFRARED CHEESE MELTER CAUTION ALL PIPE JOINTS AND CONNECTIONS MUST BE TESTED THOROUGHLY FOR GAS LEAKS. USE ONLY SOAPY WATER FOR TESTING ON ALL GASES. NEVER USE AN OPEN FLAME TO CHECK FOR GAS LEAKS. ALL CONNECTIONS MUST BE CHECKED FOR LEAKS AFTER THE EQUIPMENT HAS BEEN PUT INTO OPERATION. TEST PRESSURE SHOULD NOT EXCEED 1/2 psi (3.45 kpa) or 35 mbar (14” W.C.). 1. Check that the control valves on the cheese melter are in the OFF position. 2.
INFRARED CHEESE MELTER INSTALLATION STEP 5: CHECK THE INSTALLATION Check the installation of the cheese melter, as follows: 1. Check that all screws and bolts are tightened. 2. Check that the gas connection has been made correctly. 3. With the cheese melter in the position that it will be operated, check that the cheese melter is level (both front-to-back and side-to-side). 4.
OPERATION INFRARED CHEESE MELTER OPERATION DANGER EXPLOSION HAZARD In the event a gas odor is detected, shut down equipment at the main gas shut-off valve and immediately call the emergency phone number of your gas supplier. Improper ventilation can result in headaches, drowsiness, nausea, and could result in death. Do not obstruct the flow of combustion and ventilation air to and from cooking appliances.
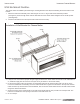
INFRARED CHEESE MELTER OPERATION Figure 6 Cheese Melter Operation OPERATION OF INFRARED CHEESE MELTER Southbend infrared cheese melters cook in half the time of ordinary cheese melters. The burners reach operating temperature in just 90 seconds, and their intense infrared energy quickly heats the food, not the surrounding air. The rack adjusts to five heights on rack guides. The cooking area has a removable rack and a drip pan for cleaning.
OPERATION INFRARED CHEESE MELTER LIGHTING CHEESE MELTER PILOTS The pilots should burn continuously unless the cheese melter is to be completely shut down. The cheese melter cavity has two or three pilots, each near the front of a pair of burners. If the pilots are extinguished, the pilot gas supply is NOT interrupted (unless the flame-failure option was ordered).
INFRARED CHEESE MELTER CLEANING CLEANING WARNING Disconnect the power supply to the appliance before cleaning. Do not remove panels that require tools to remove. WARNING Adjustments and service work should be performed only by a qualified technician who is experienced in, and knowledgeable with the operation of commercial gas cooking equipment. To assure confidence, contact your authorized service agency for reliable service, advice and other assistance with your appliance.
CLEANING INFRARED CHEESE MELTER STAINLESS-STEEL SURFACES To remove normal dirt, grease and product residue from stainless steel surfaces that operate at LOW temperature, use ordinary soap and water (with or without detergent) applied with a sponge or cloth. Dry thoroughly with a clean cloth. To remove BAKED-ON grease and food splatter, or condensed vapors; apply cleanser to a damp cloth or sponge and rub cleanser on the metal in the direction of the polishing lines on the metal.
INFRARED CHEESE MELTER TROUBLESHOOTING TROUBLESHOOTING WARNING ADJUSTMENTS AND SERVICE WORK MAY BE PERFORMED ONLY BY A QUALIFIED TECHNICIAN WHO IS EXPERIENCED IN, AND KNOWLEDGEABLE WITH, THE OPERATION OF COMMERCIAL COOKING EQUIPMENT. HOWEVER, TO ASSURE YOUR CONFIDENCE, CONTACT YOUR AUTHORIZED SERVICE AGENCY FOR RELIABLE SERVICE, DEPENDABLE ADVICE OR OTHER ASSISTANCE, AND FOR GENUINE FACTORY PARTS.
TROUBLESHOOTING INFRARED CHEESE MELTER ACCESS TO SERVICEABLE PARTS Some serviceable parts are only accessible by removing body side panels and the front panel. The main front panel is fastened with six sheet-metal screws. To remove the front panel, remove these screws, as well as the burner-control-valve knobs. The main front panel can then be pulled forward and removed. Each body side panel is fastened with two sheet-metal screws.
INFRARED CHEESE MELTER TROUBLESHOOTING ADJUSTMENT OF GAS PRESSURE REGULATOR The regulator is preset for 4” W.C. for natural gas, or 10” W.C. for propane gas. If adjustment is necessary, do the following: 1. Turn cheese melter control knob to OFF. 2. Attach a pressure-measuring device to the 1/8” NPT connector located on the front of each burner manifold. 3. Turn the cheese melter control knob to HIGH and, with the burners lit, check the manifold pressure. The pressure should be 4” W.C.
INFRARED CHEESE MELTER Notes: PAGE 20 OF 22 OWNER’S MANUAL 1186531 REV 3 (9/14)
INFRARED CHEESE MELTER Notes: OWNER’S MANUAL 1186531 REV 6 (9/14) PAGE 21 OF 22
INFRARED CHEESE MELTER INFRARED CHEESE MELTER A product with the Southbend name incorporates the best in durability and low maintenance. We all recognize, however, that replacement parts and occasional professional service may be necessary to extend the useful life of this appliance. When service is needed, contact a Southbend Authorized Service Agency, or your dealer. To avoid confusion, always refer to the model number, serial number, and type of your appliance.