Secure MICR Printer User’s Guide
Copyright Copyright Copyright ©2009 by Source Technologies, LLC. All rights reserved. No part of this document may be reproduced or utilized in any form or by any means, electronic or mechanical, including photocopying, recording, or by any information storage and retrieval system, without permission in writing from Source Technologies, LLC.
Table of Contents Table of Contents 1. Printer and Driver Installation.......................................................................1 Driver Overview.................................................................................................2 Downloading the Universal Driver .....................................................................3 Unzipping the Driver..........................................................................................3 Installing the Driver.................
PJL MICRJOB.................................................................................................29 Fonts and Secured Resources........................................................................29 PJL Unlock Sequence .....................................................................................30 PJL Re-Lock Sequence...................................................................................30 PJL Re-Lock Sequence With A New Password Value ....................................
Printer and Driver Installation | 1 1. Printer and Driver Installation Note: To access Source Technologies’ secure fonts loaded on the printer, such as the E13B MICR font, download the universal driver as described in the next section. The printer drivers on this CD may be used for general office printing but do not facilitate using secure fonts. For complete information on how to unpack and setup your printer, see your printer’s user’s guide. 1.
Printer and Driver Installation | 1 Driver Overview Your new MICR printer requires specific PCL 5 commands to load and print secure fonts such as the MICR E13B font. These specific commands may be coded in to your custom application, or if you use a software program such as Source Technologies’ CheckPartner™ Enterprise, these commands are automatically sent to the printer as needed.
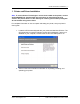
Printer and Driver Installation | 1 Downloading the Universal Driver 1. Browse to the URL below from your web browser. http://www.sourcetech.com/support/drivers.asp 2. From this page go to the section for the particular operating system you are using such as Widows 2000, XP, etc. 3. Click on your specific model such ST9612, ST9620 etc. 4. When the File Security dialog box appears, select Save. 5.
Printer and Driver Installation | 1 Installing the Driver Note: Do not connect the printer at this time. 1. From the Source Tech Driver folder, double-click the driver installation program. Note: The name of the driver’s .exe program will vary depending on the operating system being used. There will only be one executable file included with the driver. 2. Click Next >. 3. Click I accept the terms, and then click Next >.
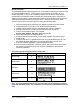
Printer and Driver Installation | 1 4. Leave the “Save files in folder” option as shown above then click Next >. 5. After the installation program installs the necessary files, the following message will be displayed revealing the next steps required to install the driver. At the same time, an “Add Printer Wizard” will run as shown in the next step.
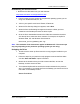
Printer and Driver Installation | 1 6. Click Cancel if connecting through USB. 7. Power on the printer and wait for the New Hardware Wizard to appear. 8. Select “No, not this time,” then Next >.
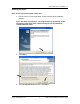
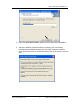
Printer and Driver Installation | 1 9. Select Install from a list or specific location (Advanced). 10. Click Next >. 11. Click Don’t search, I will choose the driver to install. 12. Click Next >. 13. Scroll down the list and select Printers.
Printer and Driver Installation | 1 14. Click Next >. 15. Click Have Disk.
Printer and Driver Installation | 1 16. Select Browse. Browse to the driver files on your disk and then select Open. 17. Select OK. 18. Select Source Technologies from the Manufacturer list and then click Next >. 19. Select Yes to continue. 20. Once the files have copied, select Finish to close the Wizard.
Printer and Driver Installation | 1 Configure the Driver to enable MICR Mode To unlock the secure font resources located in the printer, the driver must be configured to send down a separator page before each print job. The separator page contains the necessary commands to unlock the resources. 1. Click Start then select the Printer and Faxes folder. 2. Locate the printer you just installed and right-click the icon. Then select Properties. 3.
Printer and Driver Installation | 1 Configure the Driver to Recognize the Printer Secure Fonts 1. Select the Fonts tab. Select Update List. 2. Select the upper Browse button. Locate the directory that contains the 96XXfont.pcm file and select OK. 3. Select the Search Path button. 4. Select ST 96XX Font Collection. Then select the Add to driver button. 5. Select the Done. 6. When you have made all of the desired changes choose OK to save your settings.
Printer and Driver Installation | 1 3. Choose the port to which your MICR printer is connected and then select Next >. 4. Select the Have Disk button and the Browse button and locate the driver files. Select Source Technologies as the Manufacturer and select Next >. 5. Choose Keep existing driver and select Next >.
Printer and Driver Installation | 1 6. Enter a Printer name to differentiate it from the MICR instance of the driver and then decide if it is to be the default printer. Select Next >. 7. If you do not wish to share your printer on a network, leave the "Do Not share this printer" button marked and choose "Next". Otherwise, select the "Share as" radio button and enter the name you wish to assign to this shared printer. Then choose Next >.
Printer and Driver Installation | 1 Selecting the Printer Printing Secure font resources from a Windows Application First, set the MICR printer as the active printer – in most applications this is done by selecting Print from the File menu. This is not necessary if the MICR printer is the default printer. Source Technologies’ fonts should appear in the application’s font formatting options. The fonts are named: ICR Secure 12 pt. MICR CMC7 8 pt. MicroPrint 1 pt. MICR E13B 8 pt. SECURE 36 pt.
Printer and Driver Installation | 1 Comparison of printer drivers configured as MICR and non-MICR CONFIGURED FOR MICR CONFIGURED FOR NON-MICR MICR_on.sep separator page used Unlocks Secure Resources (fonts) Copy Count = 1 Jam Recovery = Off MICR Toner ONly DEFAULT MICRJOB=ON MICR_off.sep separator page used Locks Secure Resources (fonts) DEFAULT MICRJOB=OFF Secure Fonts enabled by 96xxFont.pcm ICR Secure 12 pt. MICR CMC7 8 pt. MICR E13B 8 pt. MicroPrint 1 pt. SECURE 36 pt.
MICR Overview | 2 2. MICR Overview MICR stands for Magnetic Ink Character Recognition. All MICR documents have a MICR line with numbers and symbols printed in a unique MICR font with magnetically chargeable ink or toner. Each character of the MICR font has a unique waveform when sensed magnetically. Financial institutions and the Federal Reserve use the MICR line to identify and sort checks.
MICR Overview | 2 Softcopy: X9 Electronic Bookstore www.X9.org - click ESS www.ansi.org - click ESS or http://webstore.ansi.org Hardcopy: Global Engineering Documents Phone 800-854-7179 or 303-397-7956 Fax 303-397-2740 global@ihs.com http://global.ihs.com The key standards that address check documents are as follows: ANS X9.7 Specifications for Bank Check Background and Convenience Amount Field ANS X9.100-160 Specifications for Placement and Location of MICR Printing ANS X9.
MICR Check Design | 3 3. MICR Check Design General Features of Check Design To be a legal and negotiable document, the necessary data elements required on a check are the date, amount, payee name, payer’s bank name, and payer’s signature. Other elements included in a good check design are: the amount in words, account title, check serial number, fractional routing number and MICR line. A good check design contains security features and is formatted to be easily read by both machines and the human eye.
MICR Check Design | 3 Data Elements Date The date is a required data element for a check. It represents the day upon which or after which the transfer of the check amount may take place. The date is usually placed in the upper right portion of the check so it does not interfere with the convenience amount field. The common format is Month, Day and Year, however, the military format of Day, Month and Year is also acceptable. Amount The amount of the check is a required data element for negotiation.
MICR Check Design | 3 Given the available area on the document, you may need to use a smaller font when printing larger value amounts. Payee Area The payee is a necessary data element for a negotiable document. The payee area is generally to the left side of the document either above or below the amount in words. It is often preceded by the words “Pay to the Order Of.” The payee data should not enter the MICR clear band which extends 5/8 of an inch above the bottom of the check.
MICR Check Design | 3 Reserve District and drawee institution. Consult with your bank for the proper routing number and format for each of your accounts. MICR Line Accurate high-speed processing of your checks by financial institutions is enabled by the accuracy and integrity of the data in the MICR line. Refer to figure 3.1 for the location of the following MICR line fields.
MICR Check Design | 3 Figure 3.1: Sample Check A. Serial Number: Must be in the upper right corner and match the serial number in the MICR line (see D for further explanation). B. Fractional Routing Transit Number: Should be in the upper right corner and must match the routing transit number in the MICR line with the exception of the state prefix number (ex. 66 = NC, 67 = SC, 64 = GA, etc.) and the preceding zeros. C. Bank Name, State, City: The bank logo is optional.
4. Quality Issues A high quality MICR document can be read by bank reader/sorter equipment many times with no readability issues and does not result in damage to bank equipment. This quality is the result of a well designed printer, an originally manufactured MICR toner cartridge and high quality check stock. Printer Features Your Secure MICR Printer is equipped with some features to ensure high quality MICR documents.
Quality Issues | 4 MICR Check Stock Check stock has a significant impact on the resulting quality and security of your MICR document. Here are a few features that should be considered when selecting a check stock. Please see Chapter 5: Security Issues for more information on check stock security features. Quality Quality MICR check printing with your Source Technologies’ secure MICR printer requires check stock that matches the printer’s requirements.
5. Security Issues Printing negotiable documents from blank paper on desktop MICR laser printers makes security a top priority for any company embarking on a desktop check printing project. Combating fraud is a moving target. As soon as a new weapon is developed, malicious forces are at work to devise workarounds to it. Good security programs integrate hardware, software, your employees, processes, and your financial institution into a secure check production system.
Security Issues | 5 This also provides for inventory control of blank check stock. This number should not be linked or be equal to the check serial number due to the potential of double feeding in laser printers. Note: These features serve as a general guide for check security. You should not consider these features as an all inclusive list. We recommend consulting with your paper supplier for any additional comments or suggestions. 4. Firms accepting checks should be aware of damaged MICR lines.
MICR Features | 6 6. MICR Features Source Technologies’ secure MICR printers are designed to allow both general office document printing and secure MICR document printing. You may print a variety of conventional jobs with MICR toner using all of the printer features available. These printers come standard with PCL5e, PCL6, and PostScript Level 2 emulation.
MICR Features | 6 MicroPrint Your secure MICR printer also contains the MicroPrint font. MicroPrint text, being less than .010” tall, can be easily read with a magnifying glass but appears as a solid line to the unaided eye. This font provides protection against reproduction by most scanners and copiers because they cannot successfully print the tiny letters. Most check printers use this font in the signature area of their preprinted checks.
MICR Commands | 7 The PJL commands to unlock the fonts must precede all PCL commands. The re-lock PJL commands must follow the PCL commands and final form feed command. The PCL commands can print an unlimited number of pages between the unlock and re-lock sequences. The following examples will use to indicate the Escape character, ASCII 27. Values shown in parentheses () are hexadecimal.
MICR Commands | 7 bitmapped fonts and therefore cannot be scaled larger or smaller than the bitmapped images. These fonts can be called by either a PCL Font Selection String or by their ID.
MICR Commands | 7 Refer to the Font Mapping Appendix pages for specific character set data for each font. PJL INFO MICR COMMAND Source Technologies’ secure MICR printers support an optional custom bi-directional PJL Inquiry Command. The command provides printer and cartridge information for network management. The command format is: @PJL INFO MICR. The command should be sent with UEL (Universal Exit Language) commands.
MICR Commands | 7 • • • 9 = Full, 0 = Empty Cartridge Count = xxxx Data indicating toner usage by counting pixels printed Low Threshold = xxxx The Toner Low point based on cartridge count value Empty Threshold = xxxx A cartridge count value that determines when printing must stop to ensure quality MICR documents Source Technologies, LLC 33 ST9612 Secure MICR Printer User’s Guide
MICR Commands | 7 Toner Cartridge and Photoconductor Units The ST9612 MICR Print Cartridge is comprised of two components: the toner cartridge and the photoconductor unit. Toner cartridges are available in two models depending on the yield: a 1.5K page and a 3K page. The 1.5K model ships with new printers. The 3K model is the normal replacement model. The projected life in terms of page count is based on a typical 5% print coverage and continuous print mode.
MICR Commands | 7 Toner Out After approximately 300 pages beyond the first Toner Low condition the printer will stop printing and display the Toner Out condition. The Toner Low light will be ON steady and the Error light will blink. All other lights will be off. You must replace the toner cartridge to continue printing. Photoconductor Unit Life Warning As mentioned above, the printer internally calculates the average print-job size and actual average print coverage percentage.
MICR Commands | 7 Replace Photoconductor (printer hard stop) After the photoconductor unit exceeds 15% beyond the usable life point, the printer will hard stop with the Error and Toner Low / Replace PC lights BLINKING and the Continue button ON. If you press Continue, one page will print with instructions in multiple languages to replace the Photoconductor Unit referring to Appendix F.
MICR Command Example | 8 PJL Re-Lock Sequence The last two lines re-lock the secured fonts. The password is not changed in this example. FIGURE 8.
MICR Commands | 7 PJL and PCL commands used to print the sample check: %-12345X@PJL LDECLARE LRESOURCE:"flash:" LRWLOCK="PASSWORD" @PJL MICRJOB @PJL ENTER LANGUAGE = PCL &l2a1h6d1e64F &u600D &f100y3X (s4099t0b10H *p300x600Y xxxxxxxxx xx/xx/xxxx $x,xxx.xx *p300x2775Y xxxxxxxxx xx/xx/xxxx $x,xxx.xx 3% 3% $x,xxx.xx $x,xxx.
Appendix B Appendix B: Secure Numeric Font Mapping Description Alpha/Numeric Character Hex Value Dollar Sign $ 23 Left Bracket ( 28 Right Bracket ) 29 Asterisk * 2A Comma , 2C Dash - 2D Period .
Appendix B Appendix B continued: Secure Numeric Font Mapping Description Alpha/Numeric Character Hex Value Five 5 35 Six 6 36 Seven 7 37 Eight 8 38 Nine 9 39 Arrow > 3E Secure Font Character Example: Note: The secure fonts in the example are magnified for purposes of clarity.
Appendix D Semi-Colon ; 3B Less Than < 3C Equal = 3D Greater Than > 3E Note: The CMC7 Font in the example above is magnified for purposes of clarity.
Appendix E Appendix E: Contact For more information, contact: Source Technologies LLC. 2910 Whitehall Park Drive Charlotte, NC 28273 www.sourcetech.com techsupport@sourcetech.com 800.922.
Appendix F: Photoconductor Replacement Source Technologies, LLC 48 ST9612 Secure MICR Printer User’s Guide
Source Technologies, LLC 49 ST9612 Secure MICR Printer User’s Guide