Table of Contents | Contestable 2 Installation... union 5-6 Safely Information eee chess 2 Surface Mounting Onl .ovvrmmrvmommm mmm 5-8 Warranty Renee 2 Electrical Operation 7 important Safety Instructions 3 Electrical Specifications. 8 4 Mechanical Specifications. coo nnn 8 Planning Installation 4 Care and Cleaning «oon 8 Tools Equitable mesa 4 Safety Information | 1.
IMPORTANT SAFETY INSTRUCTIONS Whe musing an electrical illumining, basic precautions should always be followed, including the following: Read all instructions before using this mirror. DANGER TO REDUCE THE RISK OF ELECTRIC SHOCK: 1. Always disconnect power al the circuit breaker to the uni pros Io performing any maintenance or service operation, WARNING TO REDUCE THE RISK OF BURNS, FIRE, ELECTRIC SHOCK, OR INJURY TO PERSONS: 1. Disconnect power af the circuit breaker before putting on or faking off parts.
Pr-Installation PLANNING INSTALLATION t+ Unpack your LED mirror carefully, and close the sink drain to prevent any dropped parts from falling into the drain. i. Please read the entire manual before beginning installation and become familiarized with the steps and parts involved rr For surface-mount installation only. TOOLS REQUIRED ; si Electric drill Measuring pe —— Phillips Stud {ape Level i ® screwdriver mounting.
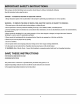
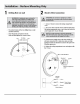
Installation Surface Mounting Only 1 Drilling Hole on wall WARNING: It installing the mirror on drywall or other hallow wall applications, the Phillips head p screws (HB) inst be fastened 10 suds headers, of either structural wall members. The included plastic wall anchors are intended for use with dolls wall applications only (ile of concrete), BO NOT USE WITH DRYWALL OF OTHER HOLLOW WALL APPLICATIONS. re The center distance of the we drilling holes on wall: 228.
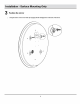
Installation Surface Mounting Only 3 Position the mirror = 1. Hang the mirror on the screw heads by engaging with the hanging holes al the back of the mirror.
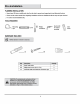
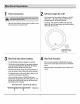
Electrical Operation 1 Power Connection A 1 When the Power Indicator Lamp is trued on (Blue in collar, it means the power connection is 0K. CATION: TURN OFF MAIN POWER BEFORE INSTALLATION TO AVOID ANY ELECTRIC SHOCK. 2 LED Circle Light On & Off rv Finger touches the Power Indicator (Diagram adhere L Circle Light: is ON.
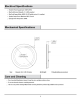
Electrical Specifications ti Hardwired Power Supply: Input 1200 AC 60Hz = Blue Tooth Version: Bluetooth 4.1 + EDR compliant = Blue Tooth Support Mode: HFP profile version 1.6 compliant 0 Speaker Output Power: Maximum 4W*2, Bi-aural = LED Light Color Temperature: 3800k Mechanical Specifications | 124.00in 1 609.60mm Size: Diameter 24 x 1.85 (T) inches Net Weight: 6.5kg (Including accessories) Care and Cleaning | Use a household liquid glass cleaner to keep the mirror and glass surfaces clean.