
User Manual

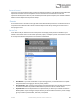


Table Of Contents
- Welcome
- Overview
- Connecting the Pedal
- Connections
- Reverb Engines
- Delay Engines
- Controls
- Hardware Shortcuts
- Preset Storage and Recall
- Universal Bypass
- Stereo Operation & Signal Routing
- External Control
- Neuro Desktop and Mobile Editors
- The Neuro Desktop Editor
- Downloading and Connecting the Neuro Desktop Editor
- Neuro Desktop Editor User Interface
- Connections
- Hardware Options
- Delay Controls (Engine A)
- Reverb Controls (Engine B)
- Routing Options
- Tap Tempo
- This section allows you to manually enter a tempo for your Delay repeats. You may type in a BPM (beats per minute) or ms (milli-seconds) numerically or use your cursor to “tap” the button at your desired tempo. Also in this section is the option to Sy...
- External Control
- Presets
- Device Tab
- Cloud Tab
- The Neuro Mobile App
- Neuro Hub
- MIDI
- USB
- Specifications
- Troubleshooting
- Frequently Asked Questions
- What kind of instruments can I connect to the Collider’s inputs?
- Can I power the Collider directly over USB, without using the 9 Volt supply?
- When connecting the Collider to a recording interface or mixer, should I used a Lo-Z (microphone) or Hi-Z (line / instrument) input?
- Why doesn’t the Collider respond to MIDI messages being sent to it?
- Can I use the Collider in my amp’s effects loop?
- How do I update the firmware?
- Rubber Feet
- Waste Disposal Notes
- Warranty
- Version History

SA263 Collider Delay+Reverb Owner’s Manual
45
connection between the Collider’s CONTROL INPUT jack and any of the Neuro Hub’s multi-function
outputs. For more information, refer to the Neuro Hub documentation on the Source Audio website.
MIDI
Using the MIDI IN jack (5-pin DIN) or a USB connection, the Collider can be controlled by generic MIDI
Continuous Controller (CC) and Program Change (PC) messages. All of the Collider’s adjustable
parameters are directly accessible via MIDI continuous controller messages.
MIDI Channel
By default, the Collider responds to MIDI Channel 1. The Collider ignores all MIDI messages sent to it
that are not on its channel. The input MIDI channel for the Collider can be changed in the Hardware
Options menu of the Neuro Editors. Note that the MIDI Input Channel is a global setting that is NOT
saved per preset. Note that some manufacturers begin counting MIDI channels at zero (from 0 to 15),
while the Source Audio Neuro Editors use the convention of counting from 1 to 16.
Selecting Presets via Program Change (PC) Messages
The 128 user presets on the Collider can be recalled via program change messages. Presets 1 to 128
are mapped to MIDI Program Change messages 1 to 128.
It is possible to save presets with the Collider bypassed. This means a preset can be recalled without
actually engaging one or both of the effects. The effect can then be engaged either by pressing the
footswitches or by sending the proper MIDI Continuous Control message.
Many of the parameters in the Collider can be controlled via MIDI. For more details, see MIDI
Implementation.
Controlling the Collider with MIDI Continuous Controller (CC) Messages
The Collider responds to MIDI Continuous Controller (CC) messages. The pedal comes already
mapped to a default set CC numbers. For a complete list of default MIDI mappings and ranges,
download the Collider Delay+Reverb MIDI Implementation Guide located at the bottom of the
Collider Delay+Reverb page on the Source Audio website.
Custom CC Mapping
The default MIDI map provides control over parameters using specific Continuous Controller
messages. It is also possible to override the default map and create custom mapping. Custom MIDI
CC mappings are global, meaning they are not unique per preset. The CC mapping will apply in all
situations, regardless of which preset is active.
To create a custom MIDI CC mapping, follow these steps:
• Connect your Collider to the Neuro Desktop Editor.
• In the top bar menu select Device then Edit Device MIDI Map from the dropdown menu.
• The Collider Reverb MIDI Map Editor window will open. Simply scroll to the MIDI CC value
you wish to remap and click that CC’s dropdown menu. A list of parameter choices will unfold.