
User Manual
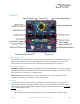
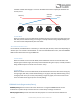

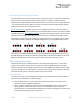
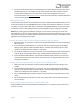
Table Of Contents
- Welcome
- Overview
- Connecting the Pedal
- Connections
- Reverb Engines
- Delay Engines
- Controls
- Hardware Shortcuts
- Preset Storage and Recall
- Universal Bypass
- Stereo Operation & Signal Routing
- External Control
- Neuro Desktop and Mobile Editors
- The Neuro Desktop Editor
- Downloading and Connecting the Neuro Desktop Editor
- Neuro Desktop Editor User Interface
- Connections
- Hardware Options
- Delay Controls (Engine A)
- Reverb Controls (Engine B)
- Routing Options
- Tap Tempo
- This section allows you to manually enter a tempo for your Delay repeats. You may type in a BPM (beats per minute) or ms (milli-seconds) numerically or use your cursor to “tap” the button at your desired tempo. Also in this section is the option to Sy...
- External Control
- Presets
- Device Tab
- Cloud Tab
- The Neuro Mobile App
- Neuro Hub
- MIDI
- USB
- Specifications
- Troubleshooting
- Frequently Asked Questions
- What kind of instruments can I connect to the Collider’s inputs?
- Can I power the Collider directly over USB, without using the 9 Volt supply?
- When connecting the Collider to a recording interface or mixer, should I used a Lo-Z (microphone) or Hi-Z (line / instrument) input?
- Why doesn’t the Collider respond to MIDI messages being sent to it?
- Can I use the Collider in my amp’s effects loop?
- How do I update the firmware?
- Rubber Feet
- Waste Disposal Notes
- Warranty
- Version History

SA263 Collider Delay+Reverb Owner’s Manual
19
Preset Select/(Hold) Save Button and LEDs
Press the SELECT button to scroll through and select saved user presets. The four PRESET LEDS next to
the PRESET BUTTON indicate which preset is active for presets 1 through 4. If a preset has been
modified, the corresponding PRESET LED will blink slowly. To save a preset, press and hold this button
– the associated preset LED will blink for a few seconds. When the LED stops blinking, the updated
preset will be saved to the current preset position.
Preset Extension Mode: Allows for easy access to an additional 4 presets for a total of 8 onboard
presets. To enable Preset Extension Mode, go to the Hardware Options sections of the Neuro Mobile
or Desktop Editor (see Neuro Hardware Options) and select the appropriate option. The illumination
patterns of the Preset Select LEDs indicate which Preset has been selected (see the figure below).
Preset Extension Mode can also be enabled as a hardware shortcut on the Collider itself. To Enable
Preset Extension Mode, hold down the CONTROL INPUT button + press the PRESET SELECT button.
Note: when using a MIDI controller to select a preset outside of the normal bank (presets 1 to 4) or
extended bank (presets 5 to 8), then all 4 PRESET LEDS will be lit, indicating that a preset in the range
between 9 and 128 is active. For details on preset editing and saving, see the next section.
Preset Storage and Recall
User Presets store all user editable parameters. This includes the knob positions, current effect
engines, routing options, external control, and the full list of Neuro/MIDI accessible parameters.
Included in every preset are settings for either position of the KNOBS Switch (Delay or Reverb). After
a preset is recalled, you can always tweak it in a performance situation by turning a knob. The knob
parameter will then “jump” to the knob position as the knob is moved.
Recalling Presets
The first 4 User Presets (or 8 in Preset Extension Mode) are accessible via the onboard hardware or
with and external footswitch in the following ways:
1. Click the SELECT button to cycle through the hardware user presets. This function works
whether the pedal is engaged and bypassed.
2. When the effect is bypassed, press and hold down the REVERB footswitch to cycle forward
through presets. Release when you’ve arrived at your desired slot. Press and hold the
DELAY/TAP switch to cycle backward through presets. If Reverb is engaged you will not be able
to cycle forward through presets, and vice versa.