Vertigo Tremolo User’s Guide Welcome Thank you for purchasing the Vertigo Tremolo. This powerful stereo effects pedal features a collection of meticulously crafted tremolo sounds ranging from classic amp tones to modulated filters that chart new sonic territory. With a simple control set, the Vertigo can work in a wide variety of musical settings, and the powerful MIDI and Neuro control options under the hood provide access to a vast array of additional tonal possibilities.
fully MIDI-controllable and 128 multi-pedal presets, or “scenes,” can be saved for instant recall on the stage or in the studio. The Vertigo can also connect directly to a passive expression pedal or the Hot Hand for expressive control of any parameter. The Quick Start guide will help you with the basics. For more in-depth information about the Vertigo Tremolo, move on to the following sections, starting with Connections.
Quick Start Power To power the unit, connect the included 9V DC power supply to the jack labeled DC 9V on the back panel. Warning: Using a non-Source Audio supply, especially an unregulated supply, could damage the unit. Please be very cautious when using 3rd-party power supplies. Guitar/Audio Connections Using standard ¼” mono cables, connect your guitar, bass, or other instrument to the INPUT 1 jack and your amp (or the next audio device in the signal chain) to the OUTPUT 1 jack.
Effect Switch: Selects between the three basic tremolo effect types – Normal (Optical), Harmonic, or Bias. Footswitch: Enables or bypasses the tremolo effect. The large LED will be lit green when the tremolo effect is engaged. Contents Welcome .................................................................................................................................................. 1 Overview .............................................................................................................
Connections Input Side Connections Input 1 This is the primary input for guitar, bass, or other instruments. It can also accept line-level inputs. Connect it to your instrument or other audio source using a mono (TS) ¼” cable. Input 2 Input 2 can act either as an audio input or as the data connection for the Neuro App, or both at the same time. Input 2 as an Audio Input The tip contact on Input 2 acts as a secondary input for guitar, bass, or other instruments.
Output Side Connections Output 1 This is the primary output. Connect it to your amplifier, recording interface, or the next device in your effects signal chain using a mono (TS) ¼” cable. Output 2 Output 2 can act either as an audio output or as the daisy-chain data connection for the Neuro App, or both. Output 2 as an Audio Output The tip contact on Output 2 acts as the secondary audio output. It carries an audio signal when the Vertigo is configured with a signal routing that uses stereo outputs.
Example Neuro Daisy-Chain Connections Mono Audio Path with Neuro Daisy-Chain In the case of a purely mono audio signal path, the Neuro data can be input to the first effect directly from the mobile device and then carried on to the second effect via TRS cable.
Power and Control Connections DC 9V (Power) Connect to the included 9 Volt DC power supply. The power supply must be regulated at 9 Volts (direct current), able to source at least 180 mA (milliamps) of current, and the plug should have a tipnegative, sleeve-positive polarity (the center tip is ground and the sleeve is power). USB Connect to your computer (Mac or Windows) to the Vertigo’s USB port (denoted by the icon) using a standard mini USB cable.
Basic Tremolo Operation OUTPUT GAIN Tremolo, in its most basic form, is a periodic change in volume. A simple example is when the volume of the output increases steadily for a fixed amount of time, then decreases steadily for a fixed amount of time, and repeats that process over and over again. This is illustrated by the following graph: TIME The blue line in the graph is known as the LFO. It changes the level of the output signal over time. OUTPUT GAIN The frequency (a.k.a.
OUTPUT GAIN The depth of the LFO can also be changed to make the tremolo effect more or less prominent, as shown in this graph: TIME Finally, the shape of the LFO can be changed to give the tremolo effect a different character.
OUTPUT GAIN Square wave: TIME Effect Types The Vertigo includes three basic effect types, with more effects available in the Neuro mobile app. Normal (Optical) Optical tremolo emulates some of the earliest incarnations of tremolo from the 60s, which relied upon a neon light bulb and a photoresistor to create the effect. An LFO controlled the brightness of the neon light, and the light that was picked up by the photo-sensitive resistor changes the output gain.
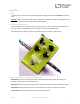
Controls Control Input Button Control LED Depth Knob Speed Knob Effect Switch Shape Knob Level Knob Engage/Bypass LED Engage/Bypass Footswitch Knobs Depth Knob SA243 OUTPUT GAIN OUTPUT GAIN Controls the depth of the LFO, which determines how prominent the tremolo effect is. When the depth is set fully counter-clockwise, the tremolo effect will be most subtle. With some effect types, such as optical and bias, this nearly bypasses the tremolo effect.
Speed Knob OUTPUT GAIN OUTPUT GAIN Controls the frequency of the LFO, which determines how fast the tremolo effect is. Different effect types (optical, harmonic, bias) may have different minimum and maximum speeds. TIME TIME Low Speed High Speed Shape Knob Sets the shape of the LFO. For most effect types, Sine, Square, and Sawtooth shapes are available. In the center position, the LFO is typically a sine wave shape. Fully counter-clockwise is a square shape.
Level Knob Sets the overall output level of the Vertigo. The control is linear and ranges from 0 (completely silent) to 2.0 (or +6 dB). At the middle position, the output gain is 1.0 (or 0 dB). The diagram below shows the levels corresponding to the different knob positions, along with linear (red) and logarithmic decibel (blue) equivalents. 0 dB 1.0 -6 dB 0.5 -∞ dB 0 +3.5 dB 1.5 +6 dB 2.0 Effect Switch Selects between the three basic tremolo effect types – Normal (Optical), Harmonic, or Bias.
Preset Storage and Recall The Vertigo features a user preset that can be easily saved and recalled using the footswitch. When a preset is recalled, all of the parameters instantly jump to their saved value, regardless of the position of the knobs. This allows you to save your favorite sound without having to worry about the knob positions. Saving Your First Preset Bypass the Vertigo by clicking the footswitch once. The engage/bypass LED should be dark at this time.
We recommend you choose between the active analog bypass (a.k.a. buffered bypass) and relaybased true bypass based on what is needed in your signal chain. Ideally, the first pedal in a signal chain is a buffered input followed by true bypass in the rest of the signal chain. Both bypass methods have pros and cons associated with them.
Band 1: Low Shelf Band 2: Peaking (a.k.a. Bell / Band) Band 3: Peaking (a.k.a. Bell / Band) Band 4: High Shelf Each band has configurable frequency, boost/cut, and Q (bandwidth). A simple example of these four bands in action is shown in the graph below. In this example, Band 1 is a low shelf filter at 100 Hz with a 6 dB cut, Band 2 is a peaking filter at 620 Hz with a 3 dB cut and relatively high Q, Band 3 is a peaking filter at 3 kHz with a 1.
Low Cut Filter The Vertigo also includes a low cut filter (a.k.a. high pass filter) with an adjustable frequency. This filter is very useful for cutting out low frequencies that do not contribute to the sound of the instrument, as well as subsonic frequencies which cannot be heard at all. Bass players often use low cut filters set very low (around 10 Hz to 30 Hz) to reduce speaker excursion and improve the clarity of the bass.
In the case of an expression pedal with a TRRS plug, like Source Audio’s expression pedals, the tip connection is power, the first ring is the X axis expression signal, the second ring is the Y axis expression signal, and the sleeve connection is ground.
3. Move the expression pedal over the range of motion you would like to use to control the Vertigo. If you would like to use the expression pedal’s full range of motion, then make sure to move the pedal all the way from its minimum position to its maximum position. Note that you can create “dead zones,” if desired, by only moving the expression pedal over a limited region of its full range of motion. 4. After setting the expression pedal range, click the Vertigo’s footswitch once.
4. 5. 6. 7. move it as you perform. The Vertigo will intelligently select the X or Y axis of the Hot Hand automatically, based on the motion of the ring. After setting Hot Hand range of motion, click the Vertigo’s footswitch once. The calibration is now complete, and the Control LED will blink faster (about 2 blinks per second). Now, it is time to map the Hot Hand to the effect parameters.
Main Menu The main menu includes links to the three main sections of the app: Sound Editor allows the user to edit the current effect or create a new sound from scratch. These sounds can be burned into the internal preset memory (three sounds corresponding to the three positions of the effect selector switch, and an additional preset accessible via the footswitch), saved to a preset file in the app, emailed to friends, posted to the Neuro Community site, and more.
Sound Editor The Sound Editor displays a wide range of parameters that can be changed to create different sounds. The Sound Editor works kind of like a remote control for a TV – only the parameters you touch on the screen will be modified on the hardware; all other parameters remain unchanged. The links at the bottom of the screen allow access to the File Menu, the Burn command, and the Send All command.
File Menu The File Menu displays different options for the sound you’re currently editing in the Sound Editor. Save Saves the current settings from the Sound Editor. If you haven’t saved yet, this will perform a Save As. Save As Allows you to save the current settings to a new file. You can choose a file name and description. Share Allows you to send the current settings to a friend as a text message or email attachment.
Burn The Burn command takes the current sound that is running in the hardware and “burns” it to the internal memory for later use. Burn works as a “what you hear is what you get” type of control; it will save all of the settings in their current state, as you hear them, and put those into memory. This will not necessarily match the exact settings shown in the Sound Editor for all parameters unless you have performed a Send All command first.
Browse Sounds The Browse Sounds screen displays lists of presets that can be easily loaded into the hardware. Just tap on a preset name to send it to the hardware, and you should be able to hear it instantly. Presets are divided into four sections: User: Presets that you have created and saved. Factory: Presets that were created by Source Audio. New presets will automatically be added to this list as Source Audio creates them.
Hardware Options This screen shows some advanced options. Effect Bypass Mode Selects which bypass path will be used for presets that use hardware bypass mode. True Bypass (Relay) uses two relays for true bypass switching. Active Analog (Buffered) bypass uses a buffer to help prevent signal loss and clicking. MIDI Channel (Device ID) Selects which channel (1 to 16) the hardware will respond to on Hub and USB-MIDI inputs.
Quick Preset Mode Allows preset mode to be enabled/disabled in 0.8 seconds instead of 5 seconds (by holding down the footswitch). Neuro Hub (Formerly the Soundblox Hub) The Source Audio Neuro Hub (sold separately), unites Source Audio pedals from the Soundblox 2 and One Series families to create a single, stage-ready system. It features shared MIDI, passive expression pedal input, Hot Hand connectivity, and USB, and can connect to up to five Source Audio pedals.
For the enable/disable footswitch, continuous control values in the range from 0 to 63 will bypass the Vertigo and values in the range from 64 to 127 will enable the Vertigo. For the effect type switch, continuous control values map directly to each effect type. 0 = Normal, 1 = Harmonic, and 2 = Bias. Values 3 and greater map to effect types that are available in the Neuro App. Any MIDI CC, from 0 to 127, can be mapped to a control on the Vertigo.
After the Vertigo receives its first MIDI clock message, the function of the Speed Knob changes. Instead of controlling the speed of the LFO directly, it controls the number of subdivisions are in the LFO, using the MIDI clock as a basis for the tempo. One, two, three, or four subdivisions can be created. Musically speaking, this means that the LFO can run at the rate of quarter notes, eighth notes, triplets, or sixteenth notes.
External Tap Tempo The Vertigo supports an external tap tempo switch that can be connected to its Control Input port. Tap tempo can be used to directly input a tempo and override the speed knob. Tap tempo is disabled by default; it can be enabled in the hardware options menu in the Neuro App. When External Tap Tempo mode is active, the Speed knob acts to set the beat subdivisions, just as it does when MIDI Clock is enabled. Source Audio makes tap tempo switches that are compatible with the Vertigo.
Weight 280 grams (0.625 pounds) Power 180 mA @ 9V DC (max 220 mA with Hot Hand Wireless Adapter) Negative tip (positive sleeve) barrel power jack, 2.1 mm inner diameter, 5.5 mm outer diameter Audio Performance Maximum Input Level: +6 dBV = 8.2 dBu = 2 V RMS = 5.
Not calibrated properly: Calibrate the Hot Hand. See the Hot Hand Input section for more details. Not connected properly: Check Hot Hand connections. Unit Appears Dead / No LEDs Lit Wrong power supply: Use correct power supply. See the DC 9V (Power) section for more details. Corroded power cable plug: Check power plug for corrosion on sleeve. Swap out power supply if necessary.
App. Channel numbers in MIDI use zero-based counting, so MIDI channel 1 is described as 0 in hexadecimal, MIDI channel 2 is described as 1 in hexadecimal, and so on, concluding with MIDI channel 16, which is described as F in hexadecimal. A continuous controller message starts with a hexadecimal B and is followed by the channel number (0 through F).
How do I enable extended effect types via MIDI? Refer to the MIDI Learn section to map a MIDI continuous controller to the Effect Type switch.
SA243 Vertigo Tremolo User’s Guide 36
Warranty Limited Transferrable Warranty Source Audio, LLC (hereinafter “Source Audio”) warrants that your new Source Audio One Series Vertigo Tremolo, when purchased at an authorized Source Audio dealer in the United States of America (“USA”), shall be free from defects in materials and workmanship under normal use for a period of two (2) years from the date of purchase by the original purchaser. Please contact your dealer for information on warranty and service outside of the USA.
Disclaimer and Limitation of Warranty Do not open the effects pedal under any circumstance. This will void the warranty. The foregoing limited warranty is the only warranty given by Source Audio and is in lieu of all other warranties. All implied warranties, including warranties of merchantability and fitness for any particular purpose, exceeding the specific provisions of this limited warranty, are hereby disclaimed and excluded from this limited warranty.