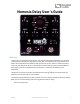
Nemesis Delay User’s Guide Welcome Thank you for purchasing the Nemesis Delay. This powerful stereo delay pedal features a collection of meticulously crafted sounds ranging from analog, tape, and slapback to multi-tap, filtered, pitchshifted, bit-crushed experimental effects charting new sonic territory.
Overview 24 Diverse Delay Engines – Choose from vintage delay tones such as Analog Bucket Brigade, Tape, and Slapback, or delve deeper into unique sounds cooked up in the Source Audio lab. 12 factory delay engines are available out of the box, 12 extended engines can be recalled via MIDI or loaded via the Neuro App. Flexible Stereo Routing – The Nemesis is equally at home in a mono rig or a stereo rig.
Tap Tempo – The TAP FOOTSWITCH allows users to directly set the delay time, with optional beat subdivisions. External Control – The Nemesis can be easily configured to work with a variety of expression pedals and footswitches for various external control options. Hold Mode – Sustain your delay sounds with the HOLD function. The delayed audio is repeated infinitely for ambient sustain effects.
Brief Knob, Footswitch, and Button Descriptions Time Knob: Controls the delay time. If an effect engine uses multi-tap delays, this will set the time for the longest delay tap, and the sub-delays will automatically scale according to that. Mix Knob: Controls the relative level between the dry input signal and the wet, processed signal. When set at 12 o'clock, the wet and dry signals will be at equal volume. Fully counter-clockwise is 100% dry, and fully clockwise is 100% wet.
mode. It’s also possible to override this and choose a custom routing mode using the Neuro App or MIDI. Contents Welcome .................................................................................................................................................. 1 Overview .................................................................................................................................................. 2 Quick Start .......................................................................
Connections Input Side Connections Input 1 INPUT 1 is the primary input for guitar, bass, or other instruments. It can also accept line-level inputs and will work in your amp’s effect loop. Connect it to your instrument or other audio source using a mono (TS) ¼” cable. Details about the allowed signal levels are available in the Specifications section.
MIDI Input This is a standard 5-pin DIN connector that accepts MIDI control messages from external devices, including program changes, continuous controllers (CCs), and MIDI clock. See the “Nemesis MIDI Implementation” document for details. Output Side Connections Output 1 This is the primary audio output. Connect it to your amplifier, recording interface, or the next device in your effects signal chain using a mono (TS) ¼” cable.
applicable) will be on the tip contact of the plug, and the Neuro App data will be on the ring contact. This allows audio and Neuro data to flow on the same cable. MIDI Thru This is a standard 5-pin DIN connector that echoes MIDI messages from the MIDI INPUT jack and sends them to other devices. The Nemesis does not generate any of its own MIDI data, but it will copy and output any data it receives. Power and Control Connections DC 9V (Power) Connect to the included 9 Volt DC power supply.
Expression/Switch Pedal Input The PEDAL IN jack on the back panel connects to either an external passive expression pedal or footswitch. The PEDAL IN SWITCH allows the user to select which type of external controller is being used. Set to EXP for expression control or SWITCH for footswitch control. See the External Control section for details. Delay Engines The Nemesis includes twelve basic delay effect engines, with 12 extended engines available via the Neuro mobile app or MIDI.
Intensity: Controls the strength of the diffusion effect. Moderate Diffusion Subtle Diffusion Intense Diffusion ANALOG (2) This delay engine reproduces the characteristic dark sound of bucket brigade analog delays. Traditional analog bucket brigade delays can be either resonant or warm. This engine focuses on warmth, and was inspired in part by the classic EHX Deluxe Memory Man delay. True to the nature of older bucket brigade delays, treble frequencies are reduced, even on the clean (dry) signal.
NOISE TAPE (4) A detailed re-creation of classic fixed-head variable-speed tape delays. Repeats are bandwidth limited and have artifacts characteristic of tape delay, such as filtering, distortion, noise, wow and flutter. NOISE TAPE is grittier and darker than the TAPE engine, and has artifacts that mimic old or damaged tape. Time Knob Range: 20 milliseconds to 1.2 seconds Mod and Rate: MOD controls wow and flutter depth and RATE controls tape speed.
Up Major 3rd Up Perfect 4th Up Minor 3rd Up Perfect 5th Down Octave Up Octave HELIX (7) Combines reverse delay with an octave up pitch shift to create an ambient, shimmering delay that disappears into the upper frequency range. Time Knob Range: 200 milliseconds to 2.6 seconds Mod and Rate: Control time (pitch) modulation depth and speed. Intensity: Sweeps from a warm and more subtle sound to a bright, shimmering, prominent effect.
SWEEPER (9) A resonant low pass filter slowly sweeps across the frequency range, creating an undulating synthlike effect. Time Knob Range: 1 millisecond to 2.6 seconds Mod: Controls the depth of the LFO (Low Frequency Oscillator) modulating the low pass filter. In other words, this controls the range of the filter motion. Rate: Sets the speed of the LFO modulating the low pass filter. Intensity: Controls the Q or resonance of the filter.
SLAPBACK (11) A short echo popularized in 50s rockabilly music and characteristic of many other genres. Based on tape delays, with some minor tweaks. Time Knob Range: 20 milliseconds to 220 milliseconds Mod and Rate: MOD controls wow and flutter depth and RATE controls tape speed. Intensity: Lower settings bring in tape saturation and warmth. Higher settings are bright and clean.
Time Knob Range: 40 milliseconds to 2.6 seconds Mod and Rate: MOD controls the amount of time modulation (vibrato) and RATE controls the modulation rate as well as the rate of the tremolo. Intensity: Controls the depth of the tremolo. Moderate Tremolo Subtle Tremolo Intense Tremolo SEQUENCED FILTERS (14) This is a 4-tap delay with a fixed filter on each tap.
Intensity: Changes the tone of the repeats from dark at low settings to bright at high settings. Warm Bright FLANGER (17) Repeats are sent through a stereo flanger effect for a classic jet-engine sound. Time Knob Range: 50 milliseconds to 2.6 seconds Mod and Rate: Controls the amount and speed of the flanger modulation. Intensity: Changes the tone of the repeats from neutral at low settings to thin at high settings.
Intensity: Selects one of 13 pre-programmed rhythms. The rhythms are spaced equally around the INTENSITY KNOB. The rhythms are described below in step sequencer notation, with red squares signifying taps in the rhythm. Rhythms 1 through 8 are straight and syncopated rhythms based on subdivisions of 8. 1 2 3 4 5 6 7 8 Rhythms 9 through 13 are swing rhythms based on subdivisions of 6. 9 10 11 12 13 LO-FI RETRO (20) Go back to the sounds of 80s video games with bit-crushed, aliased and distorted delays.
Intensity: Controls the amount of distortion and filtering. Distorted, Thin Relatively Clean COMPOUND SHIFTER (22) A delay with pitch-shifting on the delayed signal. Each successive repeat is further pitch shifted, creating a compounding shift effect. Time Knob Range: 1 millisecond to 2.6 seconds Mod and Rate: Controls time (pitch) modulation depth and speed. Intensity: Sets the pitch shift interval as shown in the diagram below.
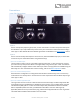
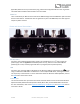
Controls Pedal Input Switch Control LED Time Knob Control Input Button Mix Knob Engine Selector Intensity Knob Feedback Knob Mod Knob On/Off LED Rate Knob On/Off Footswitch Tap Footswitch Subdivision Switch Tap LED Preset Select/Save Button Preset LEDs Knobs Time Knob Sets the delay time of tap 1, which is the main delay time. If an effect engine is selected that includes multiple taps, additional taps will scale automatically.
Mix Knob Sets the relative levels of dry signal and wet delay signal. Fully counter-clockwise is 100% dry, fully clockwise is 100% wet. The midpoint of the knob is 50% wet and 50% dry. Kill Dry Mode is available as a global option as of firmware version 1.12 (see Kill Dry / Dry Defeat). 50% Wet 50% Dry 100% Dry Dry 100% Wet Wet Wet Dry Using the Mix Knob to Set Master Output Level The overall output volume level is adjustable on the pedal hardware without needing to use Neuro or MIDI.
(pitch) modulation for the delay time, which can be used to create nice vibrato and chorus sounds. For some engines, the MOD knob controls tape modulation, filter modulation, or tremolo depth. Refer to the Delay Engines section of the user’s guide for details. Rate Knob Controls the speed of the modulation LFO. This can affect different aspects of the sound depending on which delay engine is selected.
If trails mode is active, the ON/OFF LED will be lit green when the delay effect is active and lit red when the delay effect is bypassed. Trails Mode Trails mode is an optional bypass mode that allows the repeats to fade out naturally even after the delay has been bypassed. Trails mode can be enabled from the Hardware Options menu in the Neuro App or using the hardware by pressing the ON/OFF FOOTSWITCH while holding the CONTROL INPUT BUTTON.
LED will remain lit solidly. Release the TAP switch to disable HOLD mode and resume normal effect operation. Control Input Button This small button is used when configuring external control. See the External Control section for more details. External Control LED The small LED located to the left of the MIX KNOB is the CONTROL/ACTIVITY LED. When lit, it indicates that external control mode (expression or MIDI) is active or when incoming data is being received via MIDI or a Neuro connection.
An additional 4 user hardware presets are accessible in Preset Extension Mode. In this mode, the number of presets available on the hardware interface is increased to a total of 8. The Preset SELECT button will now increment through 8 presets instead of 4. The second bank of four is indicated by the ON/OFF LED being lit red.
PRESET LED will blink fast and then turn solid. This indicates that the preset has been saved to the new location. Copying a Preset to a New Location Using the Neuro App Using the Neuro App’s Burn command, it’s possible to copy presets to any location in memory. Clearing all Presets The entire range of 128 User Presets can be erased using the Factory Reset procedure. Please note that this will also erase any other user settings as well.
To set the delay time on OUTPUT 2, see Controlling Tap 2 Delay Time with the Time Knob. I/O Routing Options Default - Auto Select: By default, the Nemesis will detect what has been plugged into its inputs and outputs and it will set the routing mode automatically.
Stereo In, Stereo Out: The inputs are mixed and sent to a delay line containing stereo-panned taps. The input dry signal stays true stereo all the way to the output, and the stereo delayed signal is mixed back in just prior to the output. Hardware bypass is used, based on the selected bypass mode. External Loop – Feedback Insert: This mode allows external effects to be inserted into the delay line of the Nemesis, making them part of its delay feedback loop.
Multi-Feedback Mode (“Stacked” Delays) Usually, only one tap is used as the feedback source, creating predictable, repeating rhythms for multi-tap delays. It is, however, possible to select multiple feedback sources, creating a “stacked” delay effect that can get downright cacophonous with high feedback settings. This mode can be enabled using the Neuro App or via MIDI.
Enable External Tap Tempo Switch hardware option in the Neuro App. Only the Tap Tempo function is available using this method. Source Audio Tap Tempo footswitches can be purchased directly from Source Audio via our online store: www.sourceaudiostore.net Expression Control A variety of the Nemesis’ effects parameters can be controlled by a passive expression pedal connected to either the PEDAL IN or the CONTROL INPUT port.
Ground Y Exp Power X Exp Third party expression pedals can be connected to the CONTROL INPUT as well, as long as they have a 3.5 mm (1/8”) TRS (Tip Ring Sleeve) plug with power on the tip, expression (the wiper of the potentiometer) on the ring, and ground on the sleeve, as seen in the diagram below. Ground Power Expression Expression pedals with TS (Tip Sleeve) plugs will not work correctly with the CONTROL INPUT of the Nemesis.
6. Move the knob(s) you wish to control with the expression pedal to the maximum desired position, then click the ON/OFF FOOTSWITCH. The CONTROL LED will now be lit solid red. 7. After setting the minimum and maximum knob positions, the parameter mapping is complete. Note: The parameter range can be inverted by swapping the minimum and maximum position of the knobs during steps 5 and 6. Note: To cancel a control assignment, press the CONTROL INPUT button at any time during the process above.
3. Tap the external switch once. 4. Click the ON/OFF FOOTSWITCH once. The CONTROL LED will blink faster (about 2 blinks per second). Now, it is time to map the external switch to the effect parameters. 5. Move the knob(s) you wish to control with the external switch to the maximum desired position, then click the ON/OFF FOOTSWITCH. The CONTROL LED will now blink even faster (about 4 blinks per second). Note that you may control one or more knobs with the external switch, up to six total knobs. 6.
expression: X and Y. These signal are carried on the two rings of the TRRS cable that comes from the Hot Hand receiver. The Nemesis uses the X expression signal. Ground Y Exp Power X Exp Configuring the Hot Hand When the Hot Hand is connected to the Nemesis, follow these simple steps to calibrate it and map it to control different effect parameters. 1. Press the CONTROL INPUT BUTTON to enable external control. The CONTROL LED should be lit red. 2.
The Neuro App provides control over all MIDI-accessible parameters in the Nemesis. For more details, refer to the MIDI Implementation section. Main Menu The MAIN MENU includes links to the three main sections of the app: SA260 SOUND EDITOR allows the user to edit the current engine running on the Nemesis or create a new sound from scratch.
Sound Editor The SOUND EDITOR displays a wide range of parameters that can be changed to create different sounds. The SOUND EDITOR works kind of like a remote control for a TV – only the parameters you touch on the screen will be modified on the Nemesis; all other parameters remain unchanged. The links at the bottom of the screen allow access to the FILE MENU, the BURN command, and the SEND ALL command.
File Menu The FILE MENU displays different options for the sound you’re currently editing in the SOUND EDITOR. Save Saves the current settings from the SOUND EDITOR. If you haven’t saved yet, this will perform a SAVE AS. Save As Allows you to save the current settings to a new file. You can choose a file name and description. Share Allows you to send the current settings to a friend as a text message or email attachment.
Burn The BURN command takes the current sound that is running in the Nemesis and “burns” it to the internal memory of the Nemesis for later use. BURN works as a “what you hear is what you get” type of control; it will save all of the settings in the Nemesis in their current state, as you hear them, and put those into memory. This will not necessarily match the exact settings shown in the SOUND EDITOR for all parameters unless you have performed a SEND ALL command first.
Browse Sounds The BROWSE SOUNDS screen displays lists of presets that can be easily loaded into the Nemesis. Just tap on a preset name to send it to the Nemesis, and you should be able to hear it instantly. Presets are divided into four sections: USER: Presets that you have created and saved. FACTORY: Presets that were created by Source Audio. New presets will automatically be added to this list as Source Audio creates them.
Hardware Options This screen shows some advanced options. Effect Bypass Mode Selects which bypass path will be used for presets that use hardware bypass mode. True Bypass (Relay) uses two relays for true bypass switching. Active Analog (Buffered) bypass uses a buffer to help prevent signal loss and clicking. Input MIDI Channel Selects which channel (1 to 16) the Nemesis will respond to on MIDI and USB-MIDI inputs.
Kill Dry / Dry Defeat This mode will mute the dry signal entirely on all outputs, whether the delay effect is engaged or bypassed. This mode is useful in situations where the Nemesis is used as part of a parallel signal chain or as a send effect. When using the Nemesis as an insert effect, typically this mode should be turned off. This feature was added in firmware version 1.12. When Kill Dry mode is active, Trails mode must also be active.
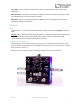
Audio (Left) Guitar In Out to Amp (Left) Out to Amp (Right) Neuro In Audio (Right) and Neuro Daisy-Chain Neuro Data in External Loop Mode When the Nemesis is configured in external loop mode, it will output Neuro data to the effects loop, but not to the next device in the chain. Neuro Hub The Source Audio Neuro Hub (sold separately), unites Source Audio pedals from the Soundblox 2 and One Series families to create a single, stage-ready system.
It is possible to save presets with the Nemesis bypassed. This means the preset can be recalled without actually engaging the delay effect. The delay effect can then be engaged either by pressing the ON/OFF FOOTSWITCH or by sending the proper MIDI Continuous Control message. Many of the parameters in the Nemesis can be controlled via MIDI. For more details, see MIDI Implementation. MIDI Clock The Nemesis syncs to MIDI clock (also known as MIDI timing clock or MIDI beat clock).
Power 200 mA @ 9V DC Center negative, Barrel positive plug, 2.1 mm inner diameter, 5.5 mm outer diameter Audio Performance Maximum Input Level: +6.54 dBV = 8.76 dBu = 2.12 V RMS = 6.0 V p-p Full Scale Output Level: +6.54 dBV = 8.76 dBu = 2.12 V RMS = 6.
Not connected properly: Check Hot Hand connections. Unit Appears Dead / No LEDs Lit Wrong power supply: Use correct power supply. See the DC 9V (Power) section for more details.
Can I use the Nemesis in my amp’s effects loop? The Nemesis’s audio inputs can handle up to 8.76 dBu or 6.0 Volts peak-to-peak, which allows it to work in most amp effects loops. Be sure to check your amp’s documentation to verify that the maximum send level is less than the Nemesis’ maximum input level.
Factory Reset. You should only create a custom MIDI CC mapping if you know what you are doing. If you are unsure, then we recommend sticking to the default mapping. To create a custom MIDI CC mapping, follow these steps: If necessary, press the CONTROL INPUT BUTTON to make the CONTROL LED illuminate. Press and hold the CONTROL INPUT BUTTON until the CONTROL LED begins to blink. Send the desired MIDI CC (with any value) to the Nemesis via the MIDI INPUT JACK or USB.
assemblies as warranty replacements for authorized repairs. Any product repaired, replaced, or upgraded pursuant to this Limited Warranty will be warranted for the remainder of the original warranty period. This Limited Warranty is extended to the original retail purchaser.
Version History December 29, 2015: Initial Release January 15, 2016: Fixed numerous typos. Updated control layout image. Added Neuro App engine overwrite description. January 29, 2016: Firmware Version 1.12 released. Added Kill Dry Mode. Updated Preset LED descriptions. Updated On/Off LED description for trails mode. Added TRS expression description for Control Input. Added min and max delay times for each engine. Added Custom CC Mapping section. Added Intensity/Mod/Rate knob reassignment description.