
User Manual


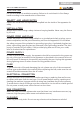

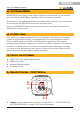

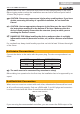

Table Of Contents
- 1. UNPACKING
- 2. ACCESSORIES
- 3. OVERVIEW
- 4. MAIN FEATURES
- 5. REAR PANEL CONTROLS
- 6. INSTALLATION
- 7. LED DISPLAY AND BUTTONS OPERATION
- 8. IR REMOTE CONTROL
- 9. DIMMER CURVES
- 10. DMX512 CHANNEL CHART (12CH)
- 11. SPECIFICATIONS
- 12. WARRANTY AND SERVICE
- 13. WARNING
- 14. DISIMBALLAGGIO
- 15. ACCESSORI
- 16. PANORAMICA
- 17. CARATTERISTICHE
- 18. CONTROLLI DEL PANNELLO POSTERIORE
- 19. INSTALLAZIONE
- 20. FUNZIONI DEL DISPLAY E DEI CONTROLLI
- 21. IR CONTROLLO REMOTO
- 22. CURVE DIMMER
- 23. TABELLA DEI CANALI DMX512 (12CH)
- 24. SPECIFICHE
- 25. GARANZIA ED ASSISTENZA
- 26. AVVISO

systems have to be used. The xture must never be xed swinging freely in the room.
Before rigging make sure that the installation area can hold a minimum point load of
10 times the projector’s weight.
CAUTION:Fixturemaycausesevereinjurieswhencrashingdown.Ifyouhave
doubts concerning the safety of a possible installation, do not install the
xture!
CAUTION:Usetwoappropriateclampstorigthextureonthetruss.Follow
the instructions mentioned at the bottom of the base. Make sure that the
deviceisxedproperly!Ensurethatthestructure(truss)towhichyouare
attachingthexturesissecure.
DANGER OF FIRE! When installing the device, make sure there is no highly
inammablematerial(decorationarticles,etc.)withinadistanceofminimum
0.5m.
For overhead use, always install a safety rope that can hold at least 10 times the weight
of the xture.
6.2. Mains Connections
Connect the device to the mains with the power-plug. The wire correspondence is as
follow:
WIRE PIN INTERNATIONAL
Brown Live L
Blue Neutral N
Yellow/Green Earth
The earth must to be connected! Pay attention to safety!
Before taking into operation for the rst time, the installation has to be approved by an
expert.
6.3. DMX-512 Connection
Wires must not come into contact with each other; otherwise the xtures will not work
at all, or will not work properly. Only use a DMX cable, 3-pin XLR plugs and connectors
in order to control with the xture or one xture with another.
DMX use of XLR connectors
1 = Ground / Shield
2 = DMX +
3 = DMX -
INPUT OUTPUT
If you are using the recommended controllers, you can connect the DMX output of the
9
ENGLISH
WF-U11 User manual