
User Manual


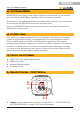

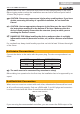

Table Of Contents
- 1. UNPACKING
- 2. ACCESSORIES
- 3. OVERVIEW
- 4. MAIN FEATURES
- 5. REAR PANEL CONTROLS
- 6. INSTALLATION
- 7. LED DISPLAY AND BUTTONS OPERATION
- 8. IR REMOTE CONTROL
- 9. DIMMER CURVES
- 10. DMX512 CHANNEL CHART (12CH)
- 11. SPECIFICATIONS
- 12. WARRANTY AND SERVICE
- 13. WARNING
- 14. DISIMBALLAGGIO
- 15. ACCESSORI
- 16. PANORAMICA
- 17. CARATTERISTICHE
- 18. CONTROLLI DEL PANNELLO POSTERIORE
- 19. INSTALLAZIONE
- 20. FUNZIONI DEL DISPLAY E DEI CONTROLLI
- 21. IR CONTROLLO REMOTO
- 22. CURVE DIMMER
- 23. TABELLA DEI CANALI DMX512 (12CH)
- 24. SPECIFICHE
- 25. GARANZIA ED ASSISTENZA
- 26. AVVISO

controller directly with the DMX input of the rst xture in the DMX chain. If you wish
to connect DMX controllers with other XLR output, you need to use adapter-cables.
Building a Serial DMX Chain
DMX Termonator
Unit 1 Unit 2 Last Unit
DMX 512
Connect the DMX output of the rst xture in the DMX chain with the DMX input of
the next xture. Always connect one output with the input of the next xture until all
xtures are connected.
A word on termination: DMX is a resilient communication protocol, however errors
still occasionally occur. Termination reduces signal errors, and therefore best practices
include use of a terminator in all circumstances. If you are experiencing problems with
erratic xture behavior, especially over long signal cable runs, a terminator may help
improve performance.
120ohm, 1/4W
Resistor
DMX Terminator
To build your own DMX Terminator: Obtain a 120-ohm, 1/4-watt resistor, and wire
it between pins 2&3 of the last xture. They are also readily available from specialty
retailers.
Complimentarysignalcablecantransmitssignalsto20unitxturesatmost.
Signalamplierisamusttoconnectmorextures.
7. LED DISPLAY AND BUTTONS OPERATION
1 2 3 4
10
ENGLISH
WF-U11 User manual