SC)IJNJ) f)lli)NilNC~I~ Pf)l\7 l~lll~l) StJIIl\7 f)f)l~l~llS II-III) 11-111)'1,1)
Thank you for purchasing Sound Ordnance You're now ready to win the battle for great sound. To ensure safe operation, always follow the instructions and guidelines in this manual. Keep this manual handy for reference. www.soundordnace.com All rights reserved. · TABLE OF CONTENTS Safety Instructions 3 Setup and Installation . . . . . . . . . . . . . . . . . . . . . . . . . . . . . . . . . . . . . . . . . . . . . . . . 4 Connections . . . . . . . . . . . . . . . . . . . . . . . . . . . . . . . . . . . .
SAFETY INSTRUCTIONS . The product's warrOIAWiS ..resultif'IS from Jai ··ti·Qns£¥le · d·o·no"1r·ac:ees:>:r';:a .·W·"r(fQ not•- o-cc:8D1'rC pror:»errv. •~au1se~r:~ · · IllY lli"'C • For safety reasons,do not attempt to modify the subwoofer. • Only a 12V DC car supply system (negative ground) should be used. Never connect the subwoofer to any other voltage supply. • Extra care should be taken when first turning on the amplifier after installation. Please follow the operating instructions carefully.
SETUP AND INSTALLATION 1. Read and understand the instructions before attempting to install this powered subwoofer. 2. Disconnect the negative terminal from the battery prior to starting the installation. Disconnecting the negative terminal on some vehicles may result in safety equipment becoming disabled. Consult with your car dealer or mechanic if you have any questions or concerns. 3. For the best possible sound, use high-quality connectors and wiring. 4.
CONNECTIONS Power Wire (BAT+) • Disconnect the negative battery terminal before proceeding. Call 1-800-955-9094 for instructions if you are unsure. • Plan wire routing before cutting any wires to length. Begin by routing the power BAT+ wire from the battery to the subwoofer location. Use a grommet when running wires through the firewall or metal openings. Avoid running the power wire near existing vehicle wiring to prevent induced noise from entering the audio system.
B-8P Connections and Controls B-8PTD Connections 6
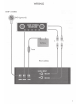
WIRING B-BP I B-BPTD GND {ground) 0 CAR STEREO RECEIVER 0 0 0 0 0 0 battery fuse RCA cables 7
CONTROLS AND SETUP POWER MODE (AUTO MODE) Set the switch to AUTO MODE is your system setup doesn't have a remote wire, as with stock head units. The subwoofer will turn on automatically when it detects an incoming signal. POWER MODE (REMOTE WIRE) Set the switch to REMOTE WIRE is you have attached a remote turn-on lead to the subwoofer. LEVEL The LEVEL control (gain) is used to obtain the best possible match between the head unit audio output and the amplifier input.
TROUBLESHOOTING PROBLEM CAUSE ACTION Unit will not turn on (no power LED indicator) • BAT+ wire not connected or incorrect voltage REM wire not connected or incorrect voltage • Check connections for proper voltage (ll - 16VDC) • GND wire not connected • Check co nnecti on to grou nd • Replace fuse(s) • Fuse(s) blown Unit will not turn on (no power LED indicator) Unit blows fuse(s) Engine noise Volume turned all the way down • Increase volume level at head unit • Speaker defective or damaged •
SPECIFICATIONS · B·8P 8-SPTD · '• 10 Maximum Output Power 160W 250W Continuous Output Power sow 125W Frequency Response 20-200Hz 40-200Hz W Crossover Frequency 70-200Hz S0-200Hz Crossover Slope 6dB/octabe 1SdB/octave Phase 0-1SO degrees 0-1SO degrees Fuse 1 x 7.
To ensure safe operation, always follow the instructions and guidelines in this manual. Keep this manual handy for reference. www.soundordnance.com All rights reserved.
MOUNTING FEET (B8PTD ONLY)
Virtual Gateways LLC™ Limited Warranty (Valid Only in the U.S.A. and Canada) Virtual Gateways LLC ("Virtual") warrants this Product (expressly excluding any accessories) against defects in material or workmanship as follows: Terms of warranty coverage: This warranty covers the product during the warranty period so long as the product is owned by the same individual whose name appears on the invoice received upon purchase of the product.