
Manual

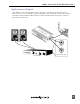
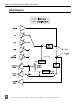
Table Of Contents
- Table of Contents
- Computer System Requirements
- Quick Start Guide
- Front Panel Descriptions
- Input and Output Panel Descriptions
- Back Panel Descriptions
- DIP Switch Options
- Mac OS Installation and Connection
- Windows Installation and Connection
- Inputs
- Outputs and Monitoring
- Stand-Alone Mode
- Locking Sample Rate to External Sources
- Setup Examples
- Block Diagram
- Specifications
- Warranty and Technical Support
- CE Declaration of Conformity

USBPre 2 User Guide and Technical Information
15
source is set to PC the meter displays the audio level for signal coming from the computer. In this
mode, the top row of the meter displays the left channel level and the bottom row displays the right
channel level. When the meter source is set to PRE, the meter displays the audio level for signal
at the active inputs.In this mode, the top row of the meter displays the level for the selected input
source on channel one and the bottom row displays the level for the selected input source on channel
2.
The meter source switches from PRE to PC automatically when signal is output from the computer.
This behavior can be defeated so that the source is switched manually. See DIP Switch Options.
Stand-Alone Mode
In Stand-Alone mode, the USBPre 2 operates as a microphone preamplifier with both digital and
analog outputs. It can also accept digital signals and output analog audio. The USBPre 2 will auto-
matically enter stand-alone mode when connected to a USB jack supplying USB power (5V, 500 mA
max) but is not associated with a running operating system (For example, a powered USB hub that is
not attached to a computer). The USBPre 2 can be forced into Stand-alone mode when connected to a
computer supplying USB power by holding down the Meter Source button when attaching the USB
cable.
In Stand-Alone mode all front panel controls perform the same functions as when the USBPre 2 is
in Interface mode, except that the Meter Source button is disabled and the meter mode is locked to
PRE. Since there is no reference clock from the computer, the operating sample rate is set using the
back panel DIP Switches. See DIP Switch Options.
Sample Rate
In Stand-alone mode, the sample clock is generated by the USBPre 2’s internal sample clock genera-
tor, and the Sample rate is set by adjusting the DIP switches on the back panel of the USBPre 2. See
DIP Switch Options. This will affect the internal sample rate of the USBPre 2 as well as the sample
rate output from the digital outputs.
Sample rates below 32 kHz are not supported on the coaxial or optical (TOSLINK) digital interconnec-
tions. 192 kHz sampling rate is not supported on the TOSLINK interconnections.
In Interface mode, the USBPre 2 operates at the sample rate set from the host operating system and
the DIP switches related to sample rate are ignored. It is further possible to change the sampling
rate of the USBPre 2 within some applications’ audio preferences. In Windows XP there is no global
sample setting, and the sample rate must be set by the application in use.
Locking Sample Rate to External Sources
The sample rate of the USBPre 2 can be locked to the sample rate of an external S/PDIF signal. When
a digital signal is connected to either the coaxial or optical input, the S/PDIF Input Source LED will
illuminate to indicate that the USBPre 2 is locked to the sample rate of the incoming digital signal.
The S/PDIF Input Source LED’s will flash for 30 seconds when the signal is removed or turned off.
To make a digital recording with the computer at a locked sample rate, be certain that the incoming
digital signal is valid (solid S/PDIF Input Source LED’s) and that the software driver is set to the