
Manual
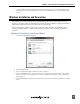
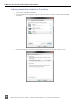
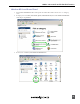

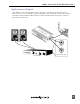
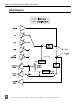
Table Of Contents
- Table of Contents
- Computer System Requirements
- Quick Start Guide
- Front Panel Descriptions
- Input and Output Panel Descriptions
- Back Panel Descriptions
- DIP Switch Options
- Mac OS Installation and Connection
- Windows Installation and Connection
- Inputs
- Outputs and Monitoring
- Stand-Alone Mode
- Locking Sample Rate to External Sources
- Setup Examples
- Block Diagram
- Specifications
- Warranty and Technical Support
- CE Declaration of Conformity

USBPre 2 User Guide and Technical Information
9
Select the USBPre 2 from the 2. Properties For dropdown menu, then set the sample rate, channel count,
and bit depth as desired from the dropdown menus in the Audio Input section and the Audio Output
section.
Windows Installation and Connection
The USBPre 2 is an Audio Device Class USB standard peripheral. No proprietary drivers are re-
quired to operate the USBPre 2 under Windows. The first time the USBPre 2 is plugged in, Windows
will install standard USB Audio Device Class drivers automatically.
Before connecting the USBPre 2, quit all open applications that use audio. An application that is
running when the USBPre 2 is connected may not recognize the USBPre 2 until the application is
restarted.
Windows 7 and Vista Sound Control Panel
Follow 1. Start> Control Panel> Sound.
Click the 2. Playback tab.
Click to select the item labeled “USBPre2” in the list of devices.3.
Click the 4. Set Default button. A green check mark icon will appear next the the USBPre 2 entry and the
phrase “Default Device” will appear below the entry, indicating that the USBPre 2 is now the default
playback device.
Click the 5. Recording tab and repeat and repeat steps 3 and 4 to make the USBPre 2 the default recording
device.