
User's Manual


8
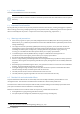
CPR4 – UA10821A
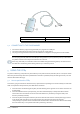
1) Collimator LEDs (white)
3) USB connector
2) Locator LEDs (blue)
4.2 CONNECTION TO THE PROGRAMMER
1. Connect the inductive programming head CPR4 to a programmer’s USB port.
2. The head is automatically turned on when the programmer is switched on.
3. The programming head is functional when the related icon is displayed in the programmer’s User Interface.
Do not unplug the CPR4 cable from the USB port during a follow-up or any telemetry action, as this would
stop data transmission and request to restart the entire session.
Same way, if the CPR4 is connected to SmartTouch tablet through the docking station, do not disconnect
the tablet from the docking station during a follow-up or a telemetry action.
5 USING THE CPR4
To perform a follow-up, CPR4 has to be placed directly on the patient’s intact (unbroken) skin or over his/her clothes
above the part of the body where the implanted device has been implanted (usually left and right clavicle). The side
with the LEDs shall be facing up.
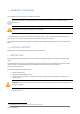
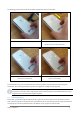
5.1 How to position the CPR4
The antenna, lying on the bottom side of the head, is positioned corresponding to the zone framed by the collimator
LEDs. To help find the best placement, the LEDs behave as follows:
when the head is not detecting the implant, the LEDs flashing on the opposite corners of the collimator will
be alternating;
when the head detects the implant partially, two of the LEDs will display a steady illumination and the
others will be off. This indicates to the user that a full detection is possible by moving the CPR4 in the
direction pointed by the LEDs;
when the implant has fully been detected, all of the collimator LEDs will emit a steady white light, and the
array of blue LEDs will enable more accurate positioning to find the optimal level of telemetry,
corresponding to a position where all the blue LEDs are illuminated. If not all the blue LEDs are illuminated,
the level of telemetry is not optimal and a better positioning is necessary.