
Owner's Manual

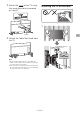


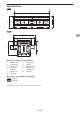
Table Of Contents
- Setup Guide
- Installation Information
- Before Getting Started
- Installing the Lateral Shift Bracket to the Wall
- Preparing for the Installation of the TV
- Installing the TV on the Wall
- Confirming the Completion of the Installation
- Installing the Wall-Mount Bracket to the Wall
- Preparing for the Installation of the TV
- Installing the TV on the Wall
- Confirming the Completion of the Installation
- Specifications
- References
- Reference Guide
- Warranty

− 14 (US) −
3 Drill pilot holes on the marks.
× 4
75mm
(3inch)
10mm
(13/32inch)
Note
Pilot holes must be drilled to a depth of 75mm
(3inch), using a 10mm (13/32inch) diameter drill
bit.
4
WA1
5 Install
WM1
on the wall.
WS2
WW1
Note
Use a level to check whether
WM1
is level.
Precaution
Do not over-tighten the lag bolts
WS2
. Improper
tightening could reduce the holding power of the
lag bolts
WS2
.
Installing the Wall-Mount
Bracket to the Wall
1 Decide on the installation
location.
Make sure that the wall has enough space
for the TV and is capable of supporting a
weight of at least six times that of the TV.
• Refer “Measurement for Wall-Mount
Bracket installation on the wall” on page
21.
• Refer to your TV’s Reference Guide for the
TV’s weight.
Note
When your TV is installed on the wall, the upper
side of the TV slightly leans forward.
We recommend you to check the position of TV in
the viewing environment.
2 Align
WM1
to the wall and make
four marks.
× 4
WM1
Note
Use a level to check whether
WM1
is level.