3-247-837-11 (1) FM/AM Cassette Car Stereo Operating Instructions GB Manual de instrucciones ES CT For installation and connections, see the supplied installation/connections manual. Para obtener información sobre la instalación y las conexiones, consulte el manual de instalación/conexiones suministrado.
Welcome ! Thank you for purchasing this Sony Cassette Player. You can enjoy its various features even more with: • Optional CD/MD units (both changers and players)*1. • CD TEXT information (displayed when a CD TEXT disc*2 is played on a connected optional CD unit with the CD TEXT function). • Supplied controller accessory Card remote commander RM-X114 • Optional controller accessory Rotary commander RM-X4S *1 This unit works with Sony products only.
Table of Contents Location of controls . . . . . . . . . . . . . . . . . . . 4 Precautions . . . . . . . . . . . . . . . . . . . . . . . . . . 6 Notes on Cassettes . . . . . . . . . . . . . . . . . . . . . 6 Getting Started Resetting the unit . . . . . . . . . . . . . . . . . . . . . . 7 Detaching the front panel . . . . . . . . . . . . . . . 7 Setting the clock . . . . . . . . . . . . . . . . . . . . . . 8 Cassette Player Listening to a tape . . . . . . . . . . . . . . . . . . . . .
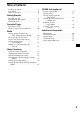
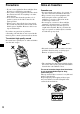
Location of controls CE UR DS P DSO MO DE OP E L L SE N SO Refer to the pages listed for details. EQ3 SEEK AT T DISC BTM/MTL SENS 1 2 REP SHUF 3 4 BL SKIP/ ALBM /ATA 5 6 LIST F OF XR-CA660X a SOURCE (Power on/Tape/Radio/CD/ MD) button Selecting the source b SEL (select) button Selecting items. c Volume +/– button d Display window e SEEK +/– button Tape: Fast-forwarding, reversing a tape Automatic Music Sensor Radio: Tuning in stations automatically/finding a station manually.
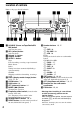
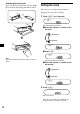
Card remote commander RM-X114 DSPL MODE PRESET + MENU SEEK– SOUN D DISC + SOURCE DISC – LIST SEEK+ ENTE R PRESET – OFF + VOL – ATT The corresponding buttons of the card remote commander control the same functions as those on this unit.
Precautions Notes on Cassettes • If your car was parked in direct sunlight, allow the unit to cool off before operating it. • If no power is being supplied to the unit, check the connections first. If everything is in order, check the fuse. • If no sound comes from the speakers of a 2speaker system, set the fader control to the centre position. • When a tape is played back for a long period, the cassette may become warm because of the built-in power amplifier. However, this is not a sign of malfunction.
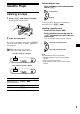
Getting Started Detaching the front panel You can detach the front panel of this unit to protect the unit from being stolen. Resetting the unit Before operating the unit for the first time, or after replacing the car battery or changing the connections, you must reset the unit. Remove the front panel and press the RESET button with a pointed object, such as a ballpoint pen.
Attaching the front panel Place hole A of the front panel onto the spindle B on the unit, then lightly push the left side in. Setting the clock The clock uses a 12-hour digital indication. Example: To set the clock to 10:08 A 1 Press (DSPL) for 2 seconds. B The hour indication flashes. 1 Press the volume +/– button to set the hour. to go forward x to go back 2 Press (SEL). Note Do not put anything on the inner surface of the front panel. The minute indication flashes.
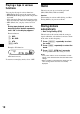
Fast-winding the tape Cassette Player During playback, press and hold either side of (SEEK). Fast-forward Listening to a tape 1 SEEK Rewind Press (OPEN) and insert a cassette. Playback starts automatically. To start playback during fast-forwarding or rewinding, press (MODE) (o). Locating a specific track — Automatic Music Sensor (AMS) 2 Close the front panel. If a cassette is already inserted, press (SOURCE) repeatedly until “FWD” or “REV” appears to start playback.
Playing a tape in various functions You can play the tape in various functions: • REP (Repeat Play) repeats the current track. • BL SKIP (Blank Skip) skips blanks longer than 8 seconds. • ATA (Automatic Tuner Activation) turns on the tuner automatically when fast-winding the tape. • MTL (Metal) lets you play a metal or CrO2 tape. During tape playback, press the desired function button repeatedly until “ON” in the display appears.
Receiving the stored stations 1 Press (SOURCE) repeatedly to select the radio. 2 Press (MODE) repeatedly to select the band. 3 Press the number button ((1) to (6)) on which the desired station is stored. If FM stereo reception is poor — Monaural Mode During radio reception, press (SENS) repeatedly until “MONO-ON” appears. “MONO” indicator is displayed.
Storing station names — Station Memo You can assign a name to each radio station and store it in memory. The name of the station currently tuned in appears in the display. You can assign a name using up to 8 characters for a station. 1 Tune in a station whose name you want to store. 2 Press (LIST) for 2 seconds. 3 Enter the characters. Erasing the station name 1 2 Press (LIST) for 2 seconds. 3 Press the volume +/– button repeatedly to select the station name you want to erase.
By rotating the control Other Functions You can also control the unit with a rotary commander (optional). SEEK/AMS control Using the rotary commander First, attach the appropriate label depending on how you want to mount the rotary commander. The rotary commander works by pressing buttons and/or rotating controls. Rotate and release to: – Locate the beginning of tracks on the tape. – Tune in stations automatically. – Skip tracks on the disc.*1 Rotate, hold, and release to: – Fast-wind the tape.
Changing the operative direction The operative direction of controls is factory-set as shown below. Adjusting the balance and fader To increase You can adjust the balance and fader. 1 To decrease Press (SEL) repeatedly until “BAL” or “FAD” appears. Each time you press (SEL), the item changes as follows: LOW* t MID* t HI* t BAL (left-right) t FAD (front-rear) If you need to mount the rotary commander on the right hand side of the steering column, you can reverse the operative direction.
Changing the sound and display settings — Menu The following items can be set: SET (Set Up) • A.SCRL (Auto Scroll)* (page 17). • M.DSPL (Motion Display) — to select the Motion Display mode from “1,” “2,” and “OFF.” – Select “1” to show decoration patterns in the display and activate Demo display. – Select “2” to show decoration patterns in the display and deactivate Demo display. – Select “OFF” to deactivate the Motion Display. • BEEP — to turn the beeps on or off.
Adjusting the equalizer curve You can store and adjust the equalizer settings for different tone ranges. 1 Press (SOURCE) to select a source (Radio, Tape, CD or MD). 2 Press (EQ3) repeatedly to select the desired equalizer curve. 3 Adjusting the equalizer curve. 1 Press (SEL) repeatedly to select the desired tone range. Each time you press (SEL), the tone range changes.
CD/MD Unit (optional) This unit can control external CD/MD units (optional). If you connect an optional CD unit with the CD TEXT function and the CUSTOM FILE function, the CD TEXT information will appear in the display when you play a CD TEXT disc. If you connect MP3 playable CD units (e.g. MP3 CD changer), you can play MP3 files; compressed audio files with quality of sound. Cautions when connecting MGS-X1 and MD unit(s) This unit recognizes MGS-X1 as an MD unit.
Notes • Some characters cannot be displayed. Characters and signs which cannot be displayed appear as “ *.” • For some CD TEXT discs or ID3 tags with very many characters, information may not scroll. • This unit cannot display the artist name for each track of a CD TEXT disc. Tip When A.SCRL (Auto Scroll) is set to “OFF” and the disc/album/track name is changed, the disc/album/ track name does not scroll. Playing tracks repeatedly — Repeat Play You can select: • REP-TRACK — to repeat a track.
Labelling a CD — Disc Memo (For a CD unit with the CUSTOM FILE function) You can label each disc with a custom name (Disc Memo). You can enter up to 8 characters for a disc. If you label a CD, you can locate the disc by name (page 20). 1 2 Start playing the disc you want to label in a CD unit with the CUSTOM FILE function. Press (LIST) for 2 seconds. The unit will repeat the disc during the labelling procedure.
Locating a disc by name — List-up (For a CD unit with the CD TEXT/ CUSTOM FILE function, or an MD unit) You can use this function for discs that have been assigned custom names*1 or for CD TEXT discs*2. *1 Locating a disc by its custom name: when you assign a name for a CD (page 19) or an MD. *2 Locating discs by the CD TEXT information: when you play a CD TEXT disc on a CD unit with the CD TEXT function. 1 Press (LIST) momentarily. The name assigned to the current disc appears in the display.
Cleaning the connectors The unit may not function properly if the connectors between the unit and the front panel are not clean. In order to prevent this, detach the front panel (page 7) and clean the connectors with a cotton swab dipped in alcohol. Do not apply too much force. Otherwise, the connectors may be damaged. Replacing the lithium battery Under normal conditions, batteries will last approximately 1 year. (The service life may be shorter, depending on the conditions of use.
2 Pull the release keys to unseat the unit. Removing the unit 1 Remove the protection collar. 1 Detach the front panel (page 7). 2 Engage the release keys together with the protection collar. 3 Slide the unit out of the mounting. Orient the release key correctly. 3 Pull out the release keys to remove the protection collar. 2 Remove the unit. 1 Insert both release keys together until they click. Face the hook inwards.
Specifications Cassette Player section General Tape track Wow and flutter Frequency response Signal-to-noise ratio Outputs 4-track 2-channel stereo 0.08 % (WRMS) 30 – 18,000 Hz Inputs Cassette type TYPE II, IV 61 dB TYPE I 58 dB Tuner section Tone controls FM Tuning range FM tuning interval: 50 kHz/200 kHz switchable 87.5 – 108.0 MHz (at 50 kHz step) 87.5 – 107.9 MHz (at 200 kHz step) Aerial terminal External aerial connector Intermediate frequency 10.
Troubleshooting The following checklist will help you remedy problems you may encounter with your unit. Before going through the checklist below, check the connection and operating procedures. General No sound. • Press the volume + button to adjust the volume. • Cancel the ATT function. • Set the fader control to the centre position for a 2-speaker system. The contents of the memory have been erased. • The RESET button has been pressed. t Store again into the memory.
*1 When an error occurs during playback of a CD or MD, the disc number of the CD or MD does not appear in the display. *2 The disc number of the disc causing the error appears in the display. Error displays/Messages Error displays (For this unit and optional CD/MD changers) The following indications will flash for about 5 seconds, and an alarm sound will be heard. BLANK*1 No tracks have been recorded on an MD.*2 t Play an MD with recorded tracks on it. ERROR*1 • A CD is dirty or inserted upside down.
¡Bienvenido! Gracias por adquirir este reproductor de casetes Sony. Disfrutará incluso más de sus distintas funciones con: • Unidades opcionales de CD/MD (cambiadores y reproductores)*1. • Información de CD TEXT (que se muestra al reproducir discos CD TEXT*2 en una unidad de CD opcional conectada con la función CD TEXT). • Accesorio de controlador suministrado Control remoto de tarjeta RM-X114 • Accesorio de controlador opcional Mando rotatorio RM-X4S *1 Esta unidad funciona solamente con productos Sony.
Índice Ubicación de los controles . . . . . . . . . . . . . . 4 Precauciones . . . . . . . . . . . . . . . . . . . . . . . . . 6 Notas sobre casetes . . . . . . . . . . . . . . . . . . . . 6 Procedimientos iniciales Restauración de la unidad . . . . . . . . . . . . . . . 7 Extracción del panel frontal. . . . . . . . . . . . . . 7 Ajuste del reloj . . . . . . . . . . . . . . . . . . . . . . . 8 Reproductor de casetes Audición de una cinta . . . . . . . . . . . . . . . . . .
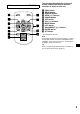
Ubicación de los controles CE UR DS P DSO MO DE OP E L L SE N SO Consulte las páginas indicadas para obtener información detallada. EQ3 SEEK AT T DISC BTM/MTL SENS 1 2 REP SHUF 3 4 BL SKIP/ ALBM /ATA 5 6 LIST F OF XR-CA660X a Botón SOURCE (Encendido/Cinta/ Radio/CD/MD) Selección de la fuente b Botón SEL (selección) Selección de elementos.
Control remoto de tarjeta RM-X114 DSPL MODE PRESET + MENU SEEK– SOUN D DISC + SOURCE DISC – LIST SEEK+ ENTE R PRESET – OFF + VOL – ATT Los botones correspondientes del control remoto de tarjeta controlan las mismas funciones que las de esta unidad.
Precauciones Notas sobre casetes • Si estaciona el automóvil bajo la luz directa del sol, deje que la unidad se enfríe antes de utilizarla. • Si la unidad no recibe alimentación, compruebe primero las conexiones. Si todo está en orden, compruebe el fusible. • Si los altavoces no emiten ningún sonido en un sistema de 2 altavoces, ajuste el control de equilibrio en la posición central.
Procedimientos iniciales Extracción del panel frontal Puede extraer el panel frontal de esta unidad para evitar que la roben. Restauración de la unidad Antes de utilizar la unidad por primera vez, o después de sustituir la batería del automóvil o de cambiar las conexiones, debe restaurarla. Extraiga el panel frontal y presione el botón RESET con un objeto puntiagudo, como un bolígrafo.
Instalación del panel frontal Coloque el orificio A del panel frontal en el eje B de la unidad, luego presione ligeramente el lado izquierdo hacia adentro. Ajuste del reloj El reloj emplea una indicación digital de 12 horas. Ejemplo: Para ajustar el reloj a las 10:08 A 1 Presione (DSPL) durante 2 segundos. B La indicación de hora parpadea. 1 Oprima el botón volumen +/– para ajustar la hora. para avanzar x para retroceder 2 Presione (SEL).
Avance o retroceso rápido de una cinta Reproductor de casetes Durante la reproducción, mantenga presionado cualquier lado de (SEEK). Avance rápido Audición de una cinta 1 SEEK Retroceso Presione (OPEN) e inserte un casete. La reproducción se inicia automáticamente. Para iniciar la reproducción durante el avance o retroceso rápido, presione (MODE) (o). Localización de una pista específica — Sensor de música automático (AMS) 2 Cierre el panel frontal.
Reproducción de una cinta con diversas funciones Es posible reproducir una cinta mediante diversas funciones: • REP (Reproducción repetida) repite la pista actual. • BL SKIP (Saltar espacios en blanco) omite los espacios en blanco de duración superior a 8 segundos. • ATA (Activación automática del sintonizador) activa el sintonizador automáticamente durante el avance o retroceso rápido de la cinta. • MTL (Metal) le permite reproducir una cinta de metal o CrO2.
Recepción de las emisoras almacenadas 1 Presione (SOURCE) varias veces para seleccionar la radio. 2 Presione (MODE) varias veces para seleccionar la banda. 3 Presione el botón numérico ((1) a (6)) en el que esté almacenada la emisora deseada. Si la sintonización programada no funciona — Sintonización automática/Modo de búsqueda local Sintonización automática: Presione cualquier lado de (SEEK) para buscar la emisora (sintonización automática).
Almacenamiento de nombres de emisoras — Memorando de emisoras Es posible asignar un nombre a cada emisora de radio y almacenarlo en la memoria. El nombre de la emisora actualmente sintonizada aparece en la pantalla. Es posible asignar un nombre con un máximo de 8 caracteres por emisora. 1 Sintonice la emisora cuyo nombre desee almacenar. 2 Presione (LIST) durante 2 segundos. Borrado del nombre de emisoras 1 2 Presione (LIST) durante 2 segundos. Presione (DSPL) durante 2 segundos.
Giro del control Otras funciones También puede controlar la unidad con un mando rotatorio (opcional). Control SEEK/AMS Uso del mando rotatorio En primer lugar, adhiera la etiqueta apropiada según cómo desee montar el mando rotatorio. El mando rotatorio funciona al presionar los botones o girar los controles. Gírelo y suéltelo para: – Localizar el comienzo de las pistas en la cinta. – Sintonizar emisoras automáticamente. – Omitir las pistas del disco.
Cambio del sentido de funcionamiento El sentido de funcionamiento de los controles está ajustado de fábrica como se muestra a continuación. Para aumentar Ajuste del balance y el equilibrio Es posible ajustar el balance y el equilibrio. 1 Para disminuir Si necesita montar el mando rotatorio en el lado derecho de la columna del volante de manejo, puede invertir el sentido de funcionamiento. Presione (SEL) varias veces hasta que aparezca “BAL” o “FAD”.
Cambio de los ajustes de sonido y la pantalla — Menú Es posible ajustar los siguientes elementos: SET (Configuración) • A.SCRL (Desplazamiento automático)* (página 18). • M.DSPL (Indicador de movimiento) — para seleccionar el modo de este indicador entre “1”, “2” y “OFF”. – Seleccione “1” para mostrar líneas decorativas en la pantalla y activar la indicación de demostración. – Seleccione “2” para mostrar líneas decorativas en la pantalla y desactivar la indicación de demostración.
Ajuste de la curva de ecualizador Puede almacenar y definir los ajustes del ecualizador para distintos rangos tonales. 1 Presione (SOURCE) para seleccionar una fuente (Radio, Cinta, CD o MD). 2 Presione (EQ3) varias veces para seleccionar la curva de ecualizador que desee. 3 Ajuste de la curva de ecualizador. 1 Presione (SEL) varias veces para seleccionar el rango de tonos deseado. Cada vez que presione (SEL), el rango de tonos cambiará.
Unidad de CD/MD (opcional) Esta unidad permite controlar unidades de CD/ MD externas (opcional). Si conecta una unidad opcional de CD con las funciones CD TEXT y CUSTOM FILE, la información de CD TEXT aparece en la pantalla al reproducir discos CD TEXT. Si conecta unidades de CD con capacidad para reproducir MP3 (como el reproductor de CD MP3), podrá reproducir archivos MP3, archivos de audio comprimidos con calidad de sonido.
Elementos de la pantalla Cuando el disco, álbum o pista cambian, los títulos pregrabados*1 del nuevo disco, álbum o pista se muestran automáticamente (si la función de desplazamiento automático está ajustada en “ON”, se desplazan los nombres que contienen más de 8 caracteres (página 15)). Fuente Reproducción repetida de pistas — Reproducción repetida Es posible seleccionar: • REP-TRACK — para repetir una pista. • REP-ALBM* — para repetir un álbum. • REP-DISC — para repetir un disco.
Etiquetado de CD Vista en pantalla del memorando de discos — Memorando de discos (Para una unidad de CD con función CUSTOM FILE) Como elemento de pantalla, el memorando de discos siempre tiene prioridad sobre cualquier información de CD TEXT original. Puede etiquetar los discos con un nombre personalizado (Memorando de discos). Puede ingresar hasta 8 caracteres por disco. Si asigna nombre a un CD, podrá localizar el disco con dicho nombre (página 20).
Localización de discos por nombre — Listado (Para una unidad de CD con la función CD TEXT/CUSTOM FILE o una unidad de MD) Puede usar esta función con discos a los que se asignaron nombres personalizados*1 o con discos CD TEXT*2. *1 Localización de discos por su nombre personalizado: cuando asigna un nombre a un CD (página 19) o MD. *2 Localización de discos por la información de CD TEXT: cuando reproduce un disco CD TEXT en una unidad de CD con la función CD TEXT. 1 Presione (LIST) durante un instante.
Limpieza de los conectores La unidad puede no funcionar correctamente si los conectores entre dicha unidad y el panel frontal están sucios. Para evitarlo, extraiga el panel frontal (página 7) y limpie los conectores con un hisopo de algodón humedecido en alcohol. No aplique demasiada fuerza ya que podría dañar los conectores. Sustitución de la pila de litio En condiciones normales, las pilas duran aproximadamente 1 año. (La duración puede ser menor en función de las condiciones de uso.
Extracción de la unidad 1 2 Tire de las llaves de liberación para extraer la unidad. Extraiga el marco de protección. 1 Extraiga el panel frontal (página 7). 2 Fije las llaves de liberación al marco de protección. 3 Deslice la unidad para extraerla de la montura. Oriente la llave de liberación en la dirección correcta. 3 Tire de las llaves de liberación para extraer el marco de protección. 2 Extraiga la unidad. 1 Inserte las dos llaves de liberación a la vez hasta que oiga un “clic”.
Especificaciones Sección del reproductor de casetes Generales Pista de cinta Salidas Fluctuación y trémolo Respuesta de frecuencia Relación señal-ruido estéreo de 4 pistas y 2 canales 0,08% (WRMS) de 30 – 18 000 Hz Entradas Tipo de casete TIPO II, IV 61 dB TIPO I 58 dB Sección del sintonizador FM Rango de sintonización Intervalo de sintonización de FM: 50 kHz/200 kHz intercambiable 87,5 – 108,0 MHz (a intervalos de 50 kHz) 87,5 – 107,9 MHz (a intervalos de 200 kHz) Terminal de la antena aérea C
Solución de problemas La unidad recibe alimentación de forma continua. El automóvil no tiene una posición ACC. La siguiente lista de revisión le ayudará a solucionar los problemas que puedan producirse con la unidad. Antes de consultarla, compruebe los procedimientos de conexión y de funcionamiento. Generales No se escucha el sonido. • Presione el botón volumen + para ajustar el volumen. • Cancele la función ATT. • Ajuste el control de equilibrio en la posición central para un sistema de 2 altavoces.
Un programa emitido en estéreo se oye en monofónico. La unidad se encuentra en el modo de recepción monofónica. t Cancele el modo de recepción monofónica (página 11). Reproducción de CD/MD Se producen saltos de sonido. Disco sucio o defectuoso. Indicaciones de error/ Mensajes Indicaciones de error (Para esta unidad y cambiadores opcionales de CD/MD) Las siguientes indicaciones parpadean durante unos 5 segundos y se escucha una alarma. BLANK*1 No hay pistas grabadas en el MD.
OFFSET Es posible que se haya producido una falla interna. t Verifique la conexión. Si el indicador de error permanece en la pantalla, póngase en contacto con el distribuidor Sony más cercano. RESET La unidad de CD/MD no puede utilizarse debido a algún problema. t Presione el botón RESET de la unidad. *1 Cuando se produzca un error durante la reproducción de un CD o MD, el número de disco del CD o MD no aparece en la pantalla. *2 La pantalla muestra el número del disco que causa el error.
!"# $ • % &'()' *+ ,-. / 01 2341 • &' 5675 89 ,: &' 5675 ;. 42 1<= > ?@ &' 5675 # % &' *+A B C89DE3 • F GHI J)K7LLM • NO HPI J)K7M !"# $ %&'()*+,$%-.
HPIQ+ RRRRRRRRRRRRRRRRRRRRRRRRRM STUV" RRRRRRRRRRRRRRRRRRRRRRW XUV" RRRRRRRRRRRRRRRRRRW YZ RRRRRRRRRRRRRRRRRRRRRRRRRRRR[ \]S^_ RRRRRRRRRRRRRRRRRRRRRRRRRR[ `aBb RRRRRRRRRRRRRRRRRRRRRRRRRRRRc de RRRRRRRRRRRRRRRRRRRRRRRRRRRRf gh# RRRRRRRRRRRRRRRRRLi jklmno p qrstuv# ,w5)3 RRRRRRLi dexlm no RRRRRRRRRRRRRRRRRRRLL ylm
CE UR DS P DSO MO DE OP E L L SE N SO ´µ¶· ¸¹ºª» EQ3 SEEK AT T DISC BTM/MTL SENS 1 2 REP SHUF 3 4 BL SKIP/ ALBM /ATA 5 6 LIST OF F XR-CA660X a b c d e f g h i j k l m 4 %¼½ %¼" ! ¾ ¿ À jk ÁI d ¾ jkso ( Âk©o &'()'¾ á ( ¿ ÄÅÆÇ¡ " #$%& '()*()+(), " - +(, ).
DE$FGHMNO MPJQ GRS TQUVW DSPL MODE PRESET + MENU SEEK– SOUN D DISC + SOURCE DISC – LIST SEEK+ ENTE R PRESET – OFF + VOL – ATT a b c d e f g h i j k l " - ! - >> X < 0 < " 0 Y Z -0 /00 89:; <<#=>?@ (OFF) ABCD EFG@897 / (SOURCE) @HIJK LMNOP89 QRS T MUVWXYZ[ <<\]#^_`ab cde f _`gab h i j kl m n 5
• !" #$%&'()* • %&+, -.
áá1 Æ S - n =>Ä YZ áá] S^_ !" #$ %Z& '( Û J6 65 ÛÜ ! áá)* + ,\ S^_ ááâ -\²S^_.
áá×S^_ A BCD Ý GÄHHIJK EF B "#$% ááBbL L} MBPÙÚDE ááN%¾ ×Bb`a) Li¾ic A 1 (DSPL) ! "# B MBOEPQ 1 $% &'( )*+, x 2 <<:·6y²¹¼^½¾ (SEL) RbOEPQ 3 $% &'( )*-# 2 (DSPL) BbÓSTB Bb`aUVWÄ DE.
!"#$ 678, (SEEK) 9:; SEEK &' 1 (OPEN) jkÓS ./0123 z1 ¿À AÓS ,Û (MODE) ÛÜ _o` %&'( )* + ,$ )-.
()*+,- áá , gh# ¾ • ÇÈÉ ÊËSÌÍ!ÎÏ • ÐÑ7 ÒÓÔÉ7 ÊÕ_Ö×Ì[XWÕ_Ø_7 Ù7 Ú Ö×Û • ÜÝÜ ÊÞßBà¯á¯Ì[XW UVâãQ ௠áÞßB • äÝÑ ÊåæÌ[XW çRSåæUVq7èéê UV 678H IJ @A KL OPQR S6TUV5 áá:1i jAzstnoB q rstuv# k6lV¯ .
I J KL M NOPQ + R SH &'401 23 1 2 3 IJ (SOURCE) IJ (MODE) XucdH IJ (SENS) O_PQP(PQR S6TUV5 WX$Y WZ[ ab@Acd ef (6)` !&'('$% \(1) N =>?@ 56AB + ,$56 C DEFGH 9|}~f 9 ,Ð 5ÕDEx3 9:;<=>? 9:;ghicd (SEEK) \j klKL` : >dfÆÇnoB st.
YZTU[\ 012389 + TU789: áá ,ØÇ=>nnoOaÆÇ{| ×ûluv$A :Ssno {|. ª1DEÝ ,)ØÇnoOaÆÇ q!, c ÇÚ {| 1 2 3 k/wAay }~ cd (LIST) W@A 0 y ; y V ]]] y W y y X ]]] y y y ]]] y 41 y 0 øÇ û 2 @A f ÆÇÚPQ (SEL) ! "# (LIST) (DSPL) ªlm {| ! "# 3 IJ $% &'( cd}~ 4 ! "# (SEL) C{|.
_`c$ d áá , NO HP *+ HPI ^_ 345& ,-. @A ááb ` NO HPIÌ*c Ý ¨ ááNO HPI~ÛÛÜ/(OkHP I¿rÈÉ !" © Ý ¡ jksno Ã. 4 1 Ý #$ ¡ # k Âk©no ¿ ( ÀOÆb SEL MODE DSPL Ó"Q+ !" ¡ 4 1 <<·6 N ç ¹ ;@ (MODE) @H DSPL MODE SEL efgc$ d _`aab (ATT) (SEL) (MODE) 6 478 # ,-. OFF (SOURCE) (DSPL) (OFF) )* +'" ,-.
hijklm ááHPI% ¢BCDEFGHI áá , s 9: 1 ;< ááâ¤z×NO HPIÌ*1 cí ¥F ¦K , ×HPI ÈÉcí + / IJ (SEL) MN S O]trR OtR ØÛÆ (SEL) ÛÜ "§% ¾ [ t < t =< t 7/ t >/ ¶ '# OP øj l( mû 2 $% &'( << )!*+-³ k H 6 # Ëy,-ö.
NOFPEQR"# "#SD + nR áá ,`a "¾ 1o< /@(2 • dR &J{ ,jkªk34_ L[ » ` )R' Þ{ ,«kDE3p ¬ ÐLÕÐ}Õ/ Ð33ÕA%¼«kDEZ %ÐLÕ áá , )Øǽlm;µ 0`+ npvw*x 1 2 (SOURCE) 23¢s _` W$¡ \X$Y¢ IJ (EQ3) MNw@A £¤E ¥ ØÛÆ (EQ3) ÛÜ DE"½¤W npqr stu , (SEL) @A )ef (SEL) (3)` /] (SEL) (4)` ] " (SEL) (6)` 7 " zwx0
5yvw*x áá , lm/s0I`a s¿À 1 (SOURCE) 3¢s _` 2 IJ ¥ 3 k¦£¤E¥ (EQ3) ;µ W$¡\X$Y¢2 Ww@A £¤E 1 IJ WxA $k§ (SEL) ¨ ØÛÆ (SEL) ÛÜ s¿À½¤W PQR t < t ST Ut V P t W MX "#/YZ[\]^ T_`aX ááâ Ç9I*1 È vËQ <9 ׬ ^ɪ Ê, ;ËÌ áá' ,kI3# Í ª ÎÏÐ 9 ÑÒ1Ó_Ý@!ÇÇ9I ,ÔÕÇ9I3 áá , )Øǽlm ' `a MYQ CDZ[\]^_ `a *3 *2 *1 2 IJ $% &'( k xA $% c© n LÁw Âà ¬ KLiÁw 2 ÄLiÁw ¿rs 3 1 2 k£¤E¥ %zYZ2ª£`a 0¡> ¸Û (SEL) ÛÜÅÆ } 7b 7bÄ DEXYÖ Z <<¶ '# s@ f ýýhq :Äö÷ABs
áá HPÖ> &'()' * + ,% 3 ááâ=>Æo% &' 5675 # / ×ßà# &' *+ : &' 5675 ; .B C &' 5675 89ת1DEÝ ááâ=>, )Þ &' *+,% )Þ &' -. 3 Ø, vrÙ )Þ ß àÚÛÑßà ,-bc_bdbe_ 1 IJ (SOURCE) O_¬_ª R 2 IJ MNTU@A ® (MODE) * &'()' .
• 3áqSTAB STAB/áq*ÕÖAB@ f h • r] 3NÝsáq/ I h # fi 01 ;ÄSTtAB • 89:ÄAB 7uå+,/'p$ <<¶ v ow øtûst@ f ýýh x § +,\ § +,$% yzq R § +,\ § +, $%:tAB fg,-hi + z{|}9: , %¼¾ • ÇÈÉëÝÇÜèÓ7ì7íîRS ïÎÏ • ÇÈÉëÜÑÐä ì7íîRS ÁÎÏð • ÇÈÉëñÔÒè7ì7íîRS ò ó ]¶ Ú /! Â"# $%X&ÃÄ/ q 678H IJ (3) ¬¯|° @A )« S6TUV5 ¢£ ÓS áázXYÖ Z 33Õ MN B <%¼ ÐJ6ÞK jk lm,-hi + ~n|} , %¼¾ • ÒôõöëÜÑÐä 17 ì7 ÷&øùRSÍ!úû ¦,7äÉü7ýJK[X 7èñ7LE ÎÏ ð • ÒôõöëñÔÒè ì7÷&øùRSÍ! ó Î Ï • Ò
78 n bc_ + 789: / 9: V 2 áá jã{|¨TØä;. ,;.u v# 3 Øä;.åq! c ÇÚ â¨T &' <,~{|©ª;., }i » 3 1 ³´783µ¶·¸KL s ®*HA¹ º »¼ 2 (LIST) ! "# /f 1 $% &' 8 éê W@A 0 y ; y V RRR y W y y X RRR y y y RRR y 41 y 0 Z78 3 4 ÆÇÚPQ (SEL) 3 1 2 g/} ~ 4 A (LIST) ocd781 F ! "# IJ (SOURCE) IJ (MODE) À s ®* W OsR Wab»¼½¾¿ (LIST) ! "# (DSPL) ! "# ªlm {| 5 IJ $% &'( »¼}~ 6 ! "# (SEL) C{|.
:;89opqr !"# + ]^9: / V ?ã$%î Å ¶r i j l m n I Â $q >? 01î Å ¶6! ÃÄ/ 7 ¹ q 1 ÁÂ (LIST) ):S ;.
{|#}_ ááâ ïS^_Wú =>I;ûü < , ; Ö ýÉ )* hþ}6 l ¸] S^_ , [ »3 GÄ @ Ë =>I ö÷ Î : ÷< , øù=>I T ááÆ þ} n Å: Æ B ú , ë, w n |} 3:n n ¡B F G HI ÈÉ × uB ¸ -ÆÇ Ý &J}i} n § ún , l11 ì WX x \] Y Z[ • @!¢ £ 6¤¥ ÚY- \ 9¦ æ}~\7[8 • §¨:· ù©I¼^ª«¬!Ú® ÚY T s • S F f 7 0 ¶ • ;x4f • Q "; |9 • åæ º t !"? #LFÍt ! $% 8e& ' '(q)¨*E 21
2 Ò ³ÌÍÎ Ú®*ÛÜÝÞ 1 ÄÅÆÇÈ 1 ÄÅ \É Ê Ë` 2 ³ÌÍÎÏÆÇÈÐÑ 3 ßYàá®Þ* ^_`abcde 3 Ò ³ÌÍÎgÄGÆÇÈ 2 Ó ®* 1 ÔÕ³ÌÍÎ:Ö.
uv |} "#$ O YZ ! Ym ijk lm o³v´ ±±O±X N HI o³v´ ± / HI %ij 56 WH %&'( ;<=> C -DEFG KLG "#$ 0 ! M&QRS TUG H %&'( ;<=> C EFG 9} YZ [ B_` bcd YZ ) %&*+ , -. / 0 !1 0 ! 2 *34 5 / ! 6 / 0 ! 789 5 / 5 : ! 6 0 ! 789 ?@;
|} wxyz ^&´ áá ô@ B, f åæ áá1 ^ ôWS ¸ô=>/ ÈÉç÷Öî O • Û Ä ÛÜs • wx d55 # • × Ç9I HP`a1Aõ Q+ • Ð88Õ9# wx , L »3 • =>% #Ò :I é- 2+ #Ò :I p O • %øÛ (OFF) ; I ´µ¶ · ¸¹º ÐË =>IÕ, }L »3 q ¡¢ Q£¤ ¥ QWW ' ¦ §¨©^ ! ~ª • ôn½ => âÆöÖ <¸ô «ìí • ;?@ d&& Q+ t Û (SOURCE) ÛÜ ,*Æä; .
6 I  ¹89µ¶q I  / Ö :AB6ABä7 ·µ¶/ Öj896ABä7 p{QR | }~ ¡¢£ aa bcO d ^Q &e E× 7b W× f 9 áá%ø < =@=> þ} ¸ ¤¥ VP £Ì 1 PÒYÍÍÌÓpÔ ÍÎÎQÎ 1 )' Ý @ ¡ 2 t @ ¡ )' • &' 9 &' Ý * 2 t × &' û Öî * &' • < ! )' ; 2 t *"Æä )' • < ! &'()' ; t *"Æä &'()' 1jkstB yzZ , LL »3 ¥ xfB;. S )Óe@A Ó"CD =>©$E W TPÏÎÍ Ç9I ( :I=>;Öî t ¹# $ %* &Â'ô=>þ } ST ½ÍHI ()*+, - t .
Sony Corporation Printed in Thailand